Support for

This is a guide to using w3p Flyerlink® FileCheck 2.0 to check PDF, Tif and Jpg files. The guide covers how to use FileCheck, what it can fix and report on, and which products that are supported.
Introducing Flyerlink® FileCheck 2.0
|
|||||||||||
How To Use FileCheck 2.0
|
|||||||||||
FileCheck Support
|
|||||||||||
Common Fixes
|
|||||||||||
This is a guide to using w3p Flyerlink® FileCheck 2.0 to check PDF, Tif and Jpg files. The guide covers how to use FileCheck, what it can fix and report on, and which products that are supported.
We have built into Flyerlink® a suite of software that when combined, allow us to validate and report on PDF, Tif and Jpg files reducing manual intervention. This current installation supersedes the old online preflighter and also Enfocus Instant PDF which is now obsolete and thus no longer supported.
Flyerlink® FileCheck is available for use with most products available to order from within Flyerlink®. It can be used for in-house designed PDFs, or for validating client supplied PDFs.
The software can check, correct and report on PDF files from all the major software applications:
The software has been set up to check and repair many artwork elements that may cause your PDF to print unexpectedly. However, there may be artwork contained within PDF files that cannot be corrected. Like with checking PDFs and native files manually, there are from time to eventualities that cannot be foreseen.
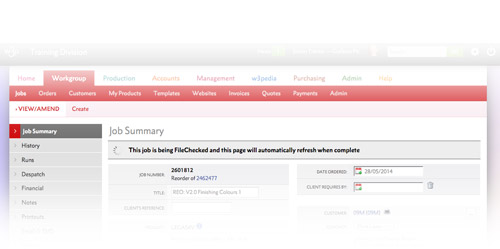
Create a job as normal in Flyerlink®, then set the job to a required status.
There are two ways to upload files to be FileChecked:
 Rename your PDF with the job number from Flyerlink® then Upload your supplied PDF via your normal FTP log in.
If you are uploading 2 single page PDFs to the Files & Images ready to use the FileCheck All button, then please note that the first page that you upload will be treated as page 1 and the second file that you upload will be treated as page 2.
We would recommend that you use the Waiting Flag system on jobs that are to be sent through the Flyerlink® FileCheck. Due to you uploading a PDF to Flyerlink®, if the PDF is the correct dimensions,
the 081 status will be available. To prevent jobs being sent to print by mistake that haven’t been FileChecked, add a Waiting Flag, then remove this Flag when you are performing your Final Review and Final V&V, which will always take place after you have received back the checked PDF.
You can upload your PDF as normal, either as individual pages or as a single PDF containing all pages. We would highly recommend that to take advantage of the full time saving to be
gained, that you upload one PDF containing all pages. Remember that you may need to change pages in when creating your job.
We have configured some Distiller Settings for use when Saving or Exporting a PDF. These can be found under w3pedia article 4803. These settings will prepare the PDF ready for processing via FileCheck. To load these open Adobe Distiller, then go to Settings > Add Adobe PDF Settings.
If you are using InDesign to generate your PDF, ensure that you use the Print option, not the Interactive option. An Interactive PDF will contain RGB elements that we will convert to CMYK. This conversion may cause an unrequired colour shift.
Jpg and Tif files are supported. We recommend that these are flat composite files and that they are the same aspect ratio as the item being ordered.
The following bitmaps aren't supported:
 If you have uploaded your PDF via your normal FTP log in then you will get a notification via Newsfeed once Flyerlink has received and accepted your PDF. If you have uploaded your PDF via the Files & Images in Step 1 then you won't receive this Newsfeed. If you have multiple jobs then it is worth uploading the PDFs at the same time.
 Once you have received your Newsfeed and notification email you can change the status. A status is available in Flyerlink® called
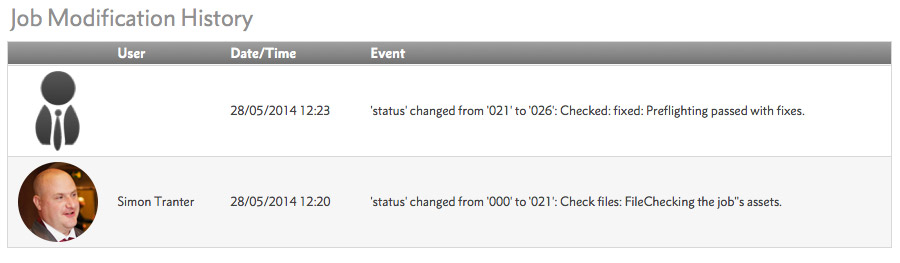
Status 021 – Check Files, select this and press the Save changes button. If you have uploaded your PDF via the Files & Images in Step 1 and pressed FileCheck All then you don't need to change this status as the FileCheck All option does this for you.
Once you have saved the status, the job will become locked so that you can’t make any changes to the Flyerlink® record whilst the PDF is being FileChecked.
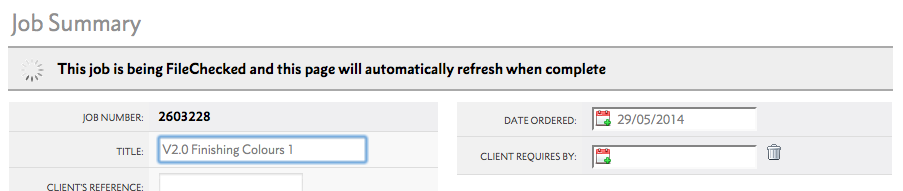
The screen will refresh once the file has been FileChecked and the results have been delivered back into for you to view.
This depends on the size of the file, but most simple jobs will be FileChecked within a couple of minutes.
The maximum size PDF that we can FileCheck is 250MB. If you have a large document such as a Booklet that exceeds this, then you will need to change your Files for Production to be set to accept multiple pages, then split your PDF, rename, and upload as required.
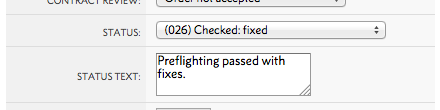 When Flyerlink® has finished checking your PDF file, it will automatically change the status
 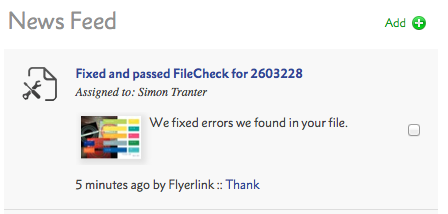 to be either 024, 026, 028 or 029, depending on what it has found. Flyerlink® will also send you a Newsfeed to alert you that the FileCheck has completed.
| Status | Description |
|---|---|
| 024 Checked: Failed | Your PDF has been checked and elements have been found that have caused it to fail. |
| 026 Checked: Fixed | Your PDF has been checked and elements have been corrected. There may also be Warnings present. |
| 028 Checked: Warnings | Your PDF has been checked and elements have been found that you need to be aware of. |
| 024 Checked: Passed |
Your PDF has been checked and it has passed with no errors or warnings. |
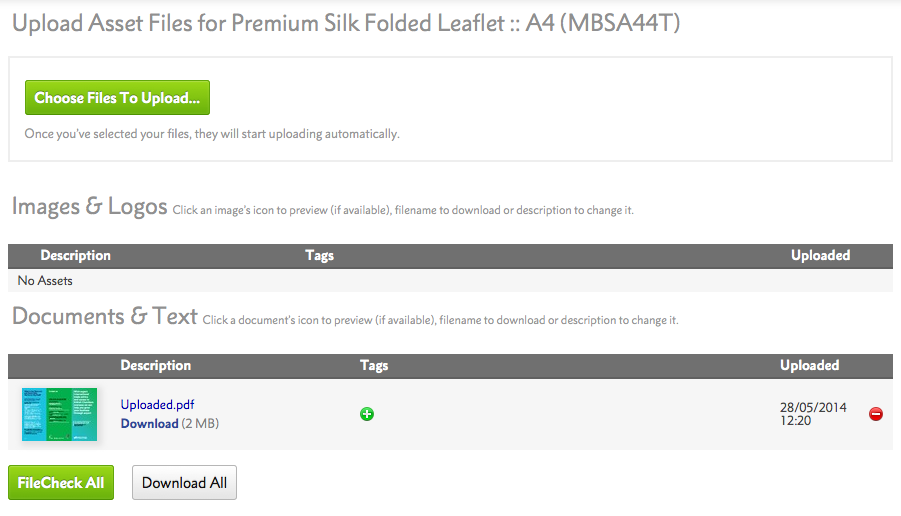
When your PDF has been processed, a new PDF and also a report will appear in the Files for Production in Flyerlink®. The report and PDF are located at
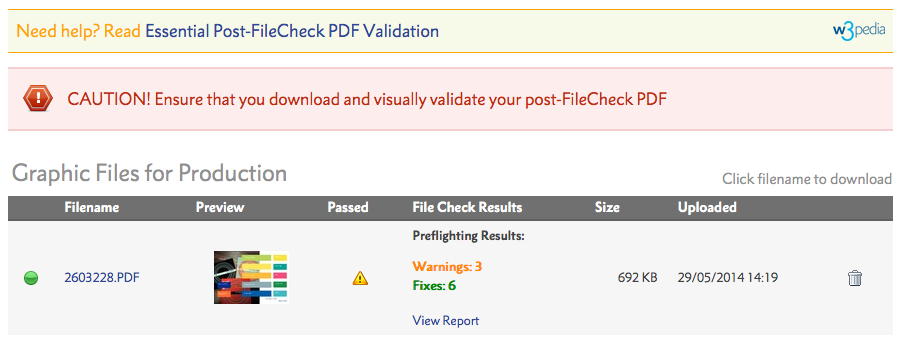
Once in the Graphic Files section, you can click on the View Report to see what has been identified as Failures, Warnings or Fixes within your PDF.
| Report Heading | Description |
|---|---|
| We found these errors but we couldn't fix them: | If you have errors in this section then your supplied PDF has failed FileCheck. |
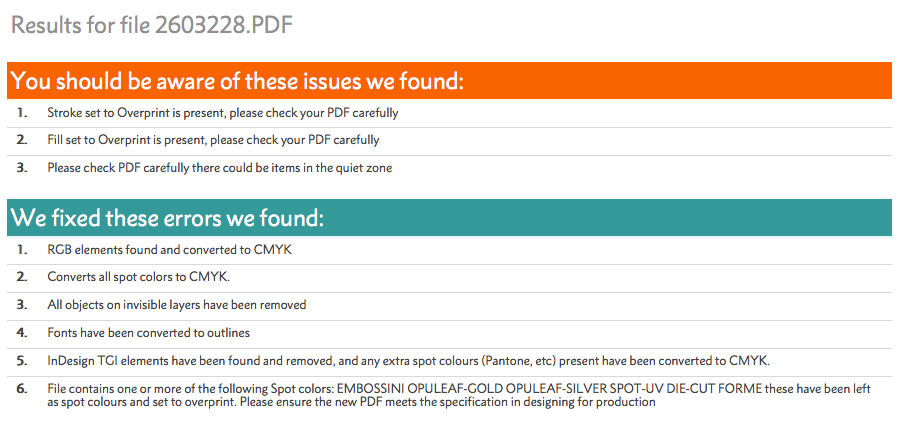
| You should be aware of these issues we found: | If you have anything listed in this section then your PDF contains elements that you need to be aware of and maybe contact the client about. |
| We fixed these errors we found: |
This means that your PDF contained errors that we have fixed. |
If there are still outstanding issues with the file then you can download the corrected PDF from within the Files for Production, then go back and resolve them, upload a new PDF and FileCheck the new file again. If there are warnings, you can decide how you want to proceed depending upon the severity of the issue. If the PDFs passes with flying colours you can perform your final checks and put it to 081.
Failed Files
If a PDF fails FileCheck 2.0, then we deliver the failed PDF to your FTP portal and a message is displayed in the Files for Production.
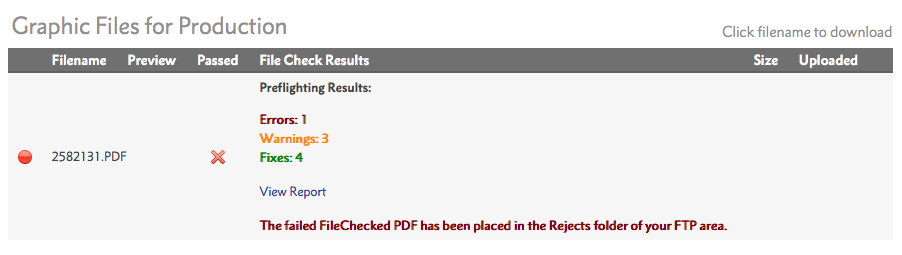 To locate the failed PDF simply log into your FTP software, and browse to the Rejects folder. We also have a link in the Files for Production to the failed file for you to download, just click the Download Failed File button to retreive the failed PDF.

The failed PDF will have been through FileCheck and had corrections made to it, you'll need to rectify the issue causing the failure and resubmit the PDF. Alternately you may elect to use the failed PDF and risk the error.
The failed file may not have completed the whole FileCheck process, and thus the file delivered back may not be completely checked.
We keep failed files for 14 days.
Before setting the status to 081 you will need to download the PDF to perform your Final Validation and Verification as you would with any other jobs. The PDF is available to be downloaded from the Graphic Files:

To help with the Validation of the PDF, we advise that you use the Output Preview to check separations, ink levels and any overprint that may be present along with visually checking that nothing has disappeared or moved on your design.

ALWAYS download the PDF that is sent back from the FileCheck. Viewing the PDF before setting to 081 is still part of the Validation process. Failing to check the post Preflight PDF
could result in the file not printing as expected. If your PDF contains spot colours for extra finishing (Die Cuts, Spot UV, Embossing or Foiling) then use the Output Preview to ensure that the separations and overprint is present as expected.
 Once you are happy that the new PDF that FileCheck has produced is correct, you can either send the new PDF for approval via Status 037 FileCheck results, Status 038 BulletProof or email. Alternately, if the PDF is already approved then set the job to Status 081to start the production process.
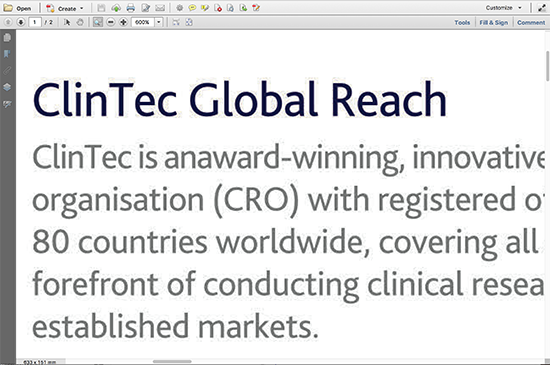
Compression noise can appear when uploaded files contain very compressed Jpegs, with the noise marks being more noticable around text on light backgrounds. The compression noise can be exagerated if your uploaded file is set in RGB or triggers ink reduction. The No Compression Distiller options in our Distiller settings will help with this, but not eradicate it.
Compression noise example:
These products can be checked using the Flyerlink® FileCheck. As part of your Final Validation of the files you will need to place the checked PDF into an InDesign template to ensure that any quiet zones have been observed and that the artwork allows for page creep.
 These products can also be checked using the Flyerlink® FileCheck. As part of your Final Validation of the files you will need to place the checked PDF into an InDesign template to ensure that any quiet zones and panel widths have been observed and that the artwork is set in the correct orientation. If your design hasn’t been constructed in an InDesign TGI template, then we would suggest placing the PDF into the Template then Exporting out a new PDF to upload so that the important red border on the front page is present.
These products (Die Cuts, Spot UV, Embossing, Foiling etc) are supported by Flyerlink® FileCheck. These products are generally
more complicated than the standard core range, and thus the post-FileCheck PDF should be downloaded and checked carefully to ensure that the special finishing spot colours have been left as specified.
FileCheck supports most products that contain extra finishing spot colours. We have configured FileCheck to leave those spot colours as spot, and we also force overprint on strokes and fills using those colours. The spot colours are:
The graphic files for products containing these colours must still be set up following the advice outlined in w3pedia article Supplying Files to HubM (Designing for Production).
FileCheck does not for example:
Always use the Acrobat Output Preview to check that your extra spot separations are present and set to overprint as expected.
If you have any unexpected results from the Flyerlink® FileCheck when checking your final PDF, please use Get File Help to ask for assistance (during business hours, Mon - Fri).
A member of the team will get in touch but if the job is time-critical, you can choose to process the PDF manually.
There are a small number of errors that may occur when using the software, resulting in your job becoming locked out in Flyerlink®.
If your job becomes locked for more than 30 minutes, please email the job number to support@nettl.com and we will unlock the job for you.
You can also use Get File Help to request assistance.
If you are using the system outside of business hours or your job is urgent, you will need to manually set up a new job and validate the PDF manually.
You can still send us an email if you set up a new job so that we can investigate and unlock and cancel the old job.
If the file couldn’t be processed then it is likely to be that the PDF is corrupt or the fonts embedded in the PDF are corrupt.
To check if the PDF is corrupt, try opening the PDF in Photoshop. If that fails to open then there is an issue with the PDF.
You can also place the supplied PDF into an InDesign template, then create a new PDF that you can then upload to Flyerlink® to be checked.
If the PDF contains security that has been added in Acrobat then the software may not able to check it.
Most security can be removed by opening the file in Apple Preview, then going to . Once resaved, upload the new PDF to Flyerlink®.
The resizing of files is by far the most complex area of the FileChecker. We’ve had some feedback that the cropping or scaling doesn't always produce the required results but this is only on certain PDFs e.g. when the internal measurements are undersized but the actual page is oversized.
We have since implemented a solution to FileCheck 2.0 that works on over 99% of files sent through.
If you do receive a PDF from the FileCheck that isn't behaving as expected, please email it to problempdfs@grafenia.com and we will take a look at it within the hour for you.
The following products are unavailable to be processed by FileCheck V2.0:
If your file fails FileCheck you can correct it manually:
If your job becomes locked during FileChecking, for more than 30 minutes please email the job number to problempdfs@grafenia.com and we will unlock the job for you.
| FileCheck Correction | Action |
|---|---|
| Page Size | Correction – If the page size is oversize then the PDF will be cropped, if the page is undersize then the PDF will be scaled up. |
| Remove printers items |
Removes items outside of the page dimensions such as printers crop marks and colour bars. |
| Fonts | Where permissions allow, all fonts will be converted to outlines. The only exception to this is if the fonts embedded are corrupt or not supplied within the PDF. |
| Colour of bitmap images | Any non-CMYK images (LAB, RGB etc) will be converted to CMYK using a generic profile. Greyscale images are left untouched. |
| Colour of vector elements | Any non-CMYK vector artwork (Pantone®, LAB, RGB etc) will be converted to CMYK. |
| Ink Levels | Where possible, reduces any ink over our recommended total CMYK percentages to a more suitable level. |
| TGI Layers and elements | Removes the Quiet Zone, Trim Lines and Folding Guides from any PDFs supplied with them visible (providing that the Spot Colours and names haven’t been changed from the TGI template). |
| Layers | Removes hidden layers in the PDF. |
| Registration Colour | Any elements set in Registration or All will be converted to Black only |
| Finishing Colours | Where an extra finishing spot colour is required, we will automatically set the spot colours to overprint. |
| Hairline stroke widths | Any stroke widths that are less than 0.24pt are corrected to 0.25pt. |
| Large Format Images | Resamples any images over 200dpi to be 150dpi. |
| FileCheck Warning | Action |
|---|---|
| Image Resolution | Warns if images are present that are less than 150dpi. |
| Image Resolution | Warns if images are present that are less than 80dpi. Always check that your PDF is suitable for print if an image is lower than 80dpi. |
| Image Resoultion | Warns if colour or greyscale images are above 450dpi. You may wish to resample any images above 450dpi to decrease file processing times. |
| Graphic element outside page dimensions |
Warns if there are elements outside of the page dimensions. |
| Items in Quiet Zone | Warns of any elements within the 5.5mm recommended Quiet Zone or Safe Zone. |
| Overprint | Warns of any overprint that is present in vector strokes or fills. |
Transparency present |
Warns that transparency or layer effects are present in the PDF and that the new post FileCheck PDF should be visually checked. |
| Artwork tint below 5% | Warns of any strokes or fills that are below 5% per CMYK channel. |
| Text below 5pt | Warns if there is any text present below 5pt. |
|
Text below 12pt using tertiary colours |
Warns of any text present that is below 12pt and using 3 or more of the CMYK printing channels. |
| FileCheck Failure | Action |
|---|---|
| Number of pages | Fails if the number of pages supplied in the PDF doesn’t match those set in . |
| PDF quality | Fails if the PDF is corrupt. |
| Font Issue | Fails if a font cannot be converted to outlines. |
| Font Issue | Fails if certain TTF fonts contain more than one encoding in their character mapping tables. |
| Overprinting White Text | Fails if there is white text set on Overprint. |
| Ink Levels | Fails if the coated ink levels are too high and can’t be fixed by the ink reduction feature in FileCheck. |
| Check | Manual Action |
|---|---|
| Elements too close to page edge | Check and correct if required any elements that are closer than 5.5 from the page edge that don’t bleed to the page edge. |
| Overprint | Use Acrobat Output Preview to check for overprint. |
| Extra Separations | Use Acrobat Output Preview to check for any extra separations in addition to CMYK. Ensure that your extra finishing spot colours are set correctly. |
| Layout |
Check to ensure that no elements have moved or disappeared. |
| Raster Images/Text |
Check the pdf to ensure raster images and text do not look pixelated |
We recently introduced an improvement to FileCheck to reduce the number of files failing due to high ink levels, especially on our uncoated stocks. Our update on 7th July 2016 lowered the number of failures by 68%, we are continuing work in this area.
Use of four colour or CMYK black or grey can cause issues with your print, so we are working on a warning to alert you of elements in your artwork.
We are looking at how we can deal with files when an over size file is ordered on a smaller sized product - for example, when a client uploads a file at A5 size, but selects an A6 product.
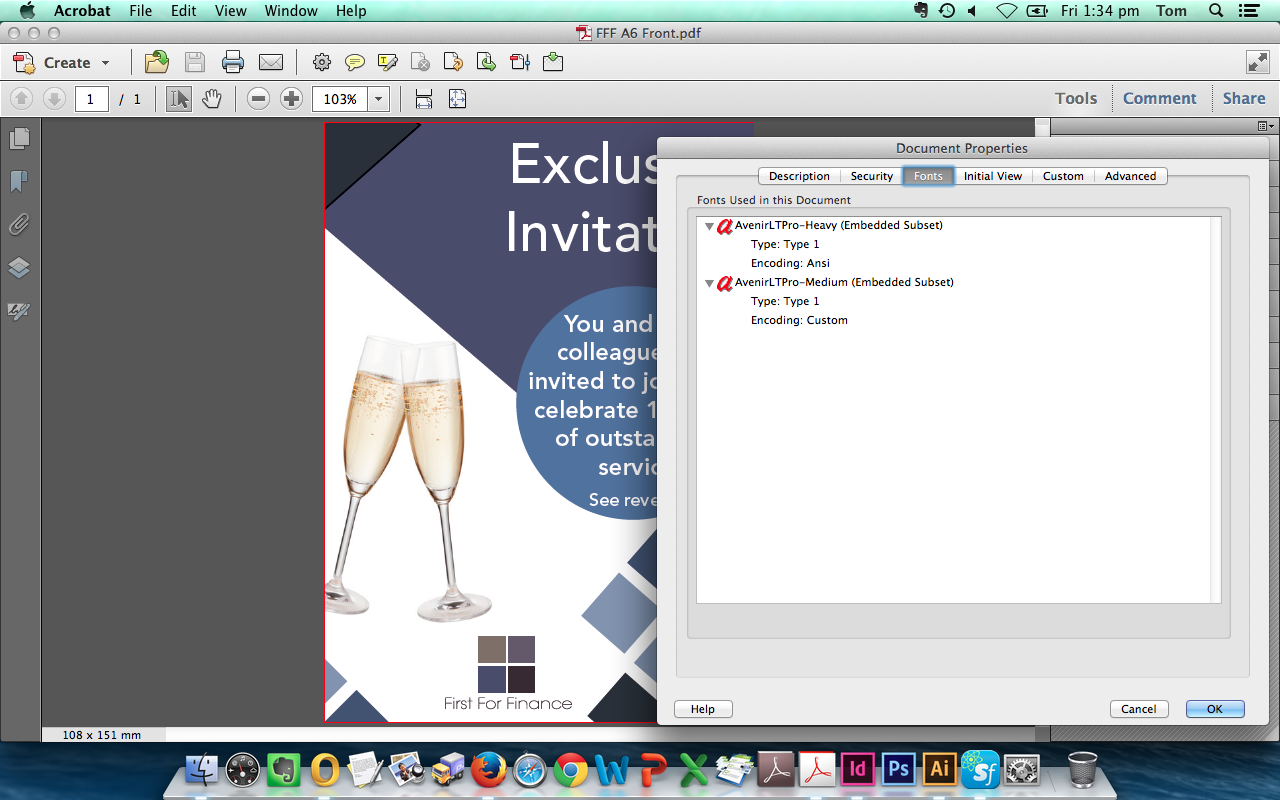
Open your PDF in Adobe Acrobat Pro.
Check for all fonts present by selecting
To convert fonts to outlines use the following steps:
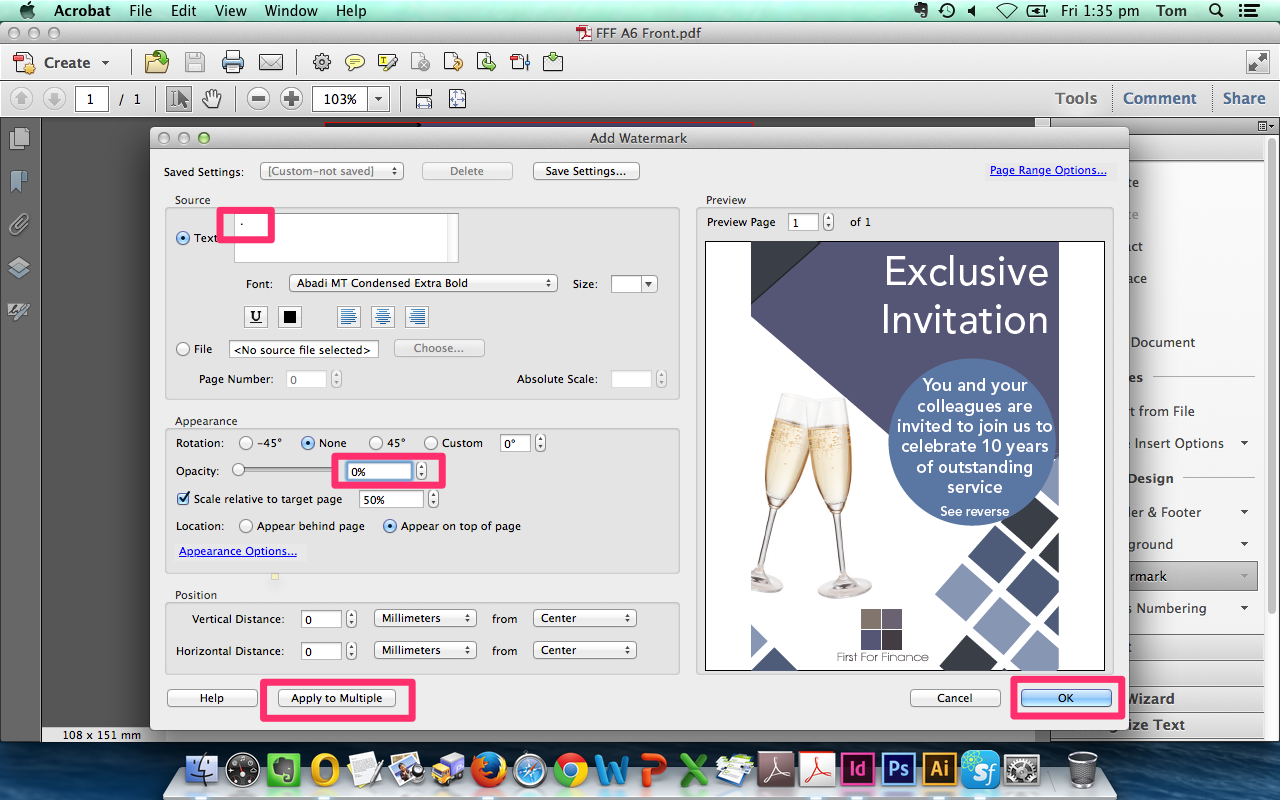
Select Add Watermark...
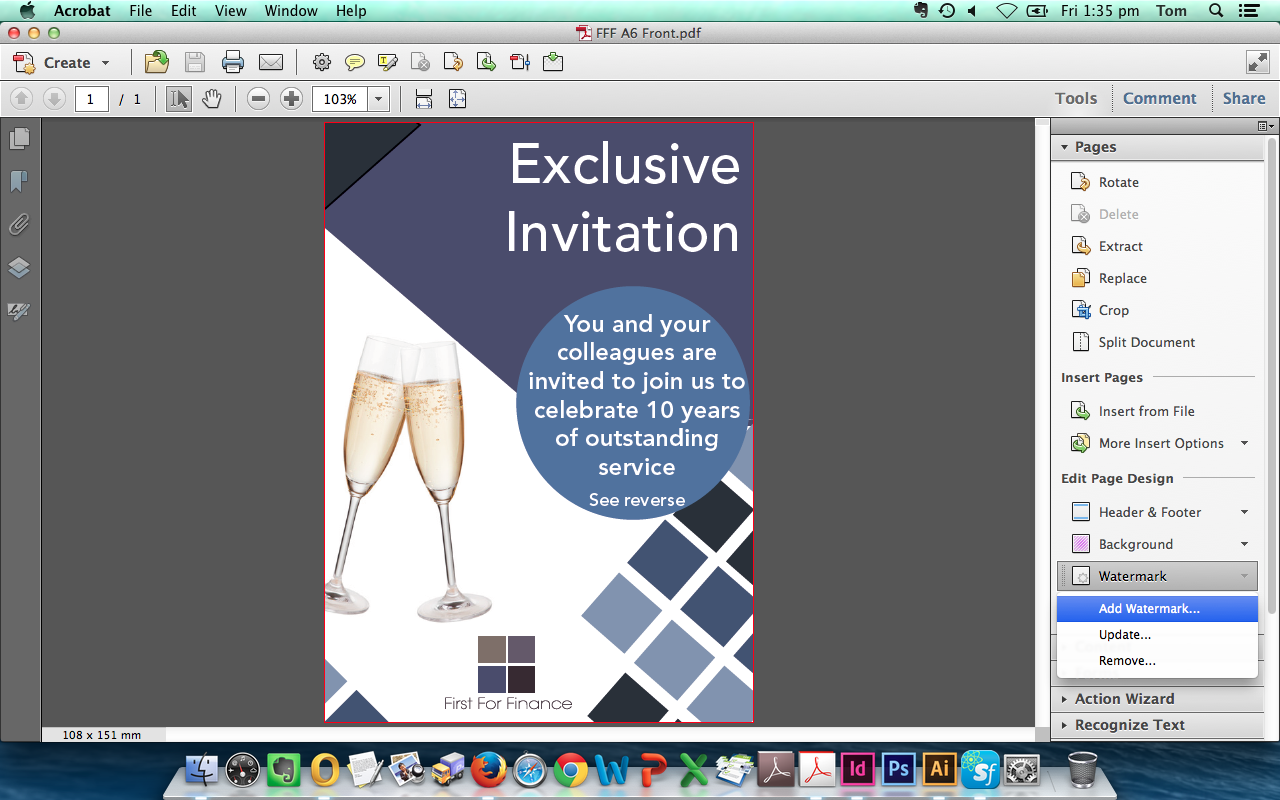
Now select Flattener Preview
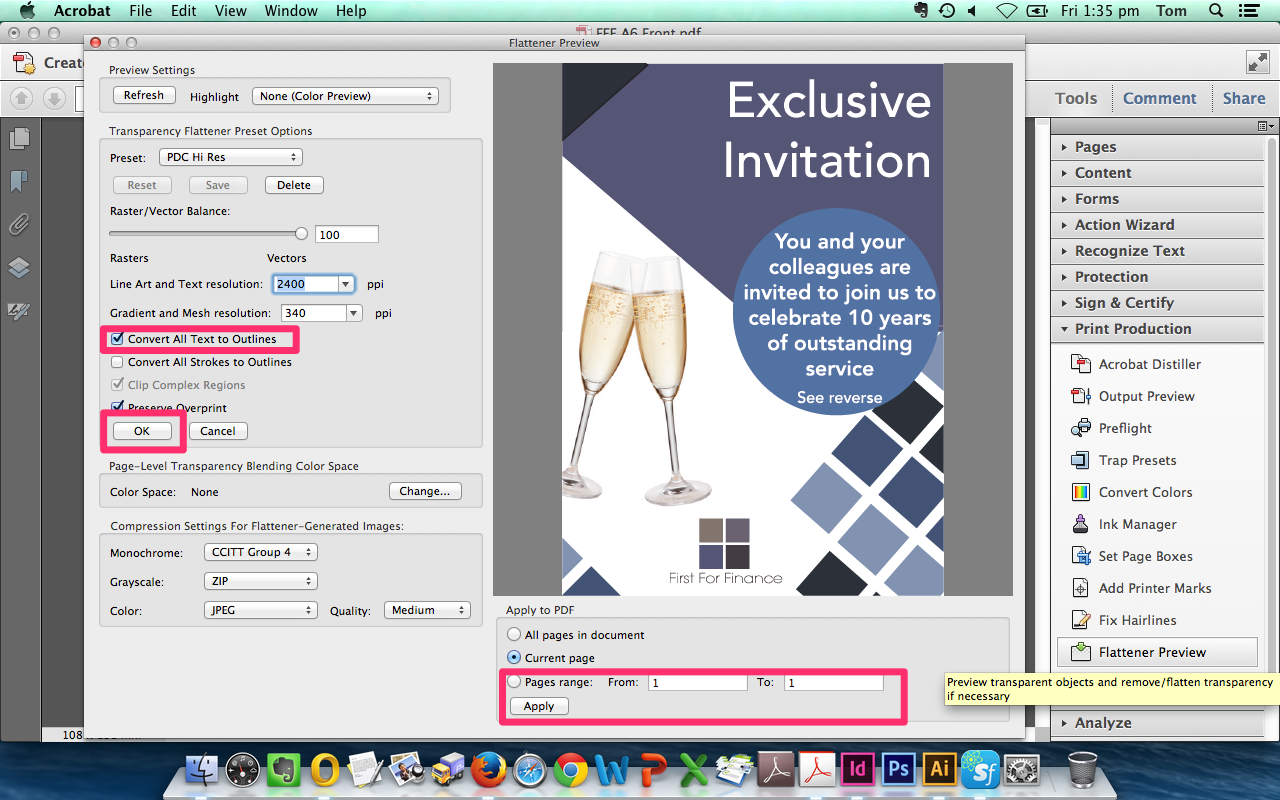
Fonts should now be converted to paths.

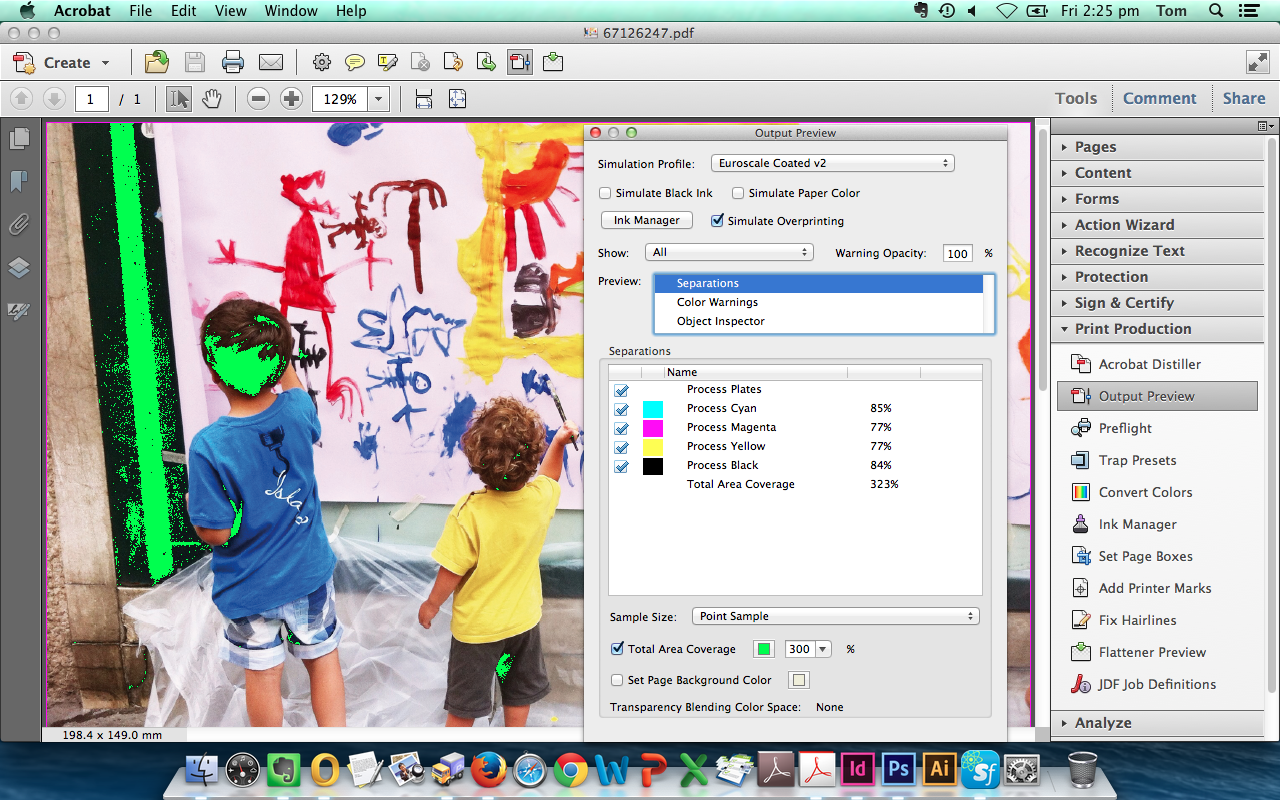
Open your PDF in Acrobat. Then go to
In the dialogue box below (under Total Area Coverage) enter the recommended Maximum Ink Limit for the paper stock you reqire (225% for Uncoated stocks such as Letterheads and 300% for Coated stocks such as Gloss Leaflets).
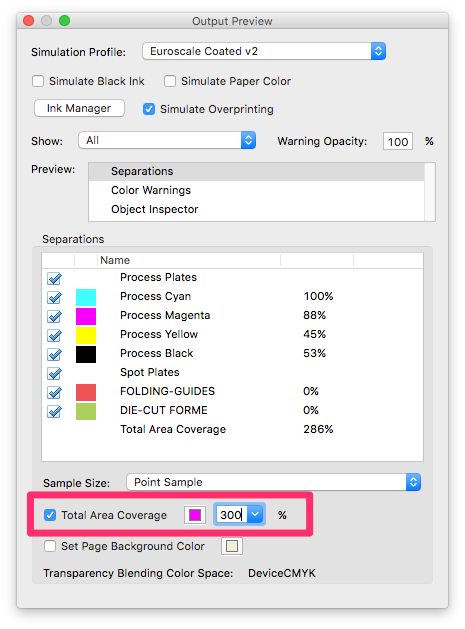
This tool will then highlight the areas within the document that exceed this limit (100C, 100M, 100Y, 100K = 400%).
To edit an image, select Edit Object (under ) then the image to select Edit Image... (see below). This opens the image in Photoshop.
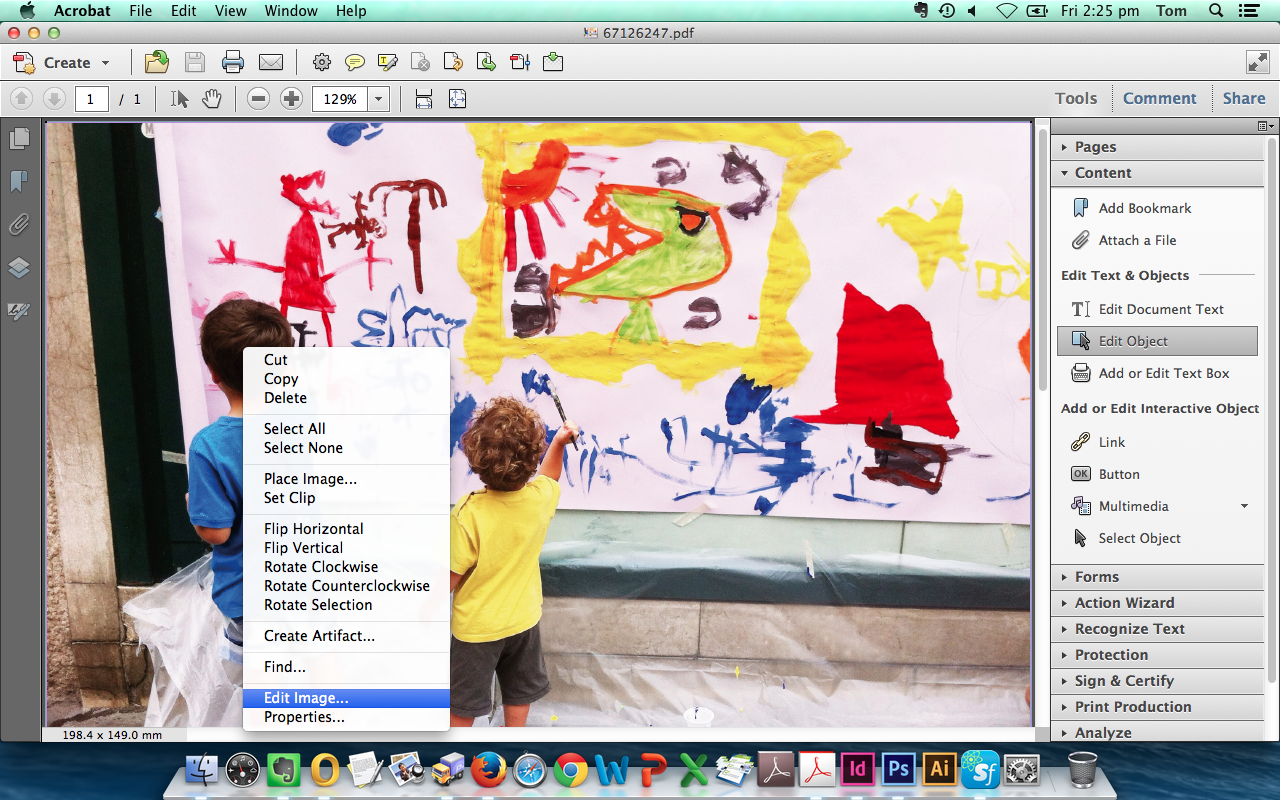
Once the image is opened in Adobe Photoshop select then underselect
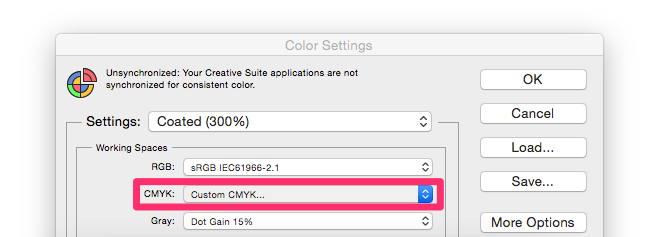
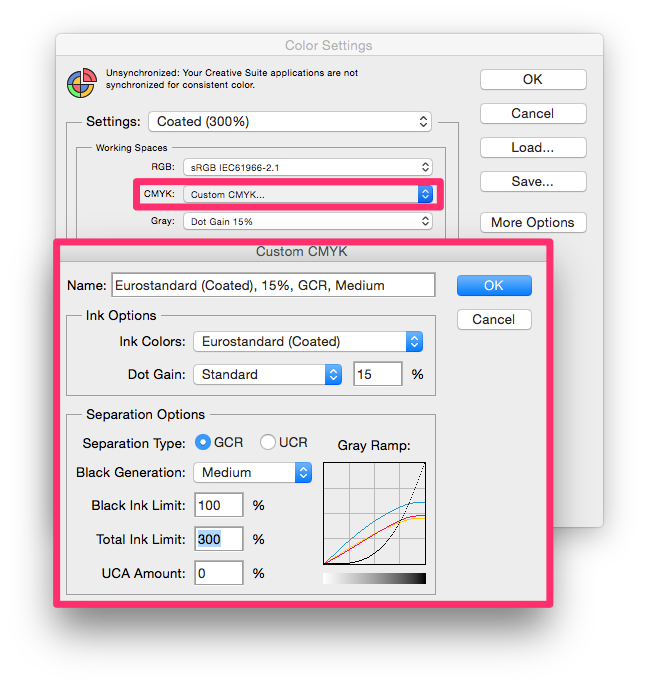
Copy the screenshot below for Coated Paper Stocks.
 UnCoated & Large Format (225%)
Copy the screenshot below for UnCoated Paper Stocks.
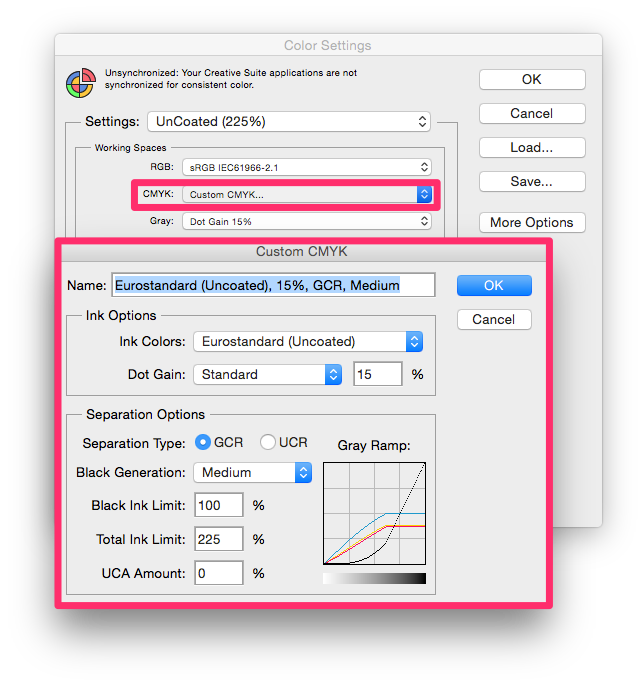
Select your Coated (300%) or Uncoated (225%) Colour Settings from above, then;
To convert RGB Images...
In Photoshop select:
To convert CMYK Images...
In Photoshop select:
The ink conversion is applied directly to the image which is then saved back into the PDF when you close the image.
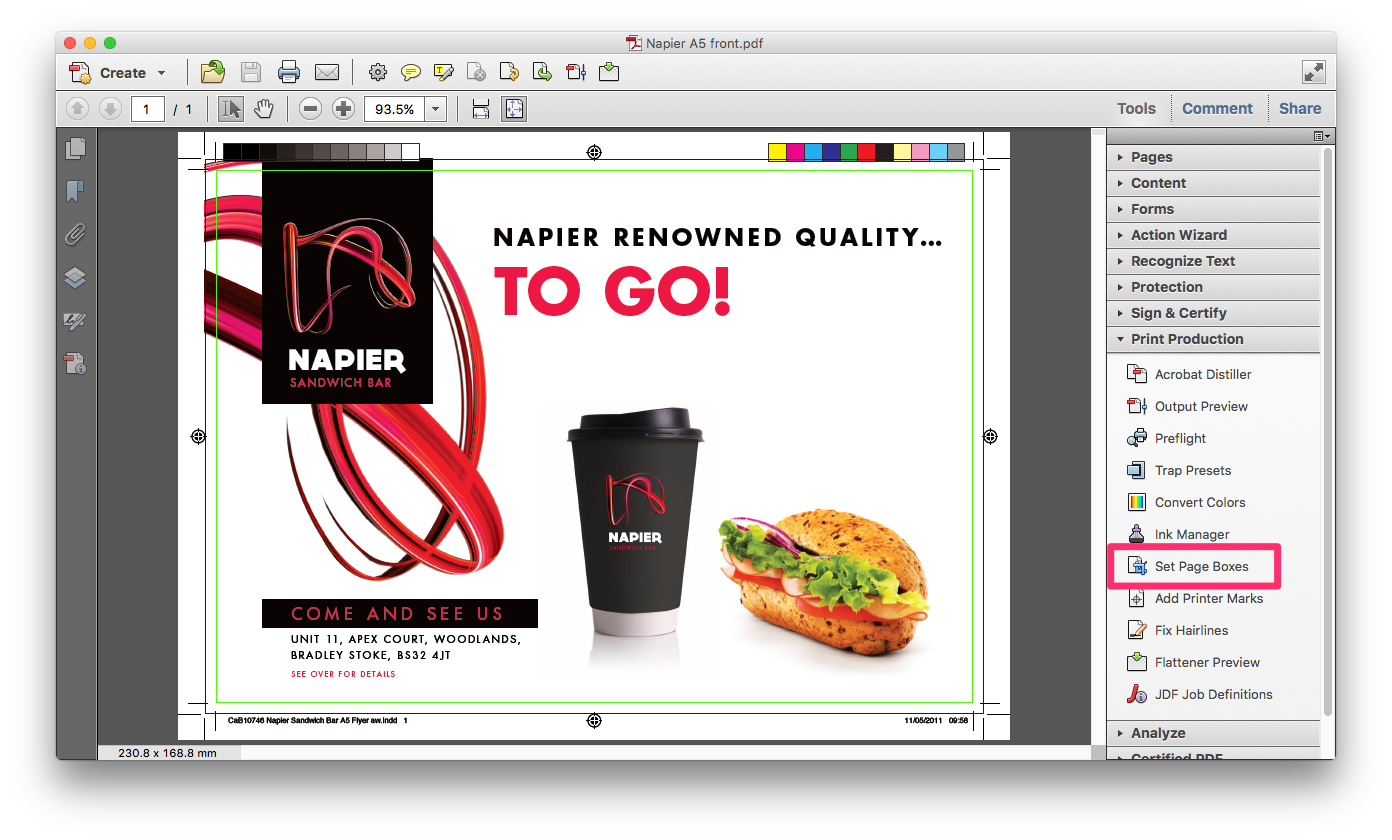
Your PDF contains a number of Internal Measurements used to set the page size.
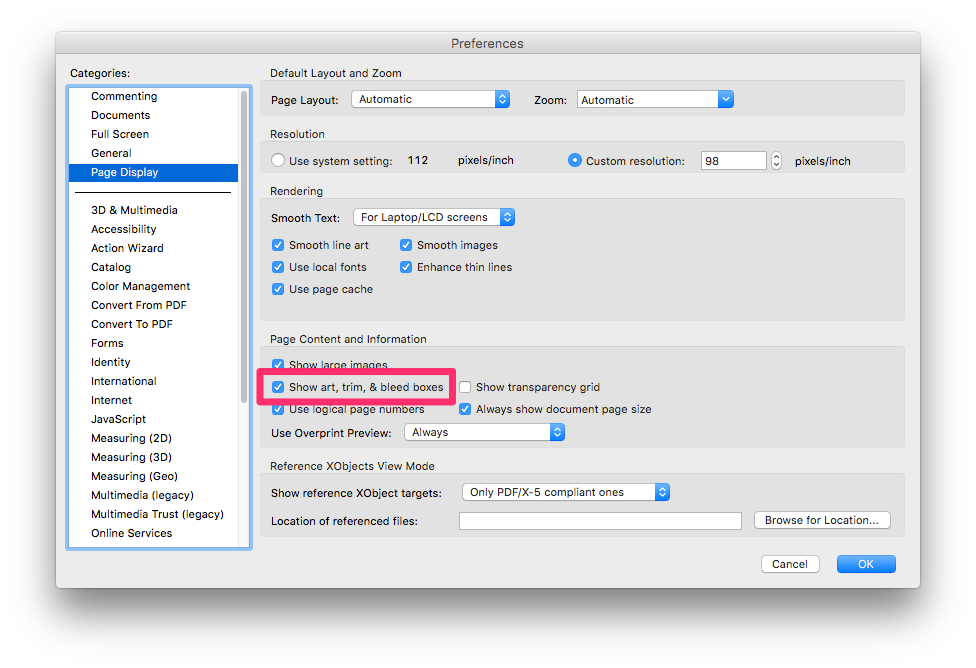
To show these internal measurements go to Show art, trim and bleed boxes.
Then select Set Page Boxes.
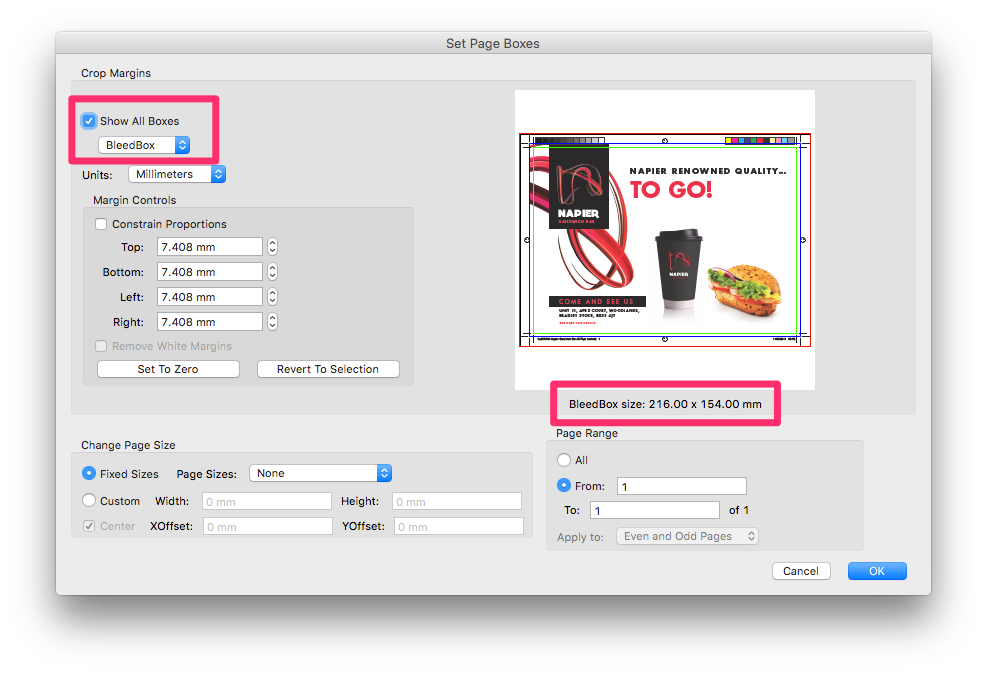
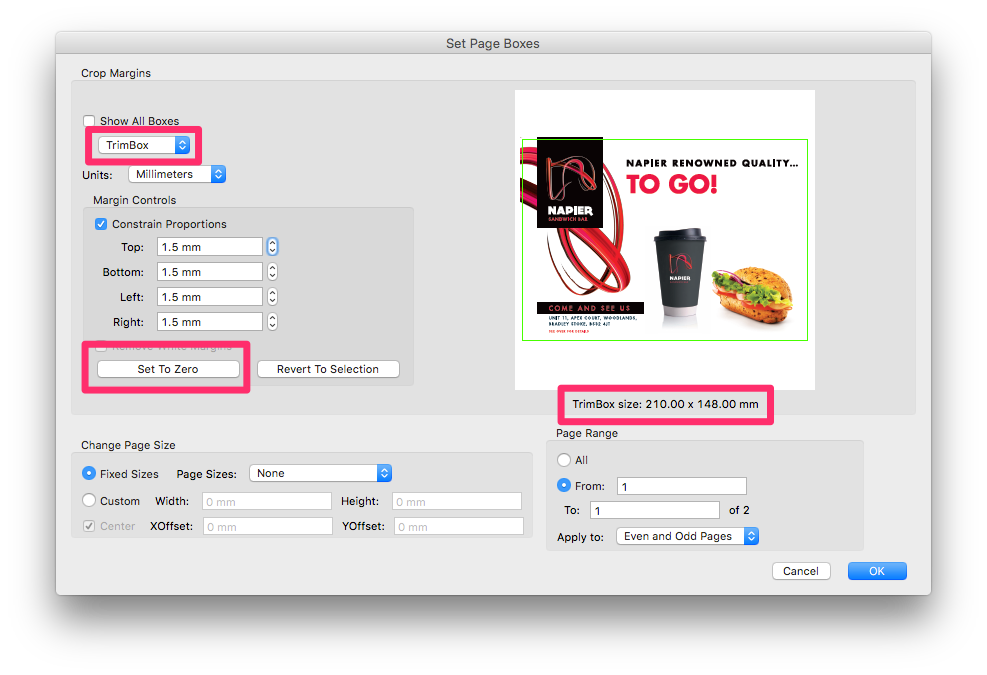
The TrimBox is the mesurement we use to impose your PDF. For a business card the demensions of this Page Box should be 88 x 58mm (on a client supplied PDF they may relate to the finished size 85 x 55mm - This is corrected during FileCheck).

The BleedBox is the area that sits outside of the Trim Box, it includes our 1.5mm bleed. For a business card the demensions of this Page Box would be 88 x 58mm (Matching the TrimBox) (on a client supplied PDF they may relate to a 3mm bleed so the measurement would be 91 x 61mm).
The CropBox is the area that sits outside of the Bleed Box, it includes any Crop Marks which are present on your PDF.
You can set and fix your Page Boxes using Margin Controls.
If your PDF includes a 1.5mm bleed which is set by the document page size (rather than using InDesign's Document Bleed Settings) but shows your TrimBox as the Finished Size you can set the TrimBox to Zero to reset the page size (Finished Size + Bleed). You do this when you get the error message, 'Incorrect page size' during FileCheck.
If a PDF appears to be the correct page size but is scaled up during FileCheck this is usually because the PDFs' Bleed or Trim Box appears smaller than the expected page size (Finished Size + Bleed) visible on .
See also
|
|||||
Jump to contents page of
|
|||||