Support for

P-FLAPI can be connected to via Zapier setting up a few Zapier triggers & actions
Zapier simplifies the process of development with APIs by connecting to a number of pre-built services (such as wordpress, woocommerce, gravity forms, drupal and other CMS) and also simplifies the management of APIs
Here's a video of integrating P-FLAPI with a simple Gravity Form sheet to understand how it works.
1) Trigger when job is ready for production
When a job is ready for production we will send a webhook to notify you, you can create a "Zap" in zapier so Zapier catches the webhook and then you can add another zap to manage the zap.
Create a Zapier account via https://zapier.com
Choose "Create Zap"
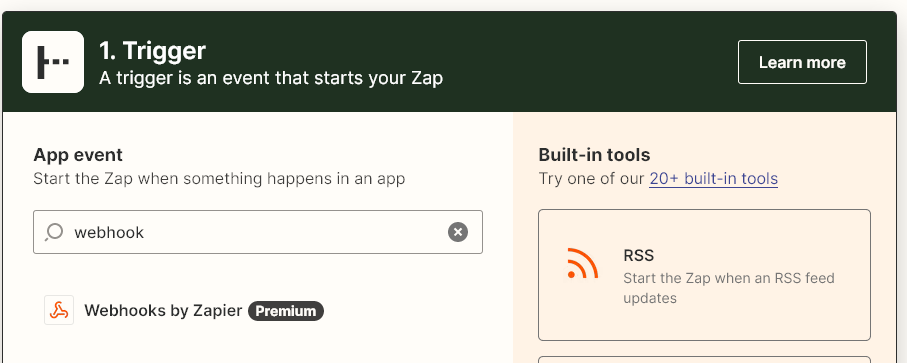
For a trigger choose Webhook by Zapier (premium)
Let your account manager know the webhook url zapier provides ( it'll be similar to https://hooks.zapier.com/hooks/catch/11111111/xxxx111/ )
Then add another application to your zap for your next step. This could be to create a job in a CMS you use such as WooCommerce
2) Action for job despatch
When you've completed a job in your system you'll need to create a new zap with a trigger coming from your CMS (perhaps a webhook?)
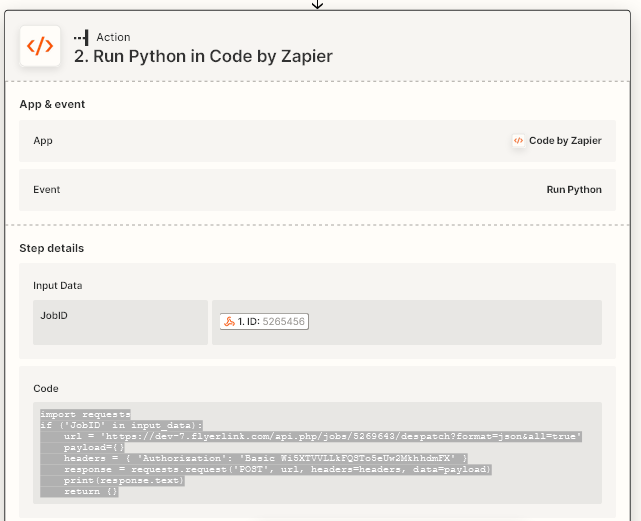
Then add an action with this python code
import requests
if ('JobID' in input_data):
    url = 'https://API_UESRNAME:API_PASSWORD@www.flyerlink.com/api.php/jobs/' + input_data['JobID'] + '/despatch?format=json&all=true'
    payload={all:true}
    headers = { 'Authorization': 'Basic Wi5XTVVLLkFQSTo5eUw2MkhhdmFX' }
    response = requests.request('POST', url, headers=headers, data=payload)
    print(response.text)
    return {}
The Job ID sent through will need to match our Job ID sent in the original Trigger
The Job ID will need to be sent in your first zap step to confirm which job is ready for production
The parts in bold API_USERNAME and API_PASSWORD will need to be replaced with your API username and password to give permission for you to despatch your jobs and only your jobs. You'll need to get in touch if you do not know this.
3) Trigger for job request to cancel production
If a studio makes a mistake (perhaps the job despatch needs to be changed, or there's a file mistake) they can send a request to cancel production.
You can then have a process to decide if it's too late to cancel or if a cancel is possible. If it's too late, you don't need to do anything. But if it's too late you can do step 4).
For step 3), again create a zap that's a webhook trigger.
Let your account manager know the webhook trigger url zapier provides ( it'll be similar to https://hooks.zapier.com/hooks/catch/11111111/xxxx111/ )
4) Action to cancel job
Create a zap to process a trigger from your CMS to cancel a job. This could be because of an issue with the file or because it was requested by a studio in the trigger 3).
The python code you'll need to process this is
import requests
if ('JobID' in input_data):
    url = 'https://API_USERNAME:API_PASSWORD@www.flyerlink.com/api.php/jobs/' + input_data['JobID'] + '/deallocate?format=json&all=true'
    payload={'all':'true'}
    headers = { 'Authorization': 'Basic Wi5XTVVLLkFQSTo5eUw2MkhhdmFX' }
    response = requests.request('POST', url, headers=headers, data=payload)
    print(response.text)
    return {}
Jump to contents page of
|
|||