Support for

Brambl is a drag and drop website building tool that is available within w3p Flyerlink®.
The following articles explain how to use Brambl to quickly and easily create beautiful responsive websites.
Did you know: Brambl stands for Build Responsive Adaptable Mobile Bootstrap Layouts.
Brambl is a drag and drop website building tool that is available within w3p Flyerlink®.
The following articles explain how to use Brambl to quickly and easily create beautiful responsive websites.
Did you know: Brambl stands for Build Responsive Adaptable Mobile Bootstrap Layouts.
Brambl isn't the only web building tool around, so it's important to understand what clients it's right for and what clients will require a different platform.
Brambl is built for graphic designers, not technical Geeks.
It lowers the bar to building great websites, so anyone who can use Photoshop can work with Brambl. It makes it easy to start out in web without the serious investment in resources needed to learn other platforms like WordPress.
Unlike WordPress or some other web builders, all editing options for a panel or block are easy to find and access. You don't need to search around a CMS to find where some text or image is coming from, instead, you see what you're editing on the page you're editing.
Since all editing options are immediately accessible, building a Brambl site can be less time consuming than other platforms.
Brambl sites are perfect for clients who want you to "knock up a website" for not very much. It can reduce the time spent building a website from days to hours. As such it's best positioned as a responsive brochure site, typically sold to end-users between £300 - £1000
However, Brambl also comes with interactive widgets to add value to companies in the service industry. From adding custom forms, interactive booking forms, Mailchimp integration, Selling tickets or managing an event and much more.
Brambl sites can't do everything. Each theme is built with a finite number of panels and blocks to make the website.
If you want to be able to adjust the website under the hood or behind the scenes, choose a different platform. Also if your client needs some functionality that Brambl doesn't meet yet, you'll need to choose something more powerful but less intuitive. Although the number of widgets keeps increasing, there may be something you need now that counts Brambl out as an option.
Finally, if you think your client will keep asking for more advanced functionality, it may be worth investing more time initially in a different platform from the outset to make life easier going forward.
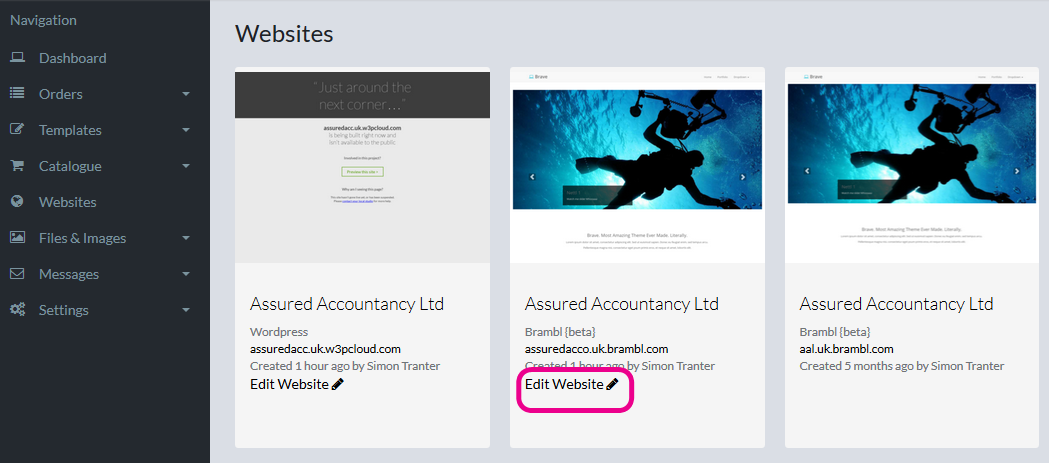
To build a new Brambl website, simply head to in Flyerlink.
Choose Brambl, and pick your theme.
Your site will be created and hosted on w3pcloud in a few minutes.
Your theme is important. Each theme comes with a limited amount of Panels. The more Panels your theme has, the more design choices you have in your site. Brave & Velocity are the most flexible themes.
Once your site is built you've two options, Edit your site or Publish changes.
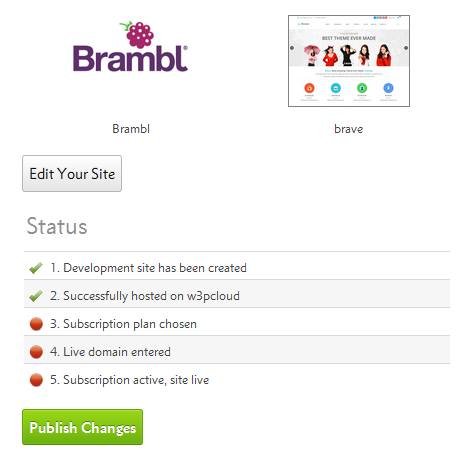
There are two versions of your Brambl site, the last saved version and published version. The Brambl Editor will always show the last saved version, but you will need to press Publish Changes before this version replaces your live site. This allows you to return to the editor and adjust a working version before publishing it live.
Press Edit your site to open the Brambl editor.

The toolbar across the top helps you make changes to the site, page or layout. You can use the Toolbar to:
The first three toolbar options let you change the page your editing, create new pages and delete pages.

You can then switch page with the Page dropdown menu.
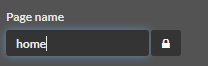
The page name can be changed via from within Brambl.
Each page can have it's own combination of Panels & Blocks with unique personalised content.
Brambl splits your pages into Panels and Blocks.
The Panels are rows that stretch across a desktop and can contain multiple Blocks.

Each Block holds content that can be edited either using our text editor or specially designed controls which you'll see for Buttons, Links, Images, Slideshows, and Widgets.
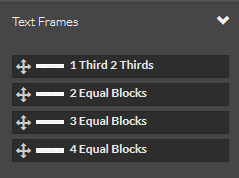
Different themes have different Panels, however all themes have Global Panels, such as Text Frames of different column widths
To edit any of your site's page content, simply double click the content you want to adjust.
Double click text, and you'll see a text editor appear on the right hand side.
The right hand side bar provides the standard text editing tools you'll be used to like applying Bold, Italics, Underlining, changing the Alignment. It is also possible to adjust the leading, line space and font width.
You can add images, icons, buttons and anchor points.
Finally you can adjust the font, font colour and background colour.
Any changes made to specific paragraphs will override the Site wide styles you set up via the Settings tab.
Double click an image and you'll see the image editor on the right hand side.
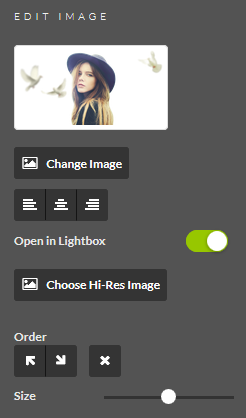
Here you can change the:
Press the X icon to delete the image
You can also either make the image open a lightbox when clicked...
or link to another page.
If you choose the lightbox, you can upload an alternative Hi-Res Image that is opened when the lightbox loads. This means you can have an image saved for web when viewing the site normally, and a higher quality image for when a user clicks to see it.
To add an icon, click on the text and then use the icon option. You can then edit any icon by double clicking it
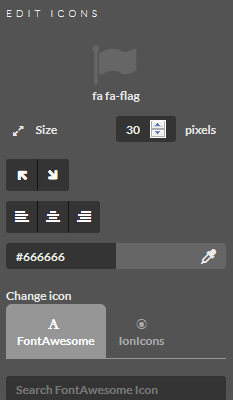
You can change the icon Size, Alignment and Colour
Brambl allows you to choose any icon from the FontAwesome & Ionicons libraries, simply choose which you want and find the best one for your clients requirements.
Double click any button to open the button right side bar.
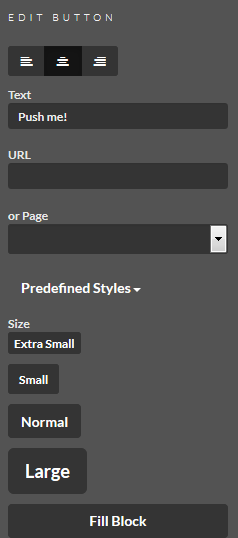
Here you can change the text displayed, the url location or Brambl Page
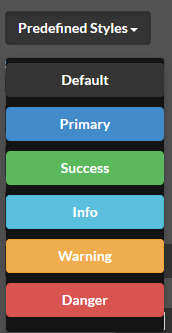
You can choose a set of predefined colours and sizes...
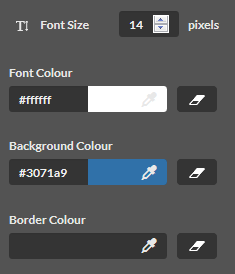
Or scroll down and choose your own size, text and background colour.
 Remember to save: Once you're happy with your changes you need to Save and Publish Changes before the edited version replaces your live site.
In Brambl, head to the Settings tab to change information for your site and the page your editing.
Head to .
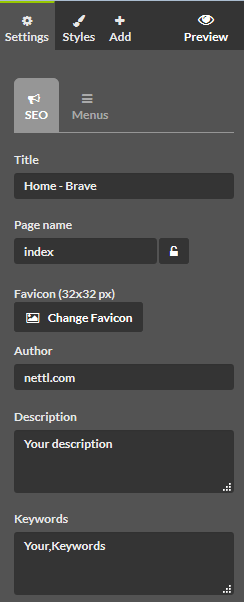
Here you'll see the Meta Title and Meta Description of this page. Meta Titles & Meta Descriptions show on search engines and describe the page content to people who may want to view the content.
The Page Name is an internal reference within the Brambl Editor for what page you are on. A descriptive page name can help avoid confusion switching between pages.
You can add Keywords as well, which were used by Search Engines to understand what your site is about but is less used these days.
Finally you can add a Favicon to replace the existing Brambl logo in your browser tab, and you can add Google Analytics to let the website track visitors.
The Favicon & Google Analytics page apply to the whole site.
To add Google Analytics
Go to
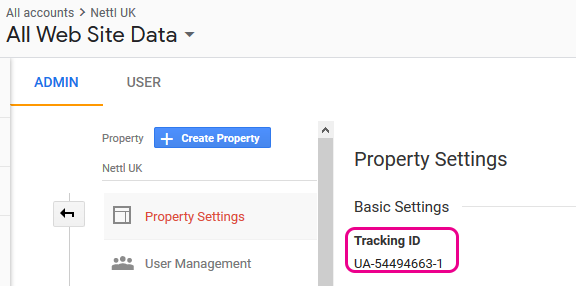
In the Google Analytics field, add your google analytics property ID
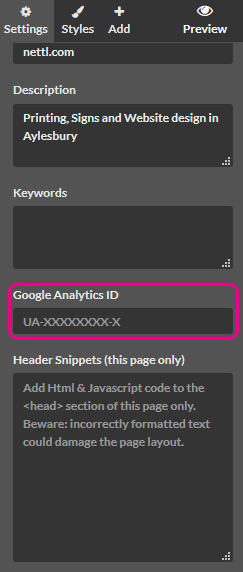
You can find this in Google Analytics
Head to .
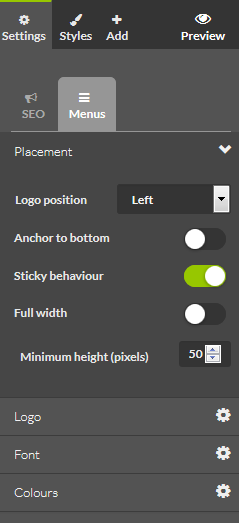
Here you can choose how your menu displays, such as:
If you scroll down, you can also change your menu links.
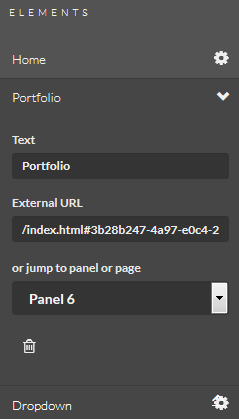
Choose the Cog to change the Display text and link destination of your menus.
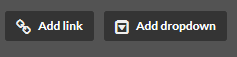
To add more menu items, choose either Add link or Add dropdown for a new dropdown menu
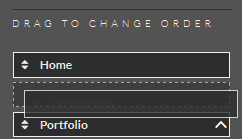
You can then reorder the menus by using a drag and drop sorting tool
In Brambl, head to the Styles tab to change default font choices and colour schemes for your site.
Head to .
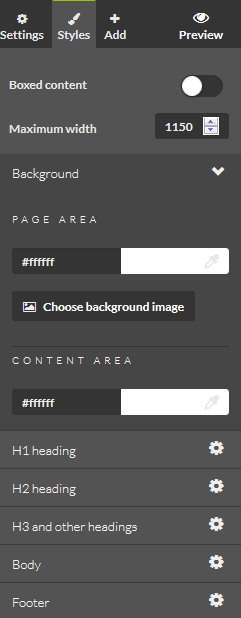
Here you can set the style sheet rules that apply across your site.
You can change the page background image, and choose a colour for the page background and for the Panel content background.
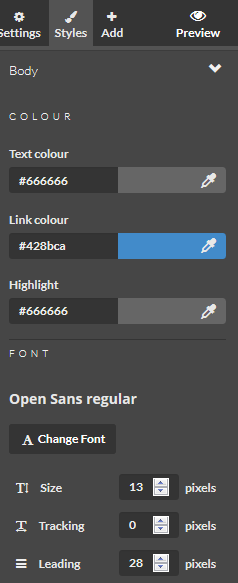
You can also choose the font, font size, and colour for all your headers and body text content. These are the default rules applied across your site.
To change the style of text on your site, double click the text and either:
1) Change the default style applied by chosing a different Header or Body style:
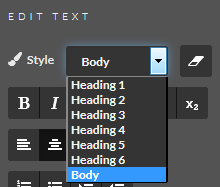
2) Override the defaults for this text by adjusting the Font size & colours with the text editor.
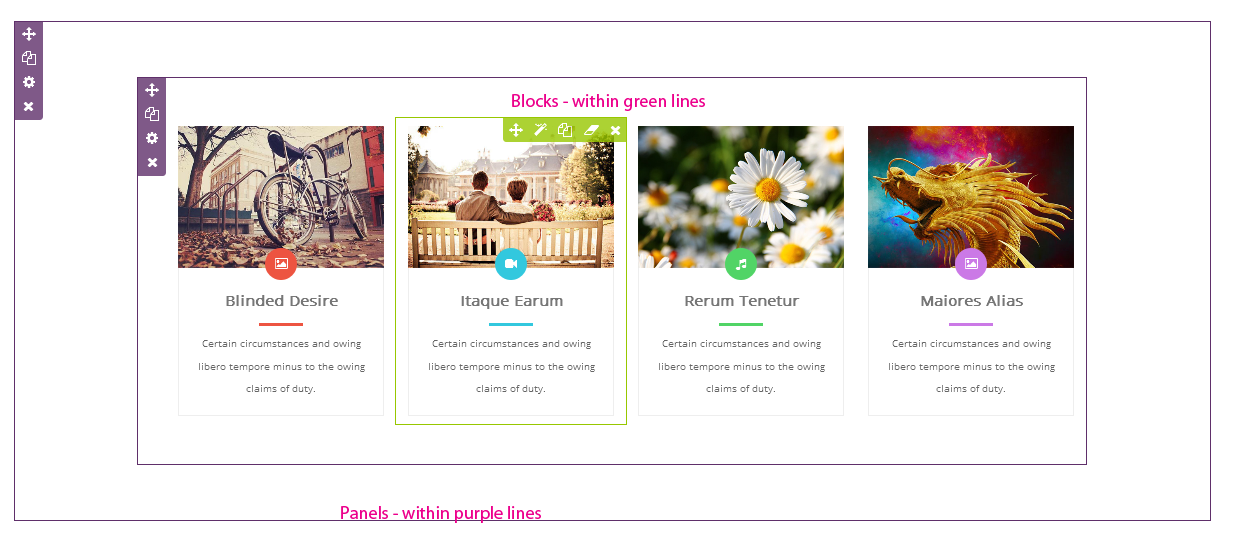
Brambl websites are made up of drag & droppable Panels.
A Panel is a full-width bar within which Blocks are placed. Blocks are then filled with pre-designed website content that can be changed to be relevant to your client.
In the Brambl editor, Panels are controlled and defined within purple lines while Blocks are within green lines.
To add a panel in Brambl, head to .
Select your preferred panel and drag it onto the page.
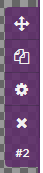
When you hover over a panel, you'll see options to customise it.
The first crosshair icon lets you move the position of the panel on your page. Hold it and drag your panel up or down the page.
The second copy icon lets you duplicate the panel. It will copy all the blocks and all the content, letting you customise again from a better starting place.
The third cog icon lets you configure the panel, more on this later.
The fourth x Panel option deletes the panel, along with all the blocks and content it contains.
The #2 tells you what order the panel is. This order can be used as an Anchor point in the text editor and menus.
Press the Panel cog icon and a right sidebar will appear specifically for this panel.
.png)
You can change the background colour, and even add a transparency. You can also add a background image. The Top layer image scrolls with the page while the Bottom layer image is static.
That means you can add a top layer with some transparency and a bottom layer as a background to create a great parallax effect.
Use Dimensions to define your Panel's max height and amount of padding.
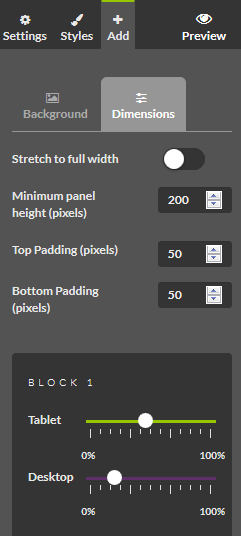
You can also set the Block Widths of each Block on both the Tablet or Desktop. By changing the sliders you can choose how much of the device width each Block should take up.
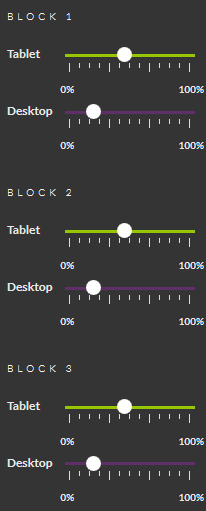
In the above example the 4 blocks within the panel will show in 4 columns for Desktop, and in 2 rows of 2 columns for Tablet.

There are also block specific options when you hover over them.
The first crosshairs icon lets you drag & drop your block within the Panel, and even onto another Panel.
The second magic wand icon lets you add custom animations, more on this later.
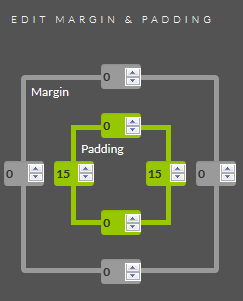
The third cog icon lets you adjust the padding or margin of your block to give it more or less whitespace.
You can also add a background colour or upload a background image
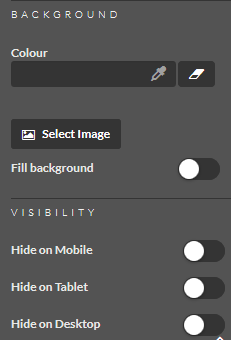
And you can choose to hide some blocks from Desktops, Mobiles or Tablets to create content specific to the device of your users.
The fourth copy icon lets you duplicate all the Block content and creates a new copy next to your original.
The fifth rubber icon strips out the Block content, but leaves a blank space in case you want a gap between two of your Blocks.
The sixth x icon deletes your Block and all the content inside it.
Press the second magic wand icon and an animate right sidebar will appear.
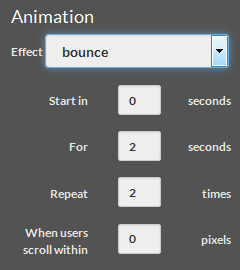
You can choose an effect to apply to this block, either after a few seconds when the user loads the page or by default when the user scrolls to the Block.
You'll see a preview of any affect you choose.
And you can choose how many times the animation happens and for how long the affect takes place.
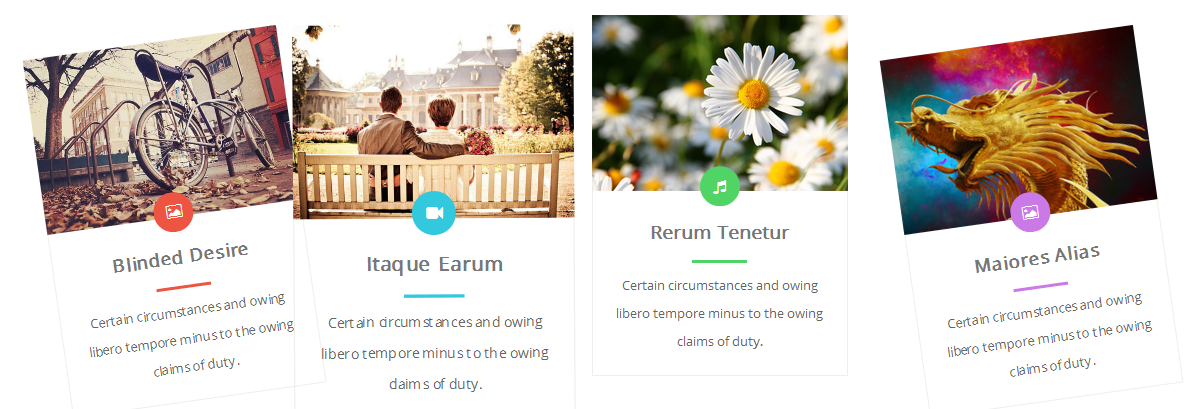
Here's an example of 4 blocks with different animations when the user scrolls.
Brambl is built on the Bootstrap responsive framework, where we do background magic to ensure that panels/rows remain responsive. Panel/rows are made so they fit 12 "units" across thier width. So 4 equal blocks for example can be achieved with each block taking 12 divided by 4=3 units. Same for 3 equal blocks (12 divided by 3= 4 units each) and 2 blocks (6 units each).
This means that you can't make 5 block fit into a panel/row as 12 divided by 5 is not an integer.
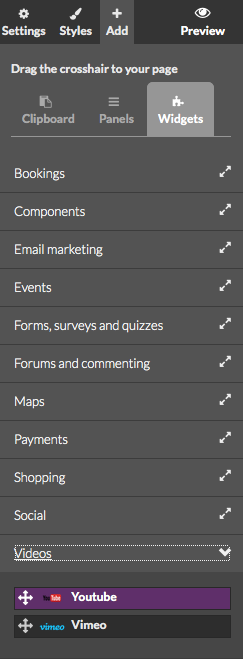
Widgets are similar to Panels, as they can be dragged and dropped onto the page with special characteristics. However, while Brambl Panels & Content vary depending on the theme, all Brambl sites have access to the same Widgets.
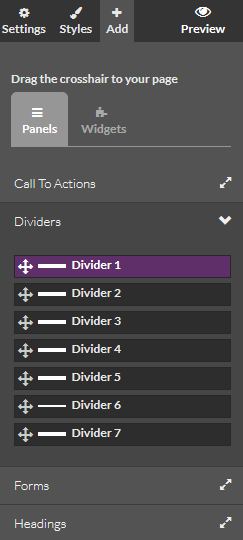
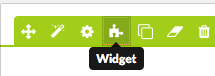
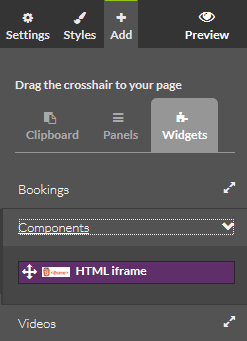
To add a widget in Brambl, head to .
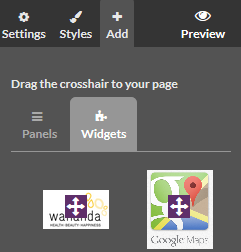
Drag the widget you want onto the page.
You'll then have a configuration option for your widget, this will ask you for the details of your client that the widget needs to work.

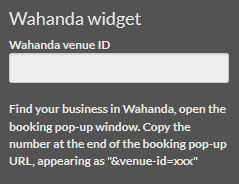
There'll be an explanation for some widgets, like Wahanda, on how to get the information:
We plan to keep increasing the number of Brambl widgets so that Brambl could act as a nettl :connect site for more and more industries. Nettl will be highlighting a different industry and building an industry leading Brambl Widget integration tailored to a specific need.
For example, when nettl highlight accountants we may provide an online loan calculator widget, or when a real estate industry is highlighted there could be an interaction with Zoopla or Find-a-Property.
Widgets are similar to Panels, as they can be dragged and dropped onto the page with special characteristics. However, while Brambl Panels & Content vary depending on the theme, all Brambl sites have access to the same Widgets.
To add a youtube video widget in Brambl, head to:
Add > Widgets > Video > Youtube and drag the widget into your bramble website.
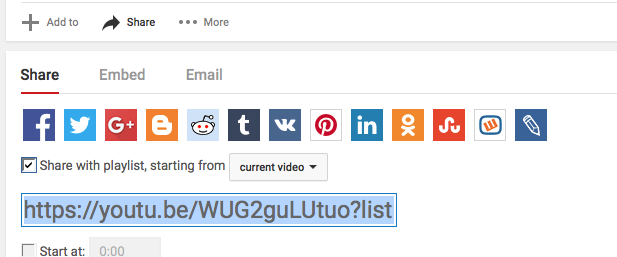
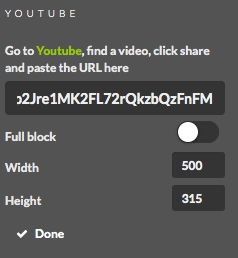
Once this is done you can configure your Youtube or Vimeo widget.
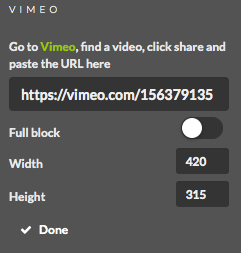
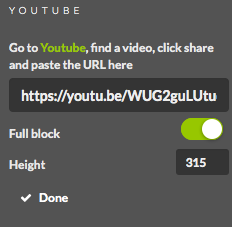
Go to Youtube/Vimeo, find a video, click share and paste the URL into the widget.
Youtube share button:
Vimeo share button:

You can paste your URL in the widget and edit the size of the player as shown below.
Example:
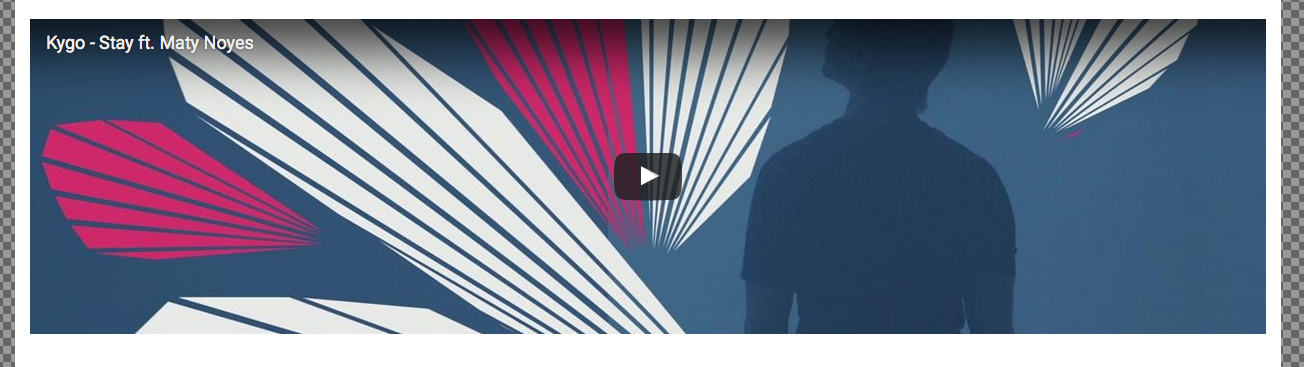
Video full with
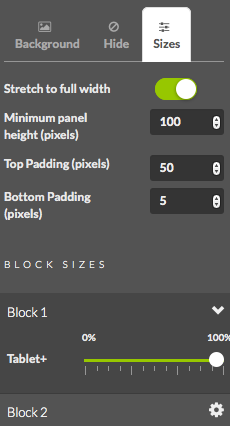
To make a video full with go to the purple confirguration wheel, select sizes and make the it 100%:
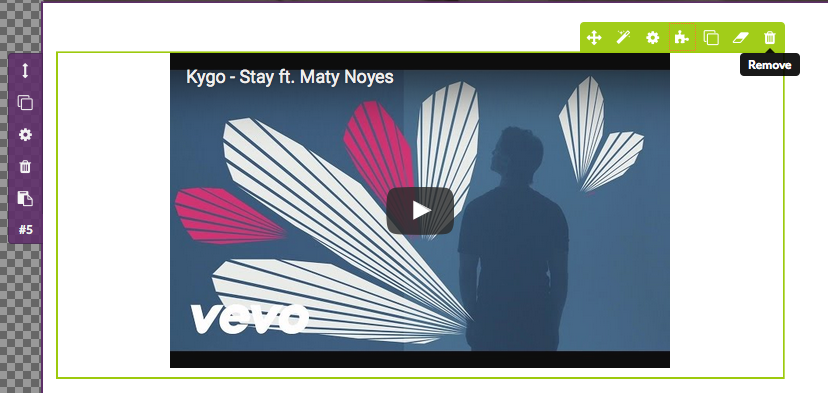
Once this is done you can go back to your youtube/vimeo widget in the green block:
Select full block in the right menu:
Your video/block should look like this:
If your site was installed before January 2017, you may need to upgrade your Brambl site to get the latest changes - just press the Apply Updates link in your website record overview page.
Then once logged into the brambl builder you'll see 2 new carousel options on all themes, one for images and one for text.
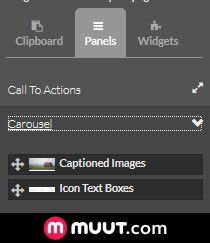
These standard panels are there to help to get you going, you can actually make a carousel out of anything.
There's a new panel option to convert the panel into a carousel:
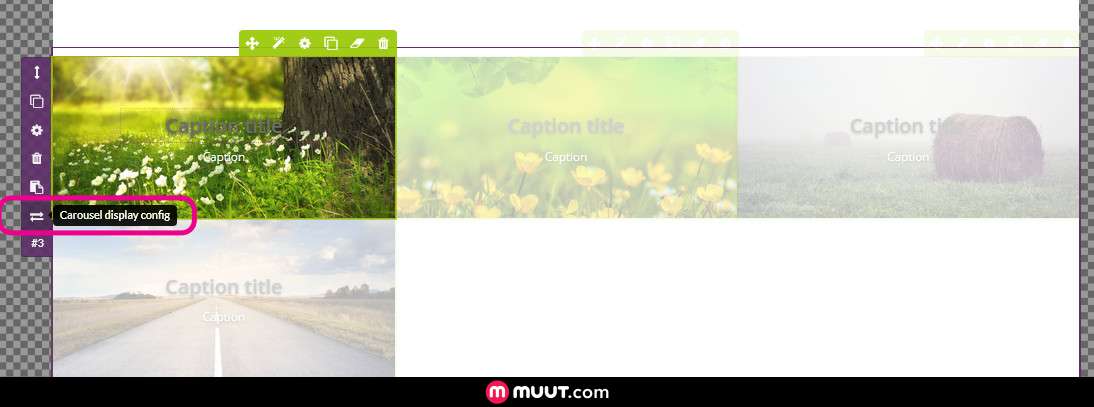
Press this and you'll see a new carousel configuration sidebar toolbox:
Any panel can be turned into a carousel, and the green content blocks are used to make up slides.
You can add youtube videos in the iframe, background images, anything you like.
You can have multiple rows per slide (each block becomes a row) and have multiple blocks on each row as well to form the slide
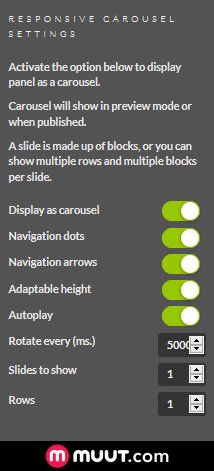
You can choose how many slides to show at a time, whether to auto-rotate.
You've also got an option about whether the height of the carousel adjusts to fit the blocks, or is kept the same size. For best results we recommend keeping all blocks and slides the same size.
Last thing to note is that the carousel won't work properly in the brambl builder as you'll be able to see all the elements in their own green content blocks. To preview your design you'll need to save and then press the green Publish button. Wait a minute or so and you'll then be able to view your development URL to see the carousel in action.
Brambl comes equiped with several ways to add custom HTML and Javascript code snippets to websites to provide extra functionality and interaction with clients.
We've pre-build widgets for connecting to popular third party services that you can find via
The HTML iframe widget lets you copy in a block of HTML & Javascript directly on the page. This widget works with a wide variety of HTML and Javascript blocks, but cannot run any php or server side languages.
There are be some third party code snippets that are incompatible with the iframe and need special development, but often this is all you need.
Google Tag Manager allows you to add tracking code and javascript snippets to the <body> section of your Brambl website. This is mainly designed for hidden code snippets, such as Google Analytics or Adword tracking.
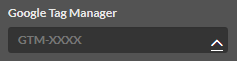
Simply sign up to an account with Google Tag Manager, create a container, then copy the Tag Manager code you've been given into your Brambl site via . Your code will look like "GTM-XXXX".
Google Tag Manager has several Google tracking services already built in, and has a tool that allows you to choose firing rules to restrict which pages your code snippets appear on.

Header snippets allow you to add code snippets to the <head> section of your website, such as tracking services.
Head to in Brambl to add your HTML or Javascript code snippets.
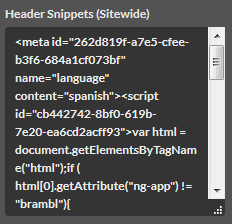
You can either add header snippets to EVERY page on the website, using the Header Snippets (sitewide) option
Or to INDIVIDUAL pages on the website, using the Header Snippers (this page only) option
Beware: header snippets can severely damage your Brambl website layout. Only use code snippets from sources you trust.
Note: we do not run header snippets in the Brambl editor to protect the website from malicious code snippets. The header snippet will only show on your published version
In Brambl, it's possible to create your own contact forms using Brambl's form builder.
Head to
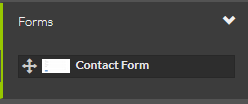
Drag on the Contact form to your site.
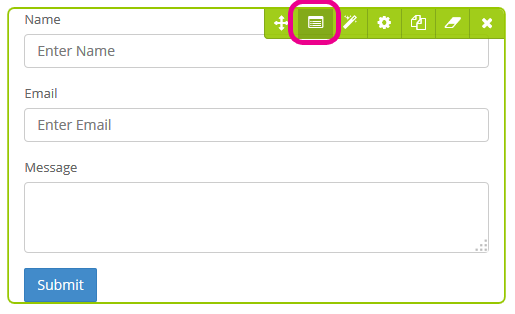
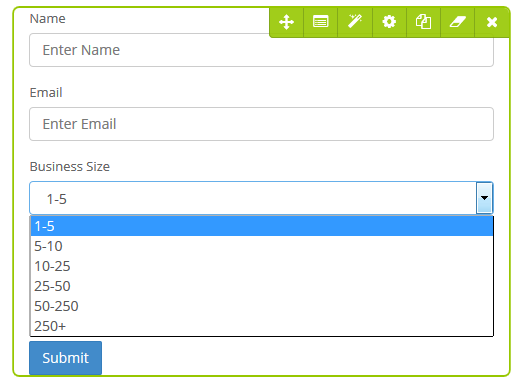
You'll see a special Block option for Contact Forms.
Click this to adjust the form.
Firstly you'll need to add the email address contact form submissions are sent to.
You can also change the message users see once they send the form.
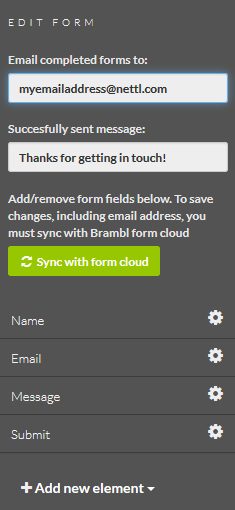
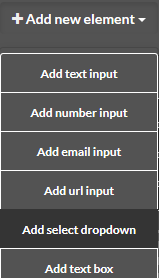
Then you can add any contact form element you like, whether it's a text box, a radio button or a dropdown menu.
To change the text displayed or field options, hit the Cog icon for the contact form element you want to adjust.
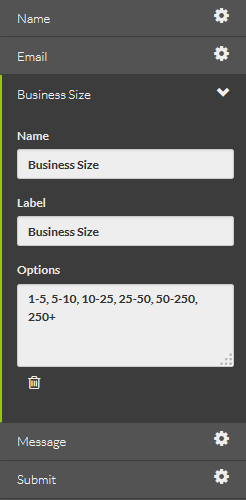
Add a label name and label, and read the options to see how to show ghost text or dropdown menu choices.
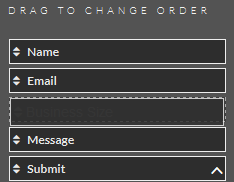
You can change the order of your contact form by scrolling down and using a drag and drop tool.
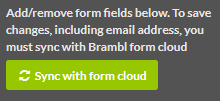
Any changes you make will show instantly on your contact us form, but you will need to sync with the form cloud when you're finished.
Warning: you will need to sync your contact form with the form cloud to save any changes you make.
The website app allows customers to log into their microsite to view or edit websites that have been created for them by Nettl studios.
The website app is turned off by default.
It is only available to V3 orderlink or branddemand sites, not printing.com or old branddemand sites.
To add it, head to .
Add every app you want on your microsite (see w3pedia article 5659)

The Orderlink app then links to a page where the customer can view all active websites created for them via Flyerlink.
Customers can view all the sites, but you can also provide an edit website link by adjusting their User Permissions.
To turn on the edit site link, head to .
In the User Permission section, change the Allow customers to edit switch to Yes.
For Wordpress, WooCommerce & Prestashop sites, this will create a edit website link that goes to the platform's back office. You will need to create a user for the customer within these platform.
However for Brambl there 3 types of editing options:
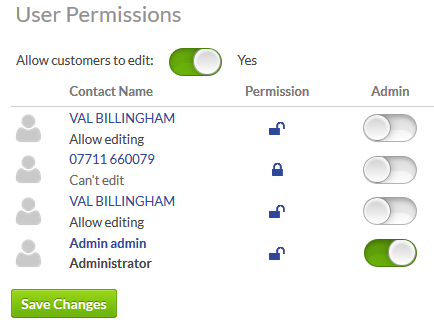
By default, customer contacts are given normal editing. This provides a striped down tool set when they open the Brambl editor. The contact can change Content, but cannot change the Layout. They can adjust text, images, buttons and icons but can't add panels, widgets or pages. Please note, clients can still radically adjust the look of the site by just changing the Content.

If you turn the Admin switch on, the contact can open Brambl with the same editing priviledges as a Flyerlink user. This means they can change both the Content & the Layout.

If a contact is blocked, they do not see the edit site option.
SSL certificates should be used on any sites that are having data transfer, data capture or financial or personal information entered. SSL certificates also assist with SEO as google likes sites with them present as it makes them more trusted.
In order for a SSL to be set up for a Brambl sites the site has to be live.
1) Head to
Once the site is live, step 6 of the site status will change from:
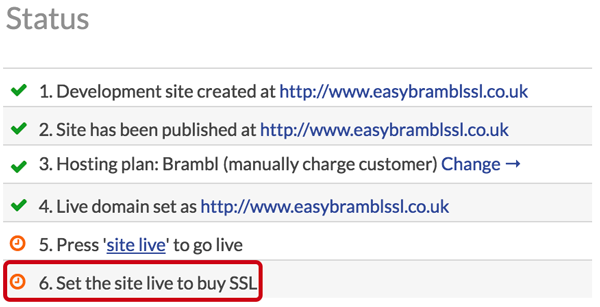
to
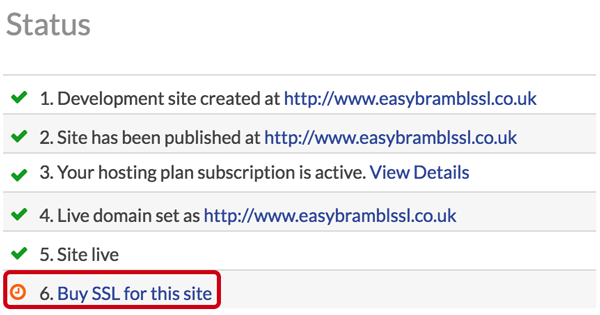
2) The link will direct to a subscription creation for a Brambl SSL Certificate:
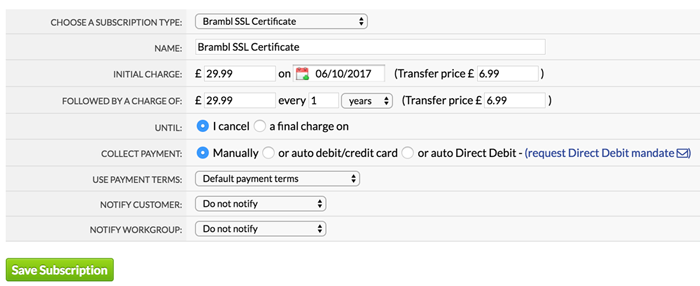
3) Save the subscription, this will store the subscription creator and linked website.
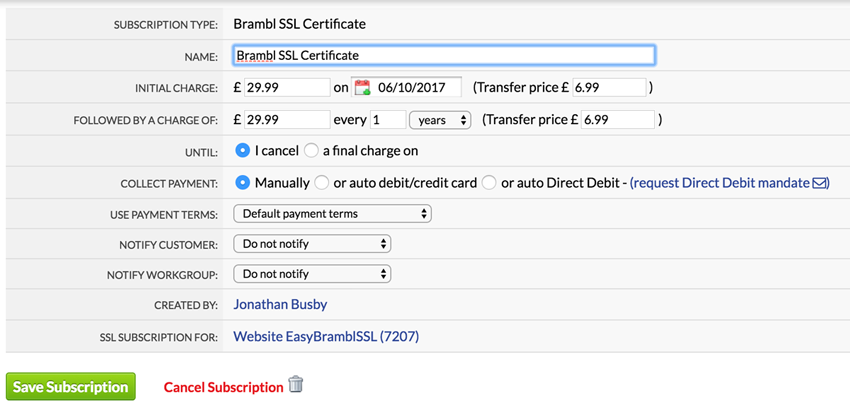
4) We'll get a job notification once the subscription processes. We will then complete the SSL installation for you.
This will normally be completed the next morning and the site will automatically start using SSL.