Support for

Nettl studios can build beautiful mobile websites, ecommerce web shops and interactive booking systems. From proposal, to project planning and deployment, find out how our systems make the process smarter.
Proposals
|
|||
Projects
|
|||
Fast Paths
|
|||
Brambl
|
|||
Launch
|
|||
Nuts and Bolts
|
|||
Nettl studios can build beautiful mobile websites, ecommerce web shops and interactive booking systems. From proposal, to project planning and deployment, find out how our systems make the process smarter.
Proposals are used to form an agreement with the client about what you will and won't do for them and decide the price. Proposals are designed for complex projects and are ideal for website builds.
The Proposal acts as both a quote and a contract:
It's a quote as it states the price for the project.
It's a contract when agreed by the client, as it states what work is necessary for each payment.
Please note: Proposals are only available to Nettl web studios.
If you would like to become a Nettl studio, please contact chris.lowe@nettl.com.
If you want to reuse the Section once you've edited it, click the green teal ( + ) button link on the left. This will then show an option to 'Then for future Proposals, in the Section Picker, you will see this saved section. Model Sections are used to provide reusable content for Proposals.
You can also make a new Model Section from scratch by heading to .
To read more about Model Sections, read through this full help article here:
➔ [ Full Model Sections help article ]
Types of Model Section:
When making a Proposal, you'll see two types of Model Sections:
.jpg)
You can click on the [+] Add icon to these sections onto your Proposal to copy the information over.
Have you found an existing Model Section that you want to edit, and save to re-use again in the future?
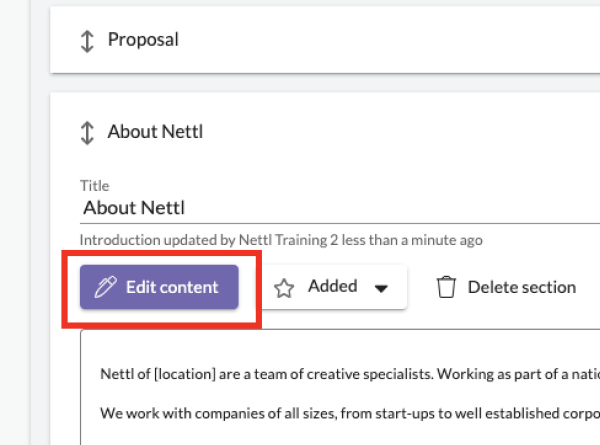
You can also make your own Model Section while writing a Proposal.
First, create your Proposal.
Then, add the Model Section you wish to edit and re-save as a new Model Section. In the image below, we are editing the 'About Nettl' section.
Click '[ Edit Content ]'
Edit the section with the content you require. Remember, as you type the system will save as you go along. No need to press Save.
The title you give the section is how it will be displayed in the Model Section library. If it's a new section we recommend you rename it.
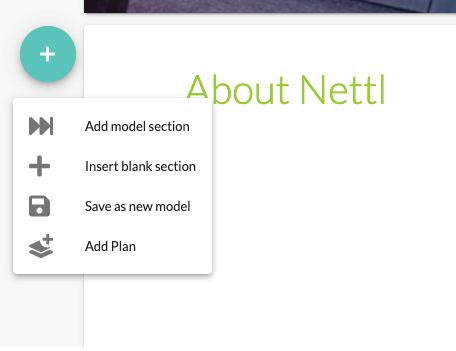
Once you've edited the section, click on the teal ( + ) icon in the top left of that section.
This will open a drop-down menu.
Click on 'Save as a new model'
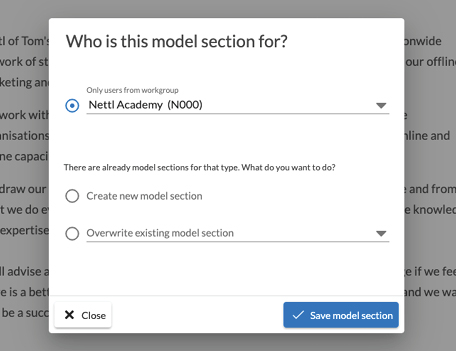
You can then choose who can access the Model Section. This is normally your studio/workgroup.
If you didn't rename the title of the section, the system will let you know that a Model Section with the same name already exists.
You can either:
Create a new Model section
OR
Overwrite an existing Model section - you would then choose from the dropdown list which one you wish to overwrite.
To make one of your own Model Sections and have your own wording when you're sending out a Proposal, head to the old-style menu, .
OR
Type into the main Flyerlink Search bar.
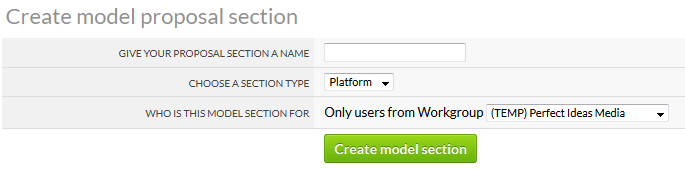
Create a new Section and choose what Type it belongs to.
Click on [ Create Model section ].
You will then be taken to the section editor screen where you can begin to put your content together.
Remember this page saves as you type.
This surgery covers how to use Flyerlink's project feature to help you manage complex projects such as website builds.
Project is especially useful if you have multiple people working on a project to give clarity over who is doing what and to mark off work when done.
It's a way to record work done and important information you may want to refer back to, such as login details and can store excel sheets of old data.
Surgery shows how to use project and project milestones for billing.
You may also like the proposal surgery here
Any questions please post to the geek channel:
Fast Paths provide proven steps, like a recipe, to help you quickly create beautiful websites. They are projects created by Nettl Geeks, usually based on websites created for real customers to help them with a specific need.
These paths then inform how websites are pitched to clients. If you know it's possible and relatively straightforward to build a site with a booking system, for example, you can be more confident in pitching a nettl :connect solution.
To find a fast path, head to .
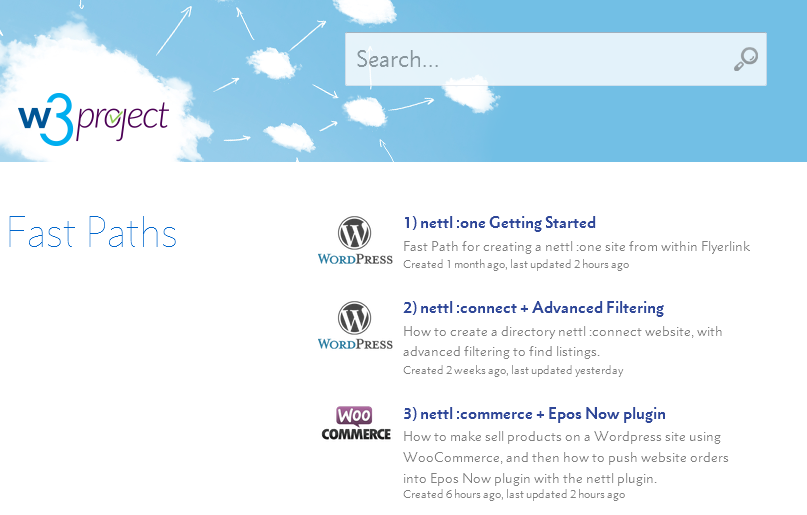
You'll see a list of all the Fast Paths currently available, and can search for more. The list will explain what the Fast Path is about, click any of them to view the tasks and
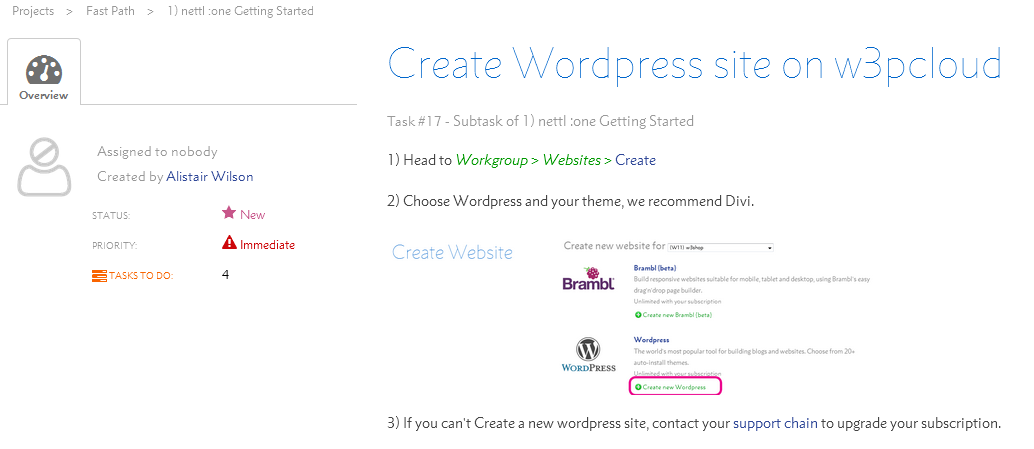
Once you click on a fast path, you'll see a list of the essential tasks to complete.
.png)
Click any task to find out more information. You'll get a description of what is required, and steps to follow.
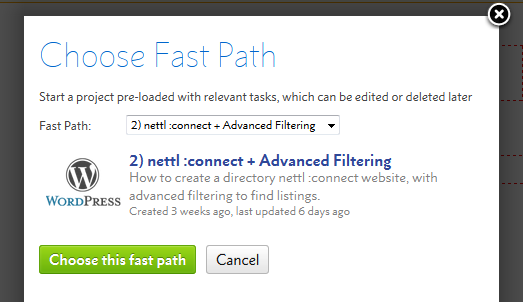
The best thing about a Fast Path, is you can choose one to start off a new project rather than re-writing the first steps for every website you create.
When you create a new project, you can either start from scratch or click "Choose Fast Path".
 |
This will show you a list of fast paths you can take all the tasks and related tasks from.
 |
Once you've created a project from a Fast Path, you can assign tasks to different members of your team. You can close tasks you don't need or edit the description to be more concise or to add extra information.
Fast Path tasks will likely be more detailed than the your average task assigned by a project member.
You can also Take a Fast Path when you're reading one from .
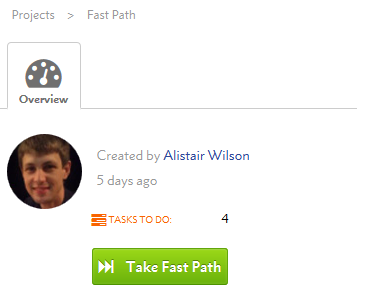 |
Simply press Take Fast Path, choose the customer your next project is for and you'll have a whole new Fast Path project you can use and adjust for your next website project.
To build a new Brambl website, simply head to in Flyerlink.
Choose Brambl, and pick your theme.
Your site will be created and hosted on w3pcloud in a few minutes.
Your theme is important. Each theme comes with a limited amount of Panels. The more Panels your theme has, the more design choices you have in your site. Brave & Velocity are the most flexible themes.
Once your site is built you've two options, Edit your site or Publish changes.
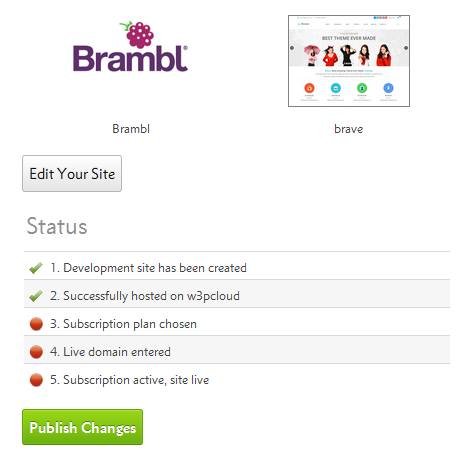
There are two versions of your Brambl site, the last saved version and published version. The Brambl Editor will always show the last saved version, but you will need to press Publish Changes before this version replaces your live site. This allows you to return to the editor and adjust a working version before publishing it live.
Press Edit your site to open the Brambl editor.

The toolbar across the top helps you make changes to the site, page or layout. You can use the Toolbar to:
The first three toolbar options let you change the page your editing, create new pages and delete pages.

You can then switch page with the Page dropdown menu.
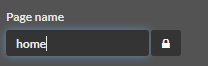
The page name can be changed via from within Brambl.
Each page can have it's own combination of Panels & Blocks with unique personalised content.
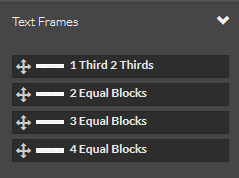
Brambl splits your pages into Panels and Blocks.
The Panels are rows that stretch across a desktop and can contain multiple Blocks.

Each Block holds content that can be edited either using our text editor or specially designed controls which you'll see for Buttons, Links, Images, Slideshows, and Widgets.
Different themes have different Panels, however all themes have Global Panels, such as Text Frames of different column widths
To edit any of your site's page content, simply double click the content you want to adjust.
Double click text, and you'll see a text editor appear on the right hand side.
The right hand side bar provides the standard text editing tools you'll be used to like applying Bold, Italics, Underlining, changing the Alignment. It is also possible to adjust the leading, line space and font width.
You can add images, icons, buttons and anchor points.
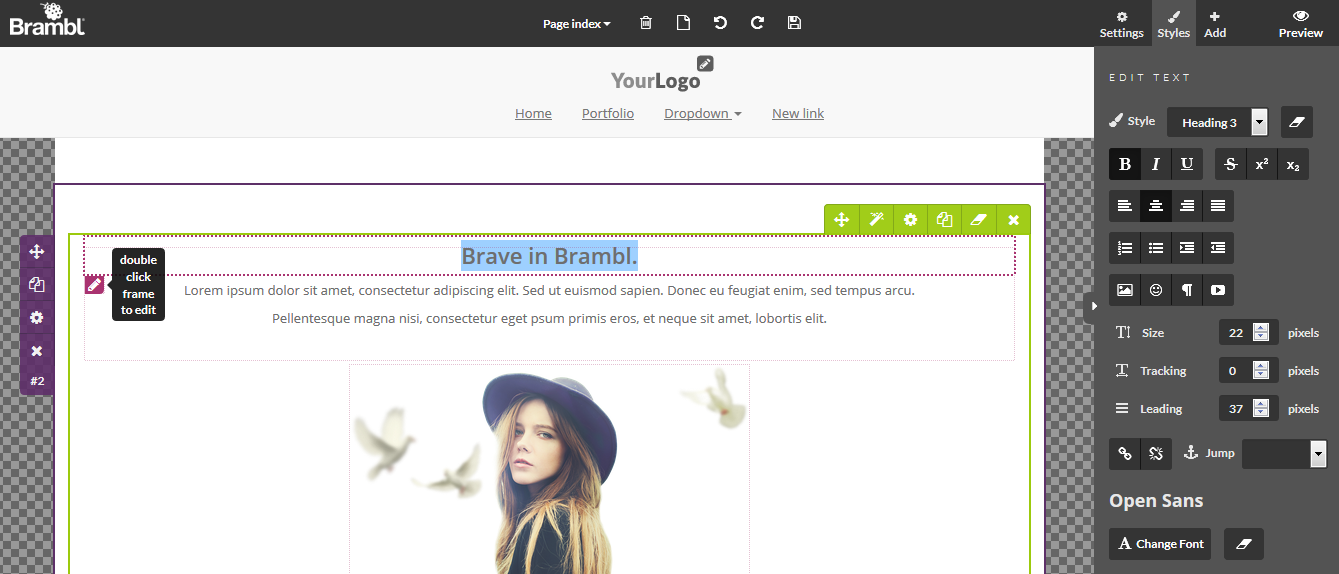
Finally you can adjust the font, font colour and background colour.
Any changes made to specific paragraphs will override the Site wide styles you set up via the Settings tab.
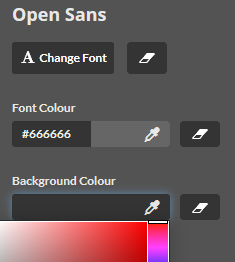
Double click an image and you'll see the image editor on the right hand side.
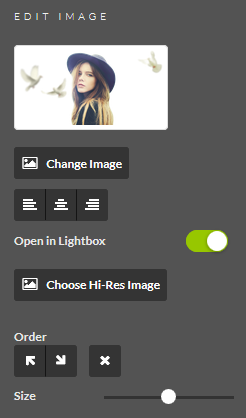
Here you can change the:
Press the X icon to delete the image
You can also either make the image open a lightbox when clicked...
or link to another page.
If you choose the lightbox, you can upload an alternative Hi-Res Image that is opened when the lightbox loads. This means you can have an image saved for web when viewing the site normally, and a higher quality image for when a user clicks to see it.
To add an icon, click on the text and then use the icon option. You can then edit any icon by double clicking it
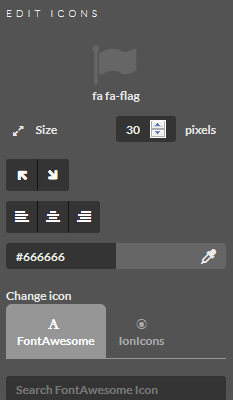
You can change the icon Size, Alignment and Colour
Brambl allows you to choose any icon from the FontAwesome & Ionicons libraries, simply choose which you want and find the best one for your clients requirements.
Double click any button to open the button right side bar.
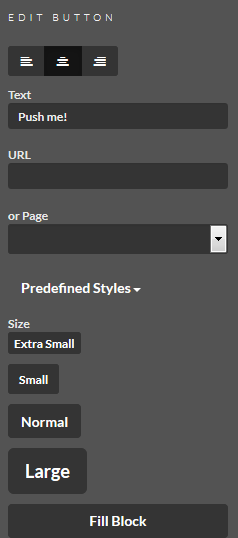
Here you can change the text displayed, the url location or Brambl Page
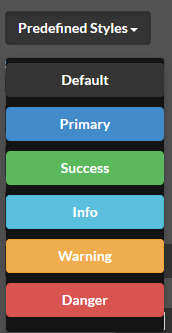
You can choose a set of predefined colours and sizes...
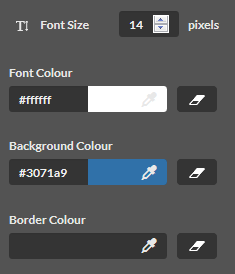
Or scroll down and choose your own size, text and background colour.
 Remember to save: Once you're happy with your changes you need to Save and Publish Changes before the edited version replaces your live site.
While your website is being created, we make a development domain such as http://yoursite.uk.w3pcloud.com.
This provides an area you can work on the site, without affecting the existing live domain.
When the website is ready to go live, you need to do 5 things:
1) Add your domain aliases in Flyerlink;
2) Change the live domain's DNS settings;
3) Choose your hosting subscription;
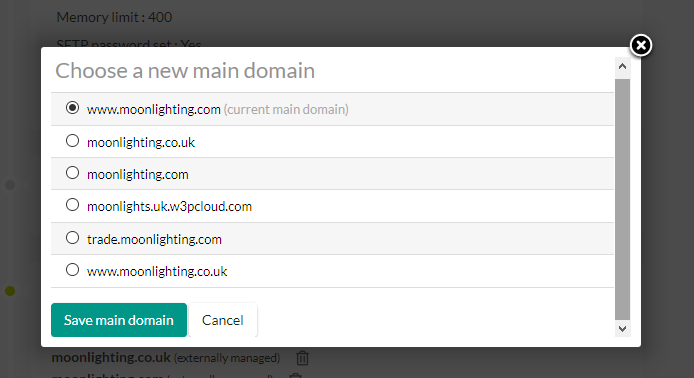
4) Change your main domain in Flyerlink;
5) Set website live.
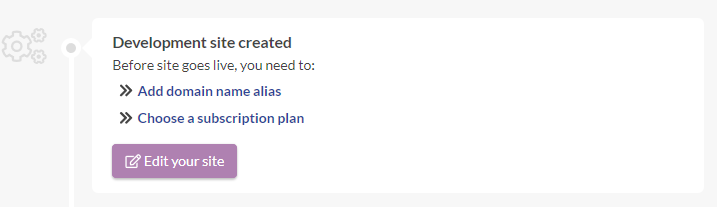
You'll see easy action links to do the necessary steps in the top section of your Website View/Amend page
Head to
Choose your website
Scroll to the Set a main domain section and press Add domain alias
Add both the version of your domain with and without www
Eg www.yournewdomain.com and yournewdomain.com
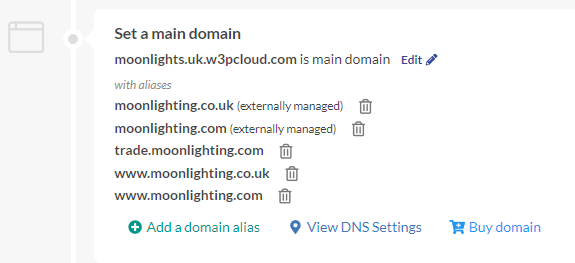
Press "Edit" and change the main domain to the one you'll be using
Choose "View DNS Settings"

This will tell you the DNS changes you will need to make at the domain's current registrar. Keep a record of this, and progress to the next step.
Please note any domain aliases will redirect to the main domain provided they are added in Flyerlink and given the correct DNS settings.
EG in the example above, moonlighting.co.uk will redirect to www.moonlighting.com.
Before your website can go live, the DNS settings on the live domain need to change for the domain to know to take information from your development site.
What we want is to add 2 Custom DNS Settings:
1) CNAME pointing to your current development site (your-site-id.uk.w3pcloud.com)
2) A record pointing to an IP address for the non-www.
Retrieve this from the View DNS Settings link in Flyerlink for your website's page.
Please note: the IP address will change on each site.
Log into your domain Registrar, the look and feel will change on each. This example is from 123-reg.
A) Head to Manage your domain with Advanced DNS settings
B) You should have 3 entries:
- 1 of "@" or " " for the A (or apex) record for your site's IP address; and
- 1 of either "www" or "*" for the CNAME, pointing at our system at your default created development url of your-site-id.uk.w3pcloud.com.
- 1 of "@" for a TXT record to act as an SPF record
This authorises the website to send emails on behalf of your site.
For more details on the SPF record see Email delivery best practice
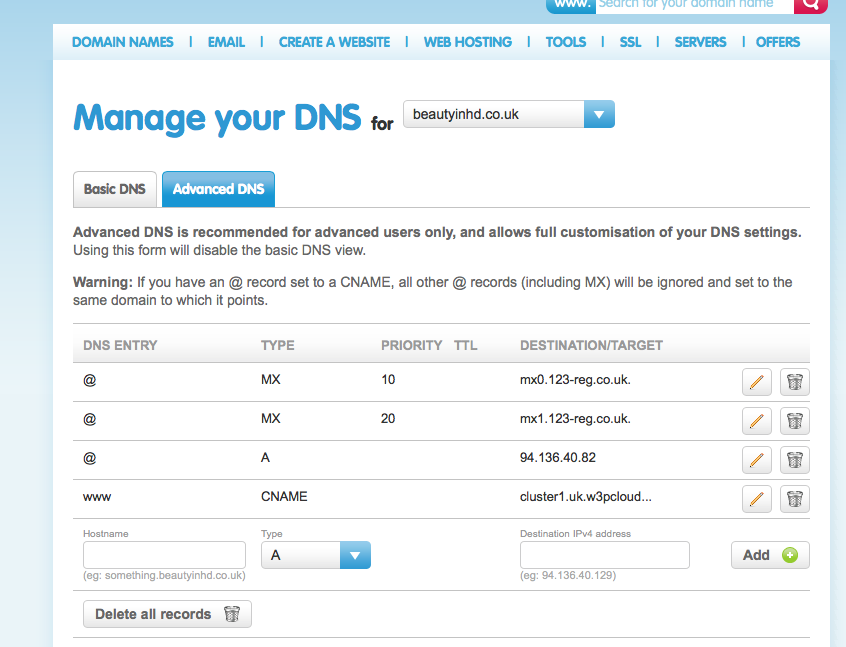
Delete any previous A, AAAA, or CNAME records starting with "@", " ", "www", or "*"
Do not change any other records including the MX or TXT records.
MX records are used for emails.
TXT records can also be used to provide third parties services to your customers, such as webmaster tools.
Do not change the Nameservers.
Contact your support chain if you are having trouble with the DNS settings
Head back to
Choose a subscription plan for your client n the Hosting plan section

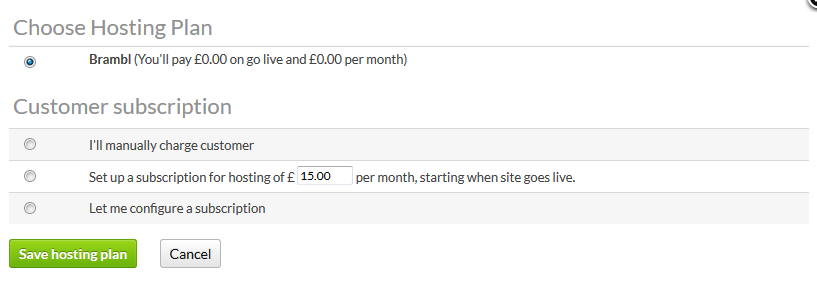
This lets you choose how much the client should be charged for hosting.
If you haven't already on
Then press the Edit link next to your domain to choose a new Main Domain.
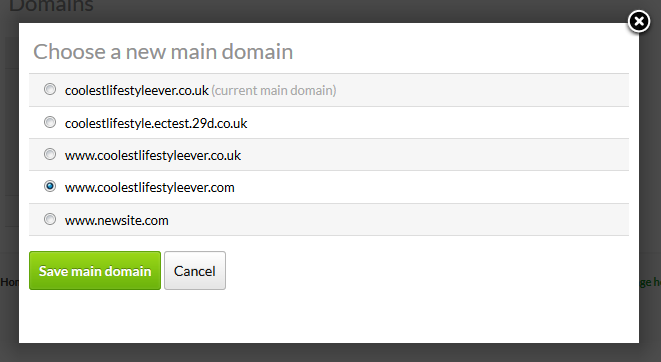
Please note: The Main Domain must either start with "www" or another sub-domain, it can't start as "yournewdomain.com" or you can have redirection issues.
Also note: The site will have a redirection issue if the DNS settings for your main domain haven't been set or propagated yet.
Change the Status from Development to Live.
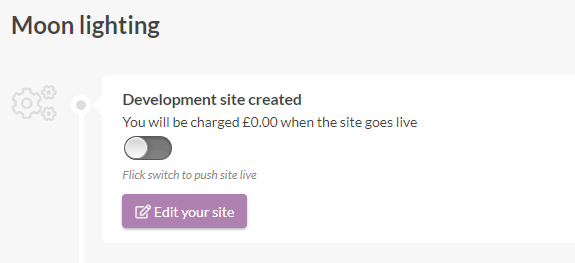
This will remove the "Just around the corner" page.
The DNS changes for Brambl sites are the same as other sites hosted on w3pcloud. However, brambl development sites are all hosted on .uk.brambl.com.
You will need to change the CNAME for your "www" record to your brambl development site your-site-id.uk.brambl.com (instead of your-site-id.uk.w3pcloud.com)
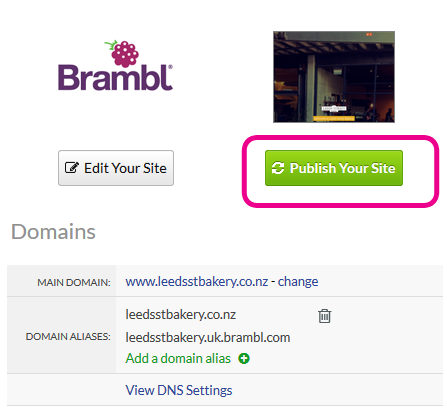
You also need to press Publish Your Site when the live domain has been chosen.
If the site being created is for a subdomain, like http://nettlsite.yourdomain.com instead of http://www.yourdomain.com, all you need to do is create:
CNAME for the subdomain (eg "nettlsite") that points to your-site-id.uk.w3pcloud.com
You will also need to add the subdomain to your of domain aliases in Flyerlink.
Your "View DNS settings" popup will explain the CNAME setting.
It can take upto 48 hours for your DNS settings to populate ( see why ).
Usually it takes less time than this.
You may need to refresh your browser cache to see the new domain if you've visited it recently.
Never change the nameservers.
Nameservers are what actually control the DNS settings.
Some domains use a nameserver hosted outside their control panel.
If this happens, you'll either need access to the website that is used to control these external nameserver or need to explain the changes required to someone with access to it.
You could swap if you know and copy all the A records, CNAME, MX and TXT settings from the existing one to your new default.
However, it is possible something will be missed and the website or emails could go down.
It's safer to re-configure the existing nameserver than to switch where possible.
If you do need to switch, try to find out all the old settings, especially the MX records first.
Check your website after you've changed the Main Domain in Flyerlink, if it's not updated yet:
1) Be patient.
It takes about minute or 2 after the status is changed from Development to Live, and after a new Main Domain is chosen for the change to take affect.
2) Double check the domain's DNS settings
If you still see a "Houston we have a problem" or redirection error message for the website after 10 minutes, double check the DNS settings.
You can check a website's DNS settings on http://network-tools.com/.
Changing DNS settings shouldn't take long, but changing a NameServer can take upto 48 hours and Transfering a domain from one registrar to another can take around 5 working days.
Web forwarding was used before the ability to set a site live within Flyerlink. Now we can use an IP address specific to the domain, which you can find by adding domains to Flyerlink.
DNS settings are used for a website and for emails.
When putting a site live all we want to do is update the website details - normally we can do this and leave the existing email set up as it is.
The DNS and emails shouldn't conflict.
You can remove any "www", "@", "*" or " " A record or CNAME and leave the emails.
Make sure to leave any TXT or MX records and emails should be fine.
The time emails become a problem is if:
1) A DNS control panel & email is hosted on the old domain itself
2) Nameservers are changed
3) The domain is transferred
We recommend not to transfer domains (see https://www.flyerlink.com/wm_project_task_va.php?id=2388#Overview)
For nameservers only change them if you really need to.
If you change a nameserver make sure you know how emails are currently set up, and then make sure you can replicate that after the nameservers are changed.
Emails are set up in one of 3 ways:
1) Email forwarding (that's possible with domains in Flyerlink see - https://www.flyerlink.com/res_art/email-forwarding-for-domains-in-flyerlink)
This would be lost when changing a nameserver or transfering a domain, but could be added back normally easily enough
2) Webmail from a DNS provider - this is linked to nameservers and not linked to MX records
Changing a nameserver would break this
3) Using MX records - we use this if we're providing emails for nettl and recommend gmail - see https://www.flyerlink.com/wm_project_va.php?id=43
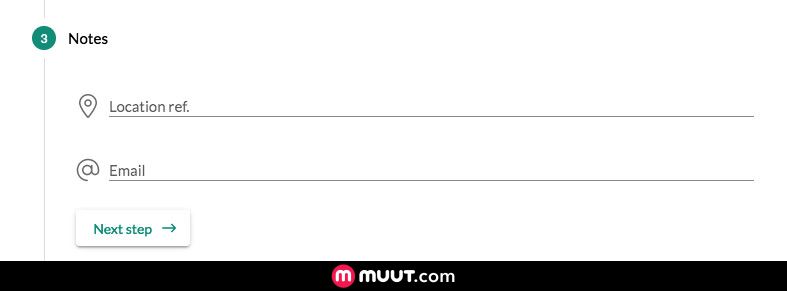
Setting up Subscriptions allows you to automatically create recurring jobs within a frequency of days, weeks, months or years.
This can be used for services you provide a client, such as marketing retainers, monthly training services or access to a service you provide.
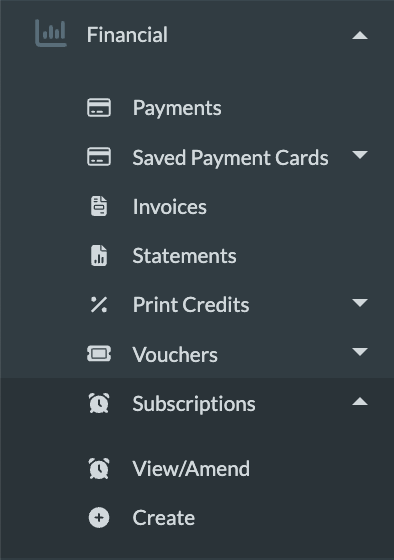
To create a new Subscription, choose your customer and go to
.png)
.
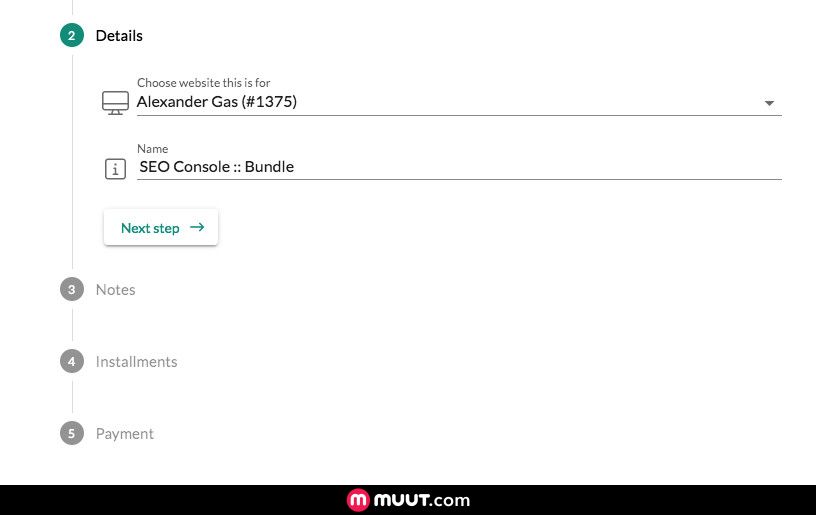
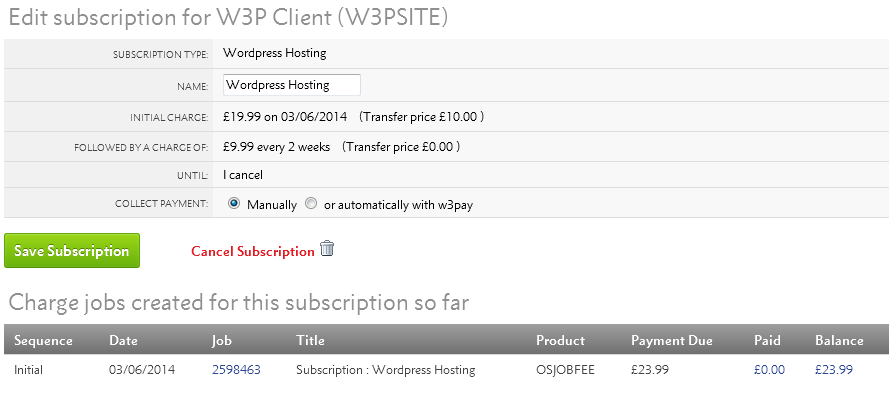
On step 1, choose a subscription plan:
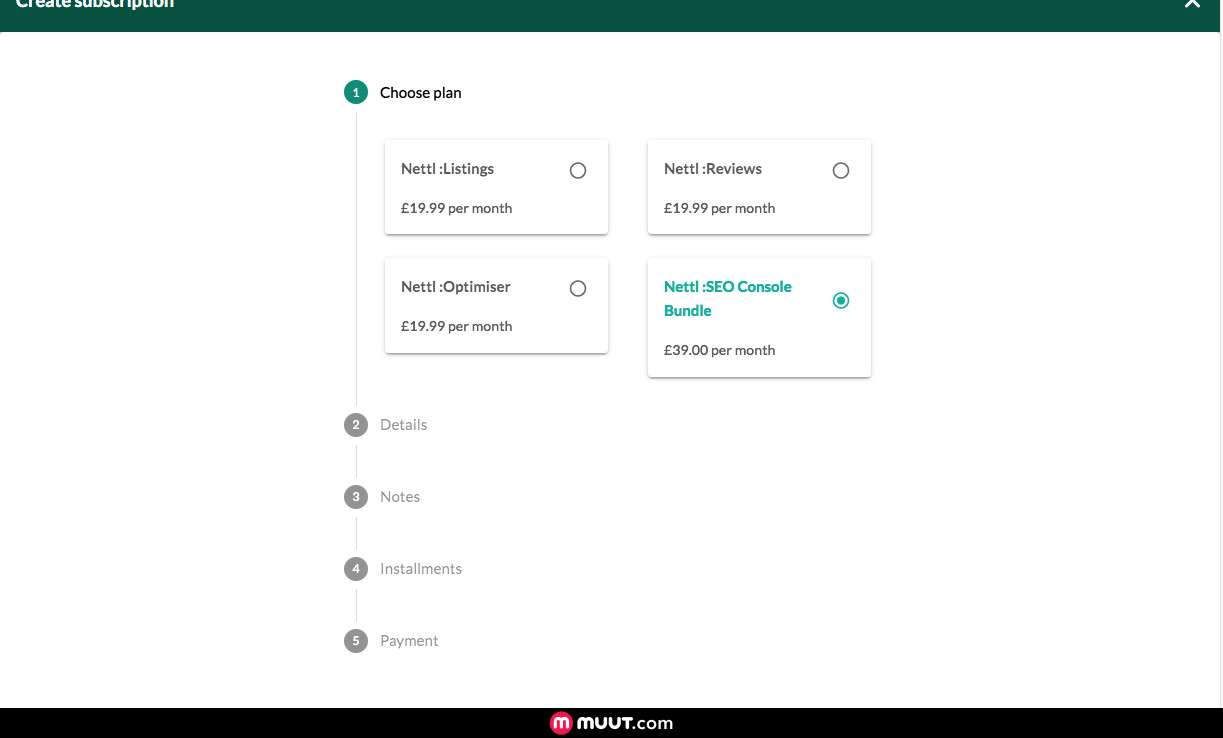
Depending on the subscription type, there may be some other options to enter:
Each subscription type includes different default values, including:
The subscription type also have default transfer prices, these are used if you're providing a service from Grafenia, such as website hosting or a new website.
You can keep a subscription running until it's cancelled.
Or you can set up a final charge in advance.

If you have w3pay set up and customer consent, you can automatically collect payments through w3pay.
Simply choose to collect payment automatically with w3pay, then choose your customer's saved card.
You can collect payments manually, by direct debit or credit card:
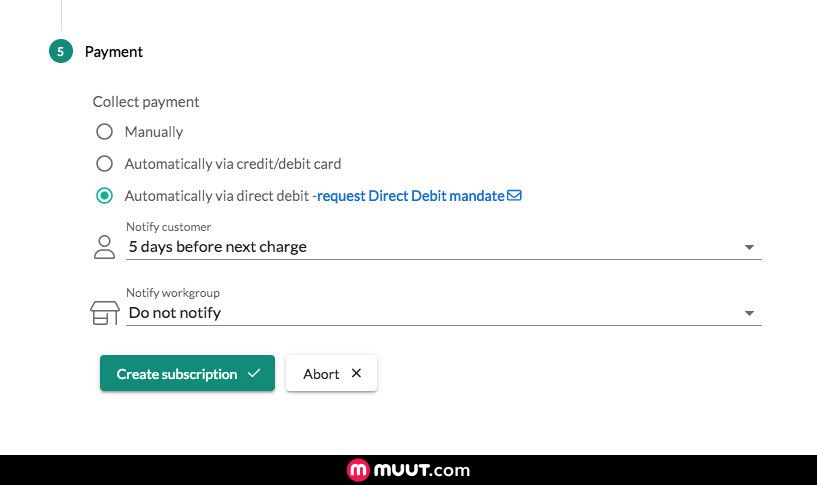
If your subscription invoices need to be VAT zero-rated, you can use the Subscription (Without VAT) subscription choice.
Flexible product support
Subscriptions support flexible products
This means you will see some subscriptions with an extra option of adding the product name and specification
The product name is the name of the service you are using
The specification is a detailed description of the service provided that shows up in customer invoices.
Once this is done, newly created subscription jobs will charge your customer's card automatically.
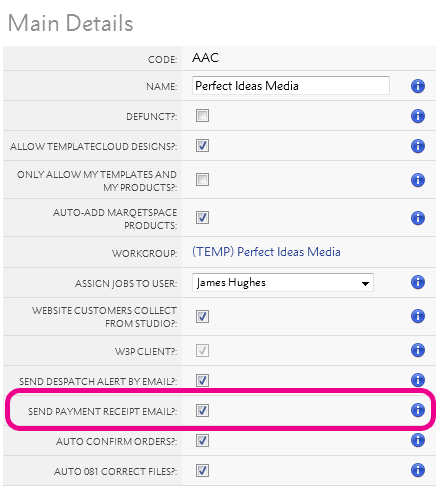
Your customer will be sent an email saying the payment took place unless you turn off sending payment receipts to an individual customer on or a whole microsite via .
You can choose when creating a subscription if you'd like to pre-warn yourself or your customer about an impending charge.
Simply choose the day before the subscription that you'd like to receive the notification
The email sent to yourself or your workgroup will say how much the initial charge and ongoing charge is
It will also tell the client or yourself whether the payment collection is manual or automated. If manual customers will be asked to pay via their online dashboard once the charge is raised.
Once a subscription has been created, a new subscription job is generated at every frequency interval you choose. You'll be sent a News Feed notification to update you on new subscription jobs:
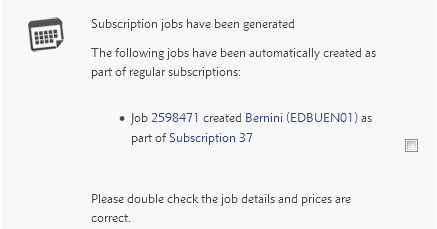
These will be changed to status 081 automatically, and your customer will be invoiced shortly after its creation.
View all subscriptions allocated to a customer on .
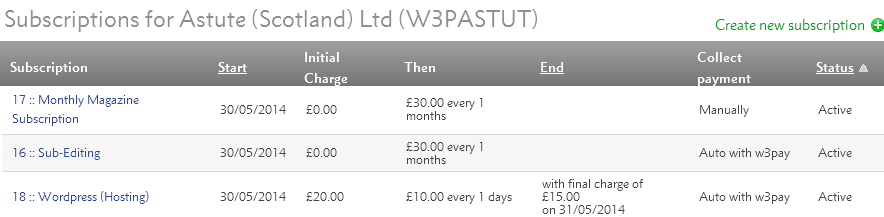
You can click on each subscription to:
You will need to manually cancel any subscriptions that need to be removed. If you cancel a website job or make a website record defunct any subscriptions associated with it will also need to be cancelled.
Customers can manage the payment of subscriptions you set up in Flyerlink in their online account area
If they head to their online account area and choose settings
They are able to set up a direct debit, or save and amend their saved card for use on the subscriptions. The option for card will only show if you have stripe, and direct debit options are hidden if you do not have GoCardless set up.
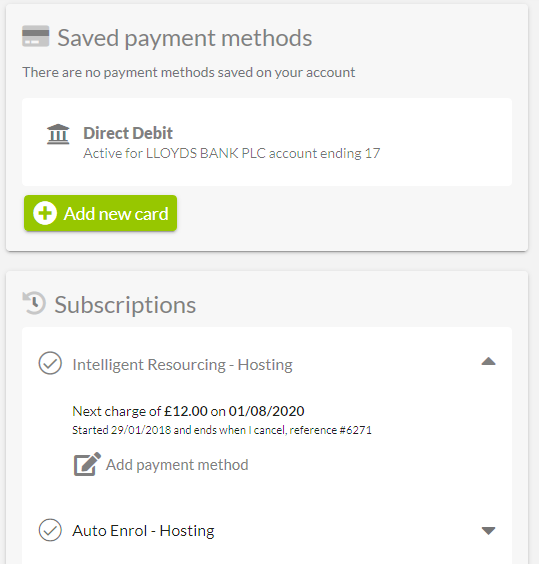
They can choose which payment method to be active on their subscriptions, whether direct debit or card.
If there are any subscriptions with an outstanding balance we show a note so they can make a one-off card payment