Support for

The following articles cover Building Products, Processing Orders and dealing with Quality Concerns.
The following articles cover Building Products, Processing Orders and dealing with Quality Concerns.
Any queries regarding product spec, pricing, artwork or invoices received should be raised to:
Email support@nettl.com (previously makercommand@nettl.com)
Phone 07968 510 666
Please have the job or invoice number to hand for the team to be able to assist.
The artwork file isn't suitable for print, what do I do?
Artwork sent to you should be print ready, if it's not then you can reject the artwork and ask the partner to resupply via your Production Dashboard in Flyerlink. The more detailed your file supply details are the more likely you are to receive print-ready files. Speak to us if you think we need to be included more details in the Design Notes for your products.
I have a question about the artwork, should I email the main contact on the job?
No, you should never contact Nettl or printing.com partners directly. This is a breach of the agreement. Please email support@nettl.com or call 07968 510 666 to speak to the Product Support team who will be able to assist.
How do I process orders?
You can download everything you need to start producing the order from the job maker pack contained in the Action Required email. See our guide on How to use the Production Dashboard.
How do I get paid for jobs?
We self-bill you for goods purchased from you at an agreed price. Therefore, there is no need for you to provide us with invoices or statements from yourselves. These invoices and prices are what are to be paid as agreed when products are created.
I've received an order but the price is incorrect as I have had to increase prices, can I reject the order?
We expect you to honour all prices agreed. All price changes must be agreed in writing and in advance. It is your responsibility to contact us to discuss this. Price increases cannot be applied retrospectively. If you need to increase prices, email support@nettl.com or call 07968 510 666 to discuss.
Help, I can't complete an order within the agreed turnaround!
Let us know as soon as possible before starting production so that we can discuss a resolution with the partner. If the order is already in production and the expected turnaround time has been exceeded then you shall ensure the Job in question is, when completed, despatched on a same-day delivery service at your own cost.
I have an idea for a product that I can sell to the network
Great! If you've got a product that you think can fill a gap in our range, send the spec details and pricing to support@nettl.com to discuss.
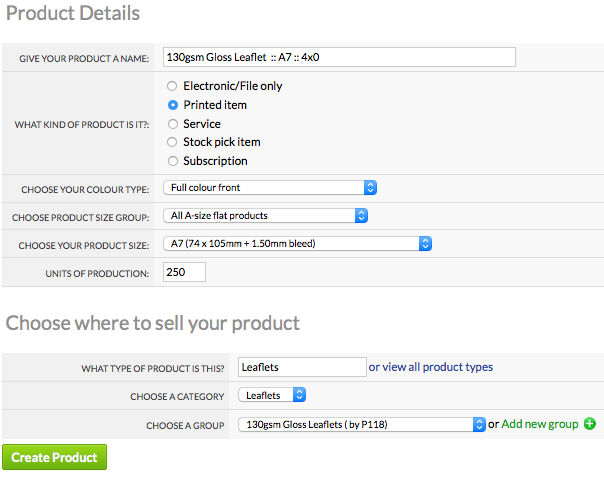
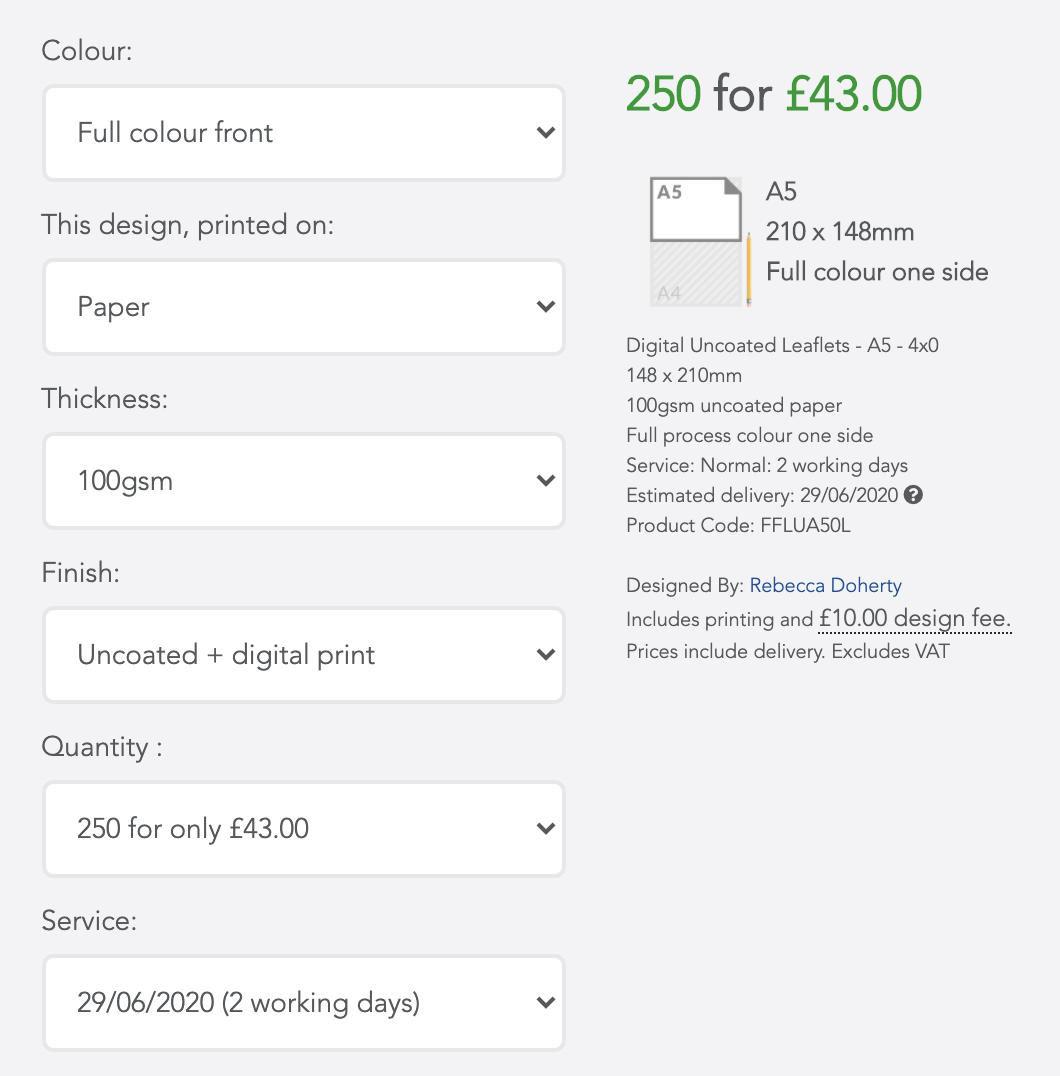
A quick guide to creating Products and Product Groups.
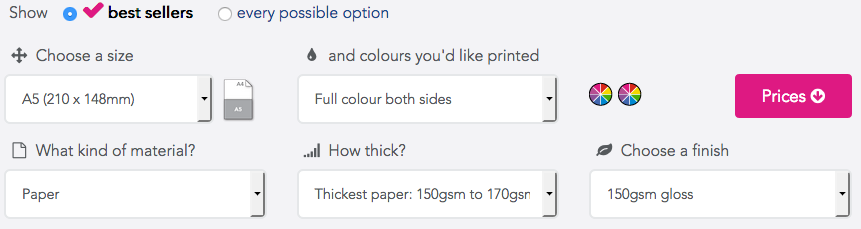
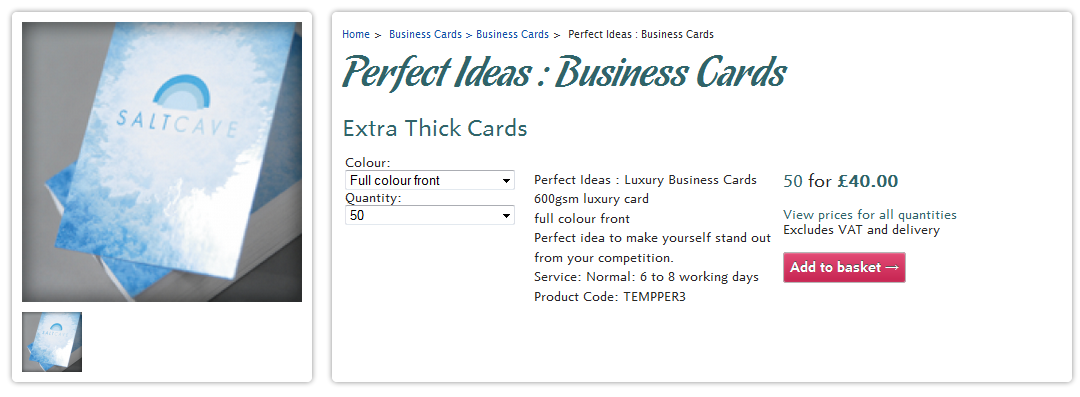
To create a New Product go to . Then enter your Product Details.
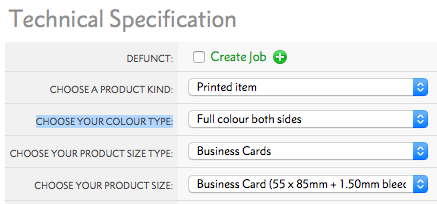
You'll need to give it a name, choose your product kind (see below), size and colour type.
Sizes are broken down into groups, with all A sizes like A4 and A5 in a group of all A-size flat products. If you can't find the right size for you, choose other sizes then custom size to enter your own size. You can also allow customers to choose their own size using an any size product.
The colour choice decides how many pages are available for the file and what colours should be expected, more details on colours can be found here.
Product Groups group together similar products, such as A4, A5 and A6 130gsm Gloss Leaflets.
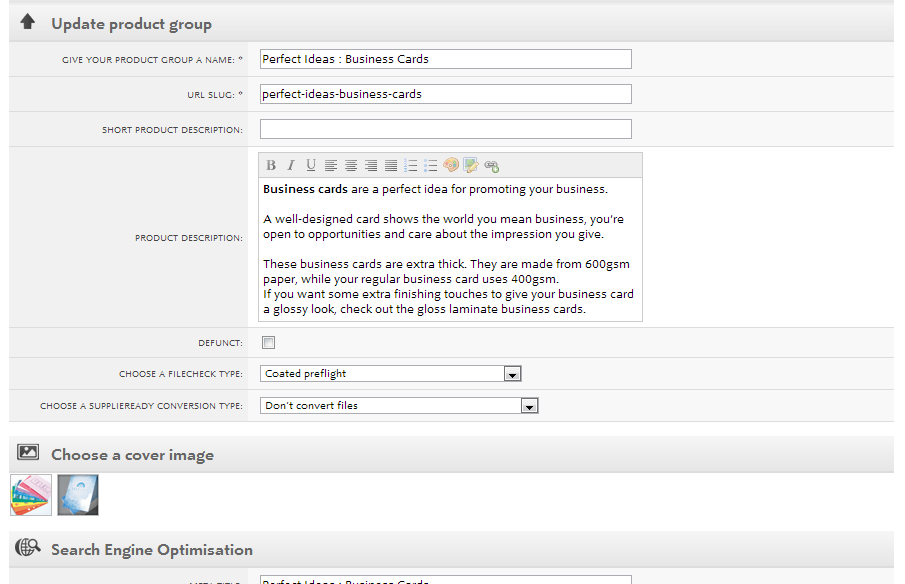
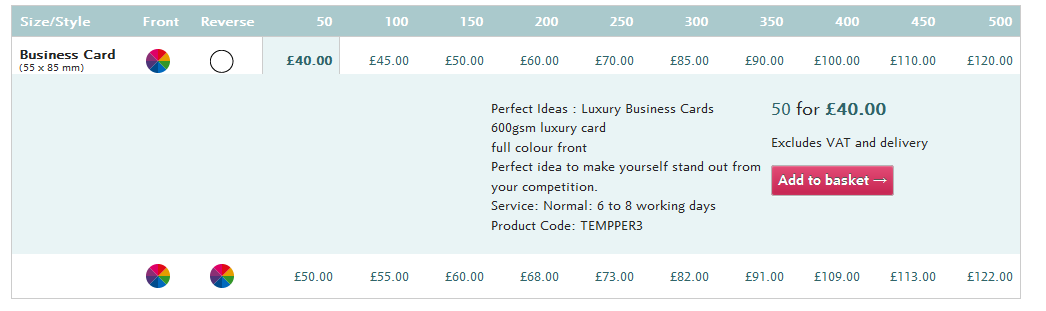
This is an example of a Business card Product Group:
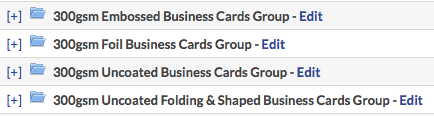
We recommend naming the products within a group consistently to help both you and your customers.
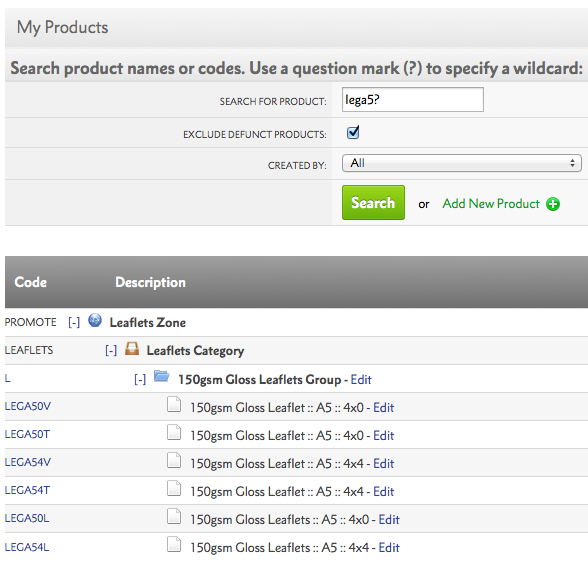
This example is of a list of Products contained within a Leaflet Product Group (Notice Products are listed by Size and Colour Type):
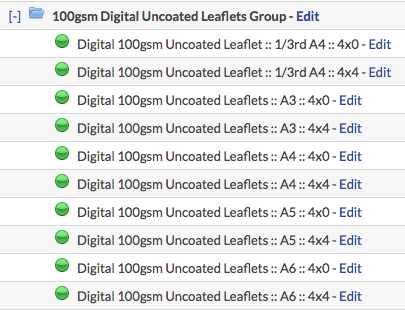
The quickest way to create your products is to create a single sided product first using the Full Colour Front Colour Type, then select Duplicate Product under Sorting & searching to create a double sided version (Identified by 4x4 in the above example).
Use Duplicate for all additional sizes and adjust your prices accordingly.
Remember to also change the Product Name, Colour Type and Product Size (under Technical Specification) for each new product you create/duplicate.
Each product you create has a product kind.
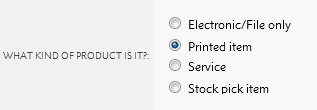
You have 5 types to choose from each with different features.
| Product Kind | Explanation |
| Printed item |
The product makes a physical printed good. |
| Electronic file | The product makes an electronic item, like a press advert or graphic design. Doesn't make a physical item, but requires a graphic file. |
| Stock pick item | The product has been pre-produced, for you to pick and pack to your customers. Physical item that doesn't need a graphic file. Uses the Stock Manager to control stock levels. |
| Service | The product is a service, like consultancy or training. It's not a physical item and doesn't require a graphic file. Can be used for Flyerlink's invoicing and TimeTracking features. |
Product Group pages display products by Size and Colour Type.
If two Products share the same Size and Colour Type, Leaflets and Flyers for example. Product tags must be used to display them correctly online.
You can view your Products Tags here:
Product Tag Order:
Your product will not show online if the purple Substrate Tag is missing.
Each tag takes the customer down a different route to find the product they are after and should be unique.
Click here to view this page live.
A5 Leaflet Products Tags
Substrate > Substrate Weight > Product Style
Paper > Thickest Paper > 150gsm Gloss
Paper > Thickest Paper > 170gsm Silk
A5 Flyer Products Tags
Substrate > Substrate Weight > Product Style
Card > Medium Weight Card > 280gsm Gloss
Card > Medium Weight Card > 280gsm Silk
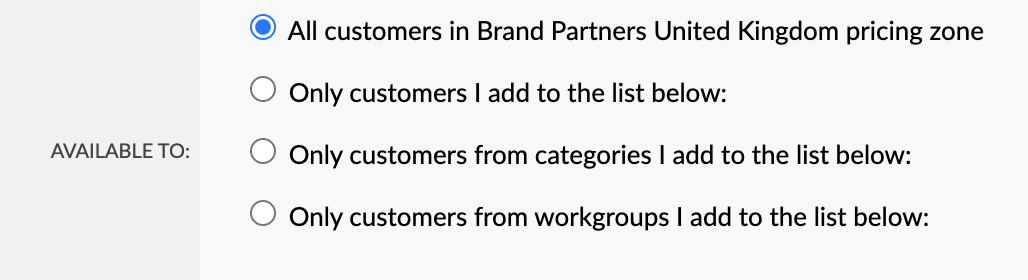
Please select "All customers in Brand Partners United Kingdom pricing zone" from the top of the list.
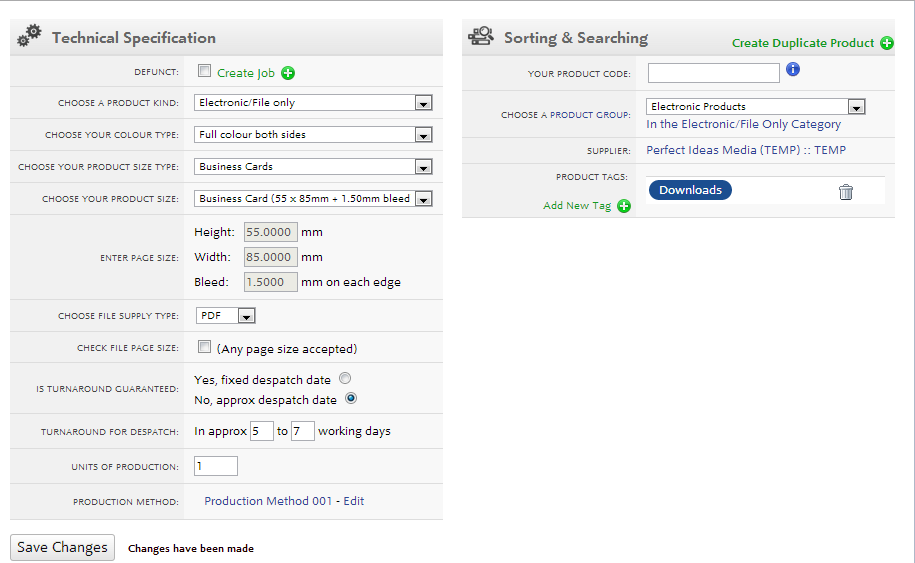
Once completed ensure you select the green ‘Make Product Active’ button, products that say ‘building' next to the product name and product code are not active.
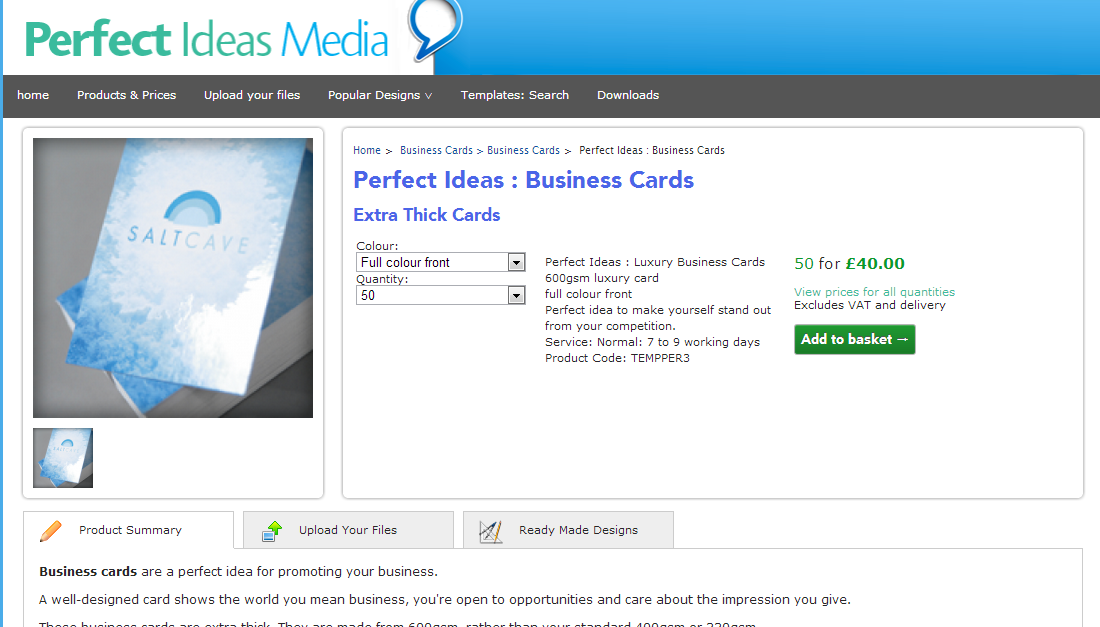
This screenshot gives you a sense of how these products appear under once completed.
This article gives advice for making the most of Product Groups.
Each product you create will belong to a Product Group.
Flyerlink will help you select a Product Group, by only showing existing groups for the type of product you select.
If you choose "Mini Brochure" you'll only see Folded Leaflet Product Groups.

Product Groups are used to group together similar types of products.
We recommend naming Product Groups after the Substrate Weight (130gsm), Paper Stock (Gloss) and Product Type (Leaflets).
You can then name products within a group consistently to help both you and your customers
For example:
| 130gsm Gloss Leaflet :: A5 :: 4x0 |
| 130gsm Gloss Leaflet :: A5 :: 4x4 |
On you have various options for how you describe your product groups.
You can choose a product group url-slugs, add a description and provide some google-friendly meta titles and meta descriptions.
The url-slug generates a new product group page for your products.
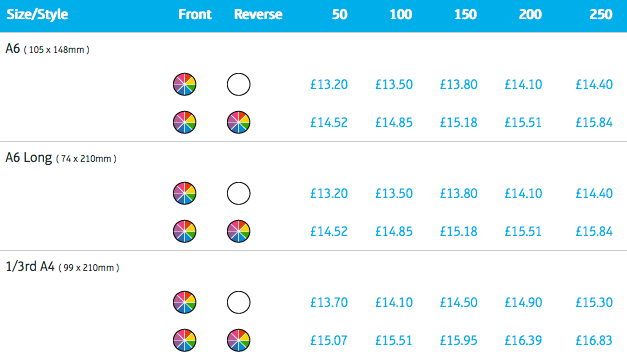
The price grid is automatically constructed using the product prices.
Each row shows the product size and colour type.
The Quick Quote uses tags (see Resource Article 4977) to help users find what they're looking for.
The images also come from those you upload to your products.
Finally, the Product Description comes from your product group description.

This article explains how Product Tags work to filter your products online.
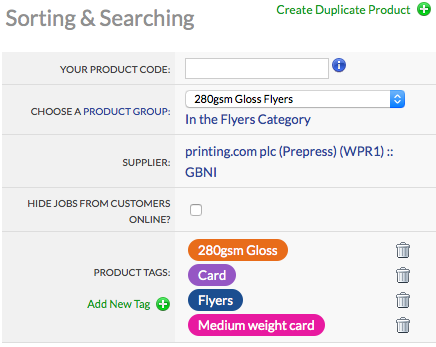
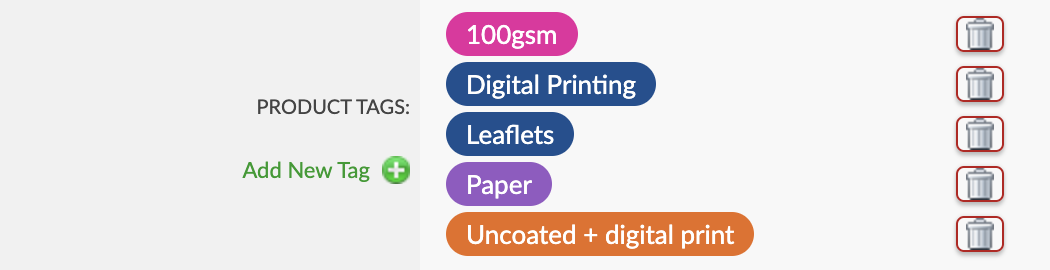
When you make products via , you may have noticed a Sorting & Searching Section.
The highlight of this section is the ability to add Product Tags. These help users distinguish between your different product options.
Please note: You need to add Substrate, Substrate Weight and Product Style to show on product group pages and the configure your printing page.
Best practice is to add 1:
(Blue) Product Tag,
(Purple) Substrate Tag,
(Pink) Substrate Weight Tag, and
(Orange) Product Style Tag.
These provide different choices for users on the Quick Quote tool.
You can add as many Product Type Tags and Product Options Tags as you want. But only 1 of each of the other types.
Provided there is at least one difference in the tags, the Quick Quote will be able to tell the two products apart.
There is a hierarchy to tags. The Quick Quote looks up Substrate tags first for the Printed on dropown menu. The Thickness dropdown uses Substrate Weight tags and the Finish uses Product Style tags.
You cannot skip tags.
Adding a Product Style tag without a Substrate tag will confuse the quick quote.
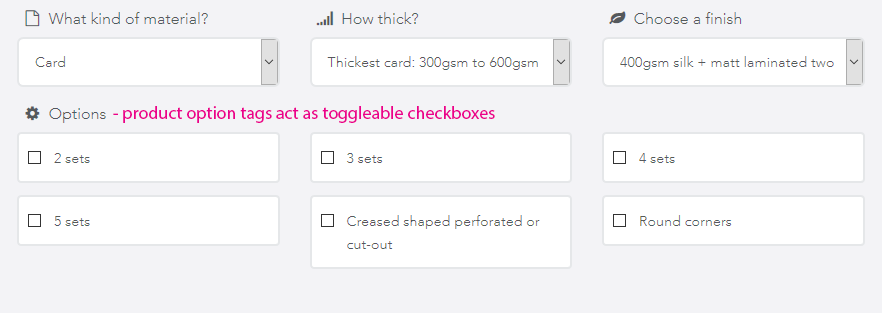
(Grey) Product Option Tag
Each Product Options Tag is visible as a tickbox on the Configure your printing page.
The idea is that Product Options can be toggled on and off
For this to work you will need
1 product with a Substrate, Substrate Weight, Product Style AND Product Option tag
And another product with the same details, the same Substrate, Substrate Weight, Product Style tags BUT NO Product Option tag.
 Try to avoid Product Option tags, as they can be difficult to remove for users.
You can use Product Style instead with as much information in to distinguish between products as possible.
Use the product stock as a way to distinguish products using the Product Style Tag. Maybe come up with your own system of what a "Thick Card" or a "Thin Card" is, or use the Product Style Tag as your own brand name for the product.
**Coming Soon**
Colour Types are used to create Single Sided and Double Sided products. They also determine the number of pages to be supplied and the choice of colours available to your customers.
Popular Colour Types are listed below:
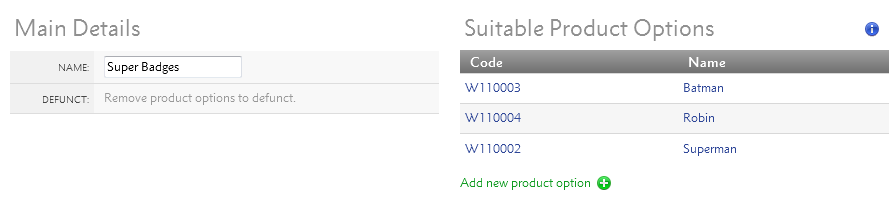
This guide explains how to add Product Options to your Products.
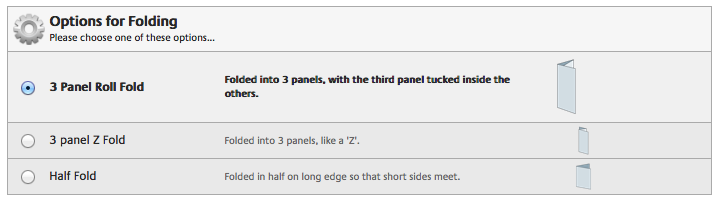
Product Options can be used to provide a choice of finishing or styles.
For example you can use Product Options to add a choice of background colours...

Or a choice of how Products are folded.
They can also be used as an additional Production Step.
Product Options show in the Configure your printing menu, when you add your product to the basket.
Go to .
Give your Product Option a name and choose it's Product Option Category as a way to group similar Options together.
Then on you can customise the Product Option to your heart's content.
In the Description Section you can add notes and images about the Product Option.

The Specification is visible to your Customers;
The Special Instructions appear to your Sales Team in a ; and
The Production Instructions appear to your Production Team in.
You can also upload an image of your Product Option, that appears to your Customers, Sales Team and Production Team.
In this section you can change the Product Option Category, and choose how much of the Product Option is needed before additional costs or transfer days are required.
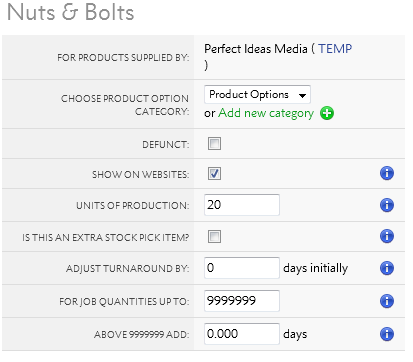
The Units of Production can be increased to change how much each Product Option costs when large amounts of associated Products are ordered.
The Adjust Turnaround options allow you to add additional turnaround times to your product. You can use Adjust Turnaround By to set additional turnaround times for all jobs using the Product Option, or you can add additional turnaround days when large job quantities are ordered using the For job quantities upto choice.
In the Financial section, you can add how much it costs to produce and how much you charge your customers.
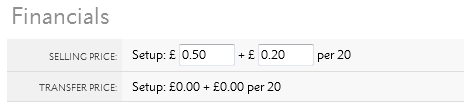
The Selling Price is how much it costs your customers, and Transfer Price is how much you pay Grafenia for the Product Option.
Transfer Prices are only used for products supplied by HubM. You can ignore them.
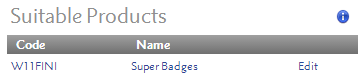
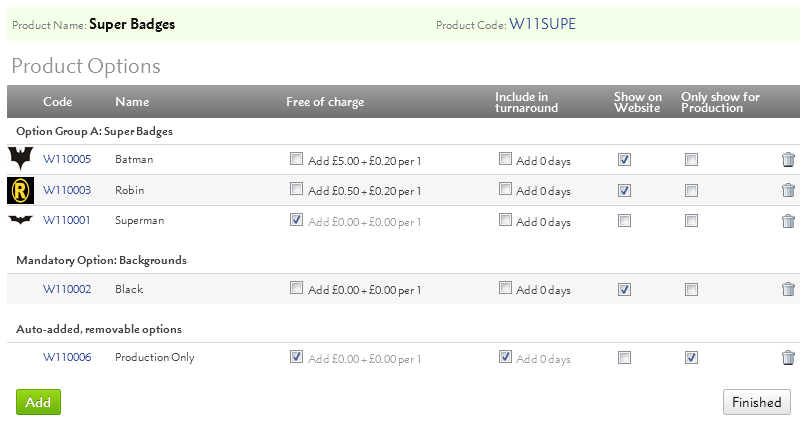
This section shows you which products this Product Option is used on.
You can add more Product Options to Products via .
Go to to edit your Product Option Categories.
Product Option Categories are used to group together similar Product Options. If you have a choice set of Product Options that will apply to multiple Products, you can add them to the same Product Option Categories to help you remember them all when you add to Products.
View the Product Options associated to a Product on

Then add more on .
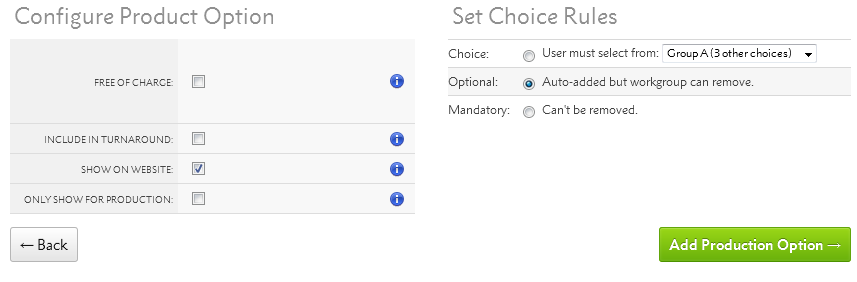
Every Product Option you add comes with a Choice Rule. The Option can be:
A Product Option will be mandatory if there is no alternative in their Option Group.
Once you've chosen your Choice Rule, there are other settings you can add to your Choice Rule:
If Free of charge is ticked, the Product Option financial details will be ignored. Otherwise each job will have a revenue line for the Product Option.
If Include in turnaround is ticked, the Product Option turnaround details will be added to the product, making the turnaround time longer.
If Show on Website? is ticked, customers will see the Product Option. This is advisable when there is a Choice of options, but not for Mandatory options.
If Only show for Production is ticked, the Sales team will not be able to adjust the option via .
This article explains:
As a Works Maker you have access to the menu in Flyerlink.
Through this menu, you can access all jobs, that are waiting to be made by you.
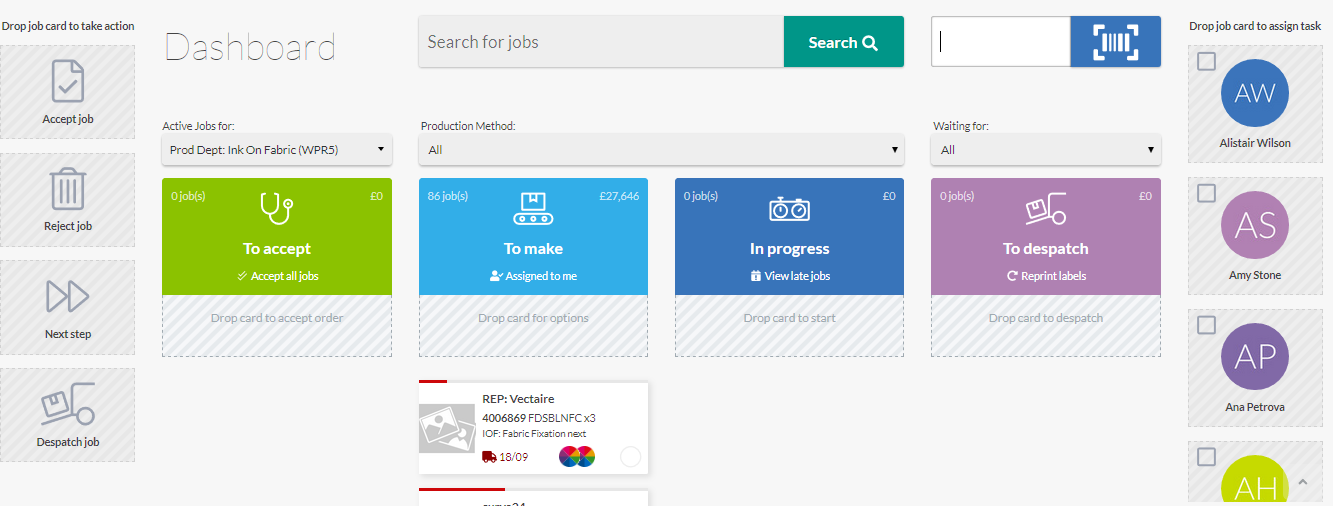
Go to and you'll see an overview of the jobs that are in production:
The page is responsive but designed to work on desktop or landscape iPad, not mobile or portrait iPad.
The screen is split into 4 sections:
You will see a job card for each job in each section
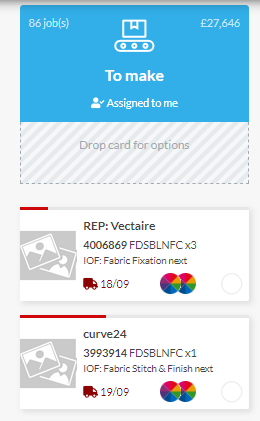
Click a card to see more details about the job, and use the tabs to find out more or act upon a production step
The Jobs to accept columns shows all jobs which are at Status 081 and haven't yet been accepted or had a production step started.
You can filter by production step or production method to only accept specific jobs.

To accept 1 job, drag one card into the accept tile
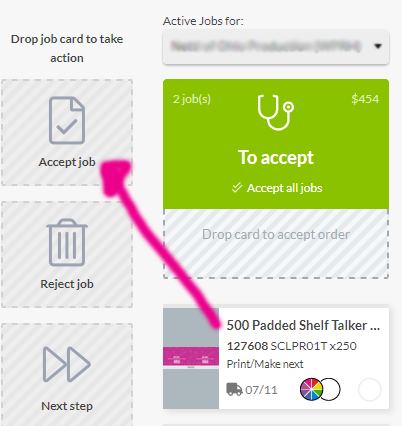
It will then move into the Jobs to make section.
You can click the accept all jobs to move them all over - or just start acting on the production steps by clicking a card, going to the steps tab and confirming a production step has started or is in progress.
If you want to reject a job, because it doesn't conform to your requirements, drag the card instead into the Reject job tile.
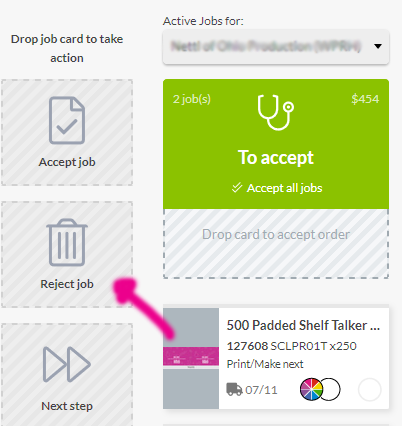
That'll put the job to status 091 and notify the workgroup that placed the order.
Status 091
If you reject a job or change the status to 091, it will be sent back to the person that generated the order and you cannot produce it.
Status 094
If there are file conformance issues but you are still willing to produce the job, choose status 094.
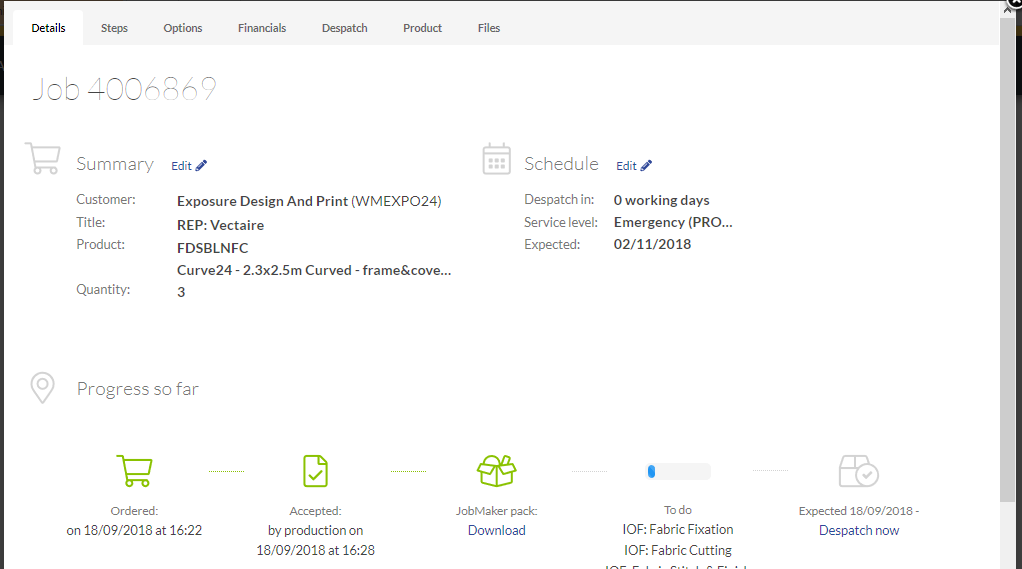
To produce a job you will need the job files
You can get these by clicking a job, choosing Files tab
You'll see a list
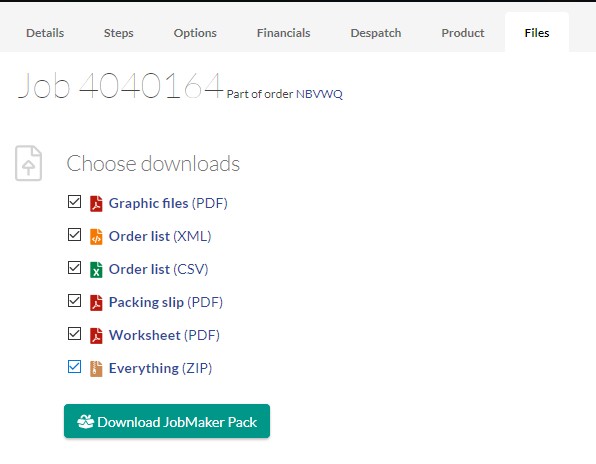
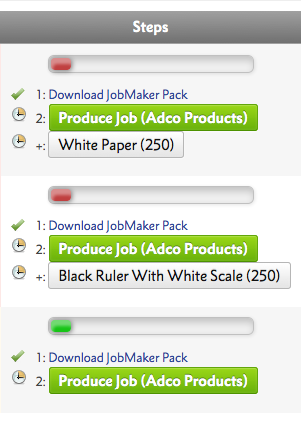
Hit Download JobMaker Pack to get a ZIP containing:
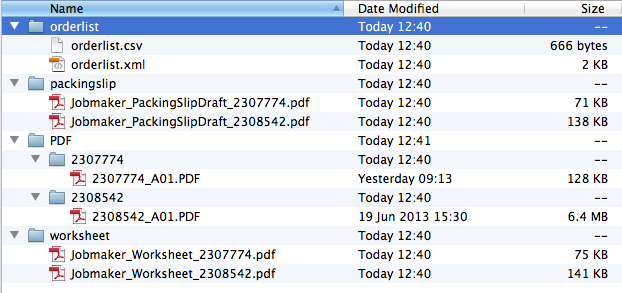
When you download a JobMaker pack we move that job from To Accept to To Make
You can still reject the job afterwards if needed
Along the right side you'll see a list of users in the production workgroup
Drag a card to a production user to assign it to that person
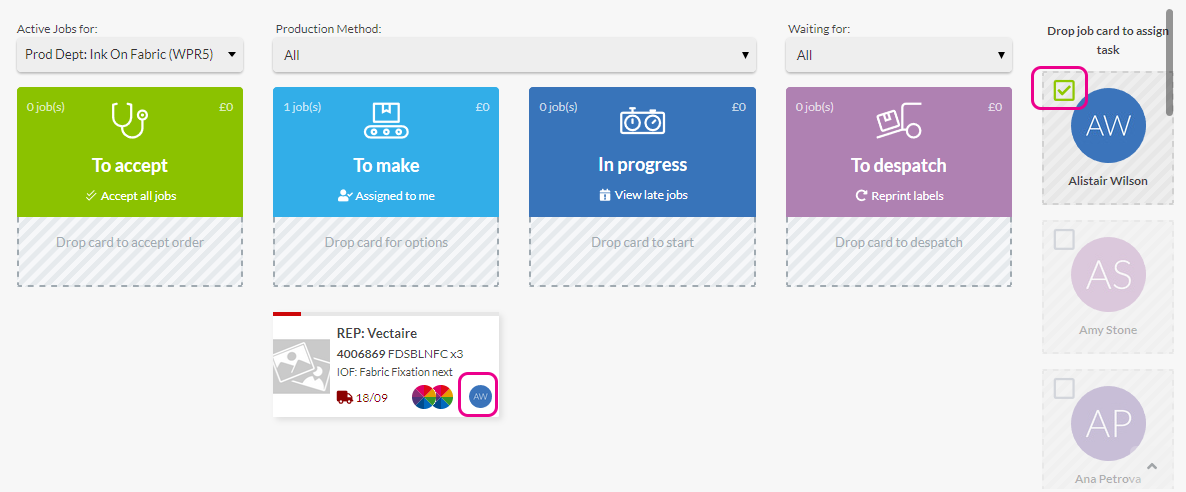
You can then tick the staff member on the side to filter only out and only show their work in progress
Once you've accepted jobs, they move to Jobs to make:
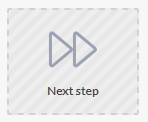
Drag a card onto Next step tile to see the next step
Or click a job and choose the Steps tab
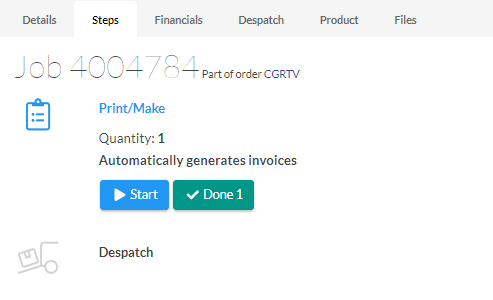
Here you'll see a list of each of the Production Steps you've added on displayed as a start or done button.
As a minimum you will have print & despatch but can add more.
The next step to do is highlighted as a green button, others need to be clicked to expand and start.
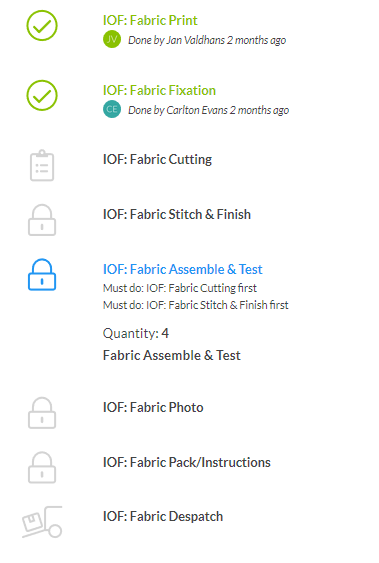 If you've set any Must do steps, that step is locked until the previous step is completed.
Once the step is completed, simply press done step. Flyerlink will record who progressed the step and when, incase there are any issues with the production.
Choose Start to record time taken between start & finish.
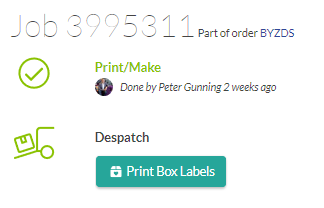
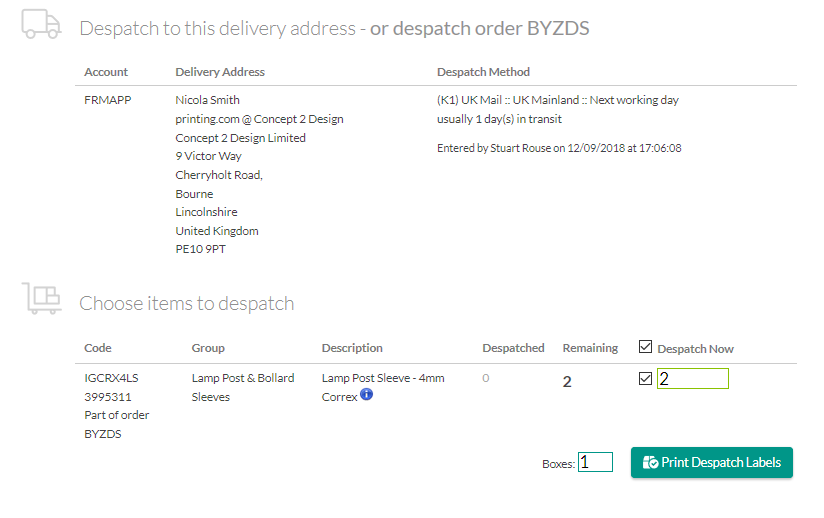
Once you've made your jobs, you need to despatch them. The ones with just a despatch left will show in the "To despatch" column
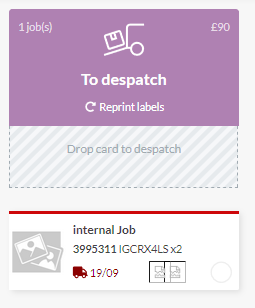
To do this click the despatch step
Click the Print box labels to start the despatch process. Flyerlink will show you all jobs going to the same address, by the same despatch method, in case you want to put more than one job in the same box. Just tick the jobs you're despatching and choose the quantity & number of boxes required:
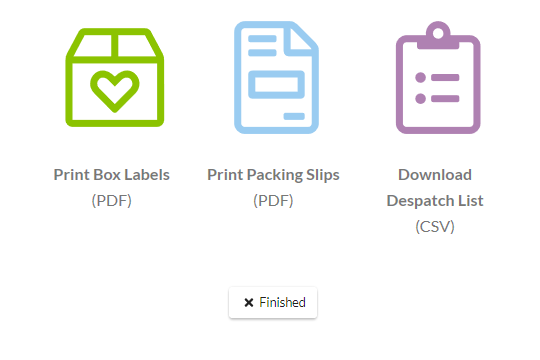
On the next screen, print the despatch labels, actual packing slips and get the despatch details as a CSV file if you want to import them somewhere else:
If you would like to change the despatch method before despatching
Click a job and choose the Despatch tab
Click the Change Despatch option
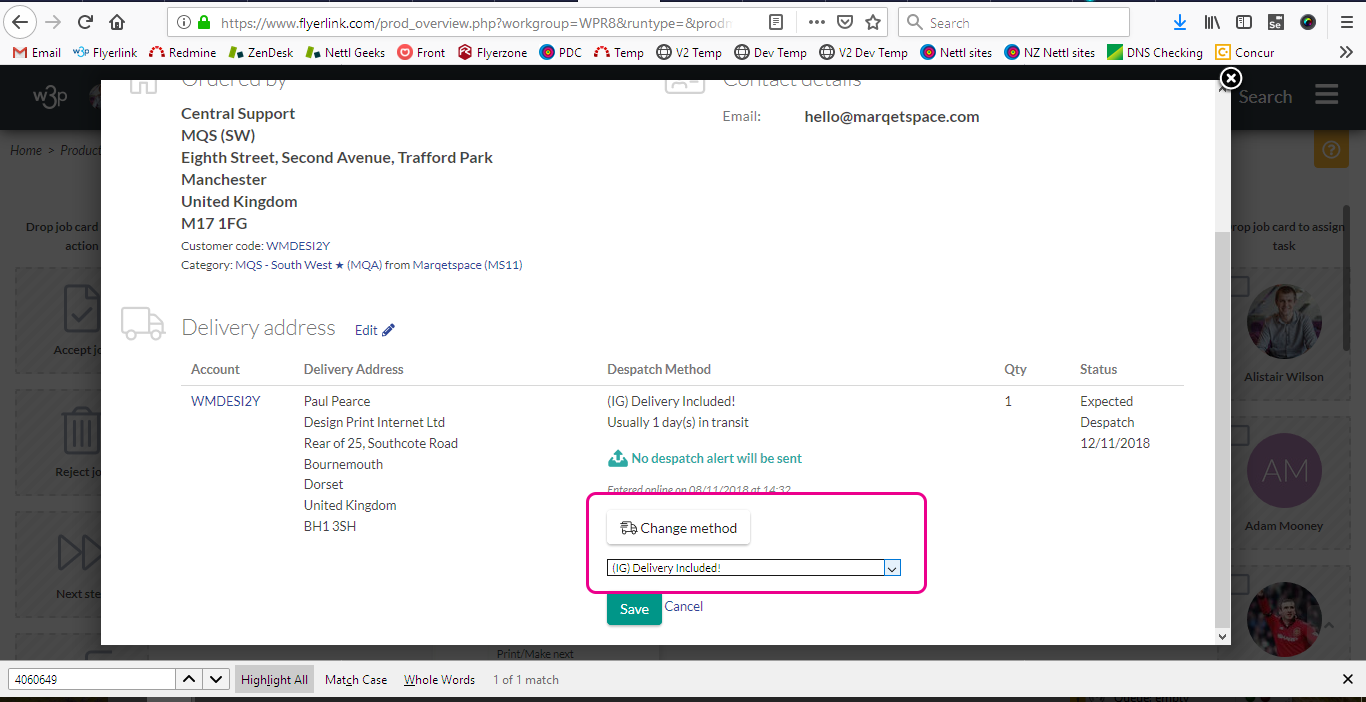
Choose the option and save then you can despatch
Follow the steps below to view and print delivery labels after despatch.
You'll receive an email once an order has been placed for you to Accept, Make and Despatch each job.
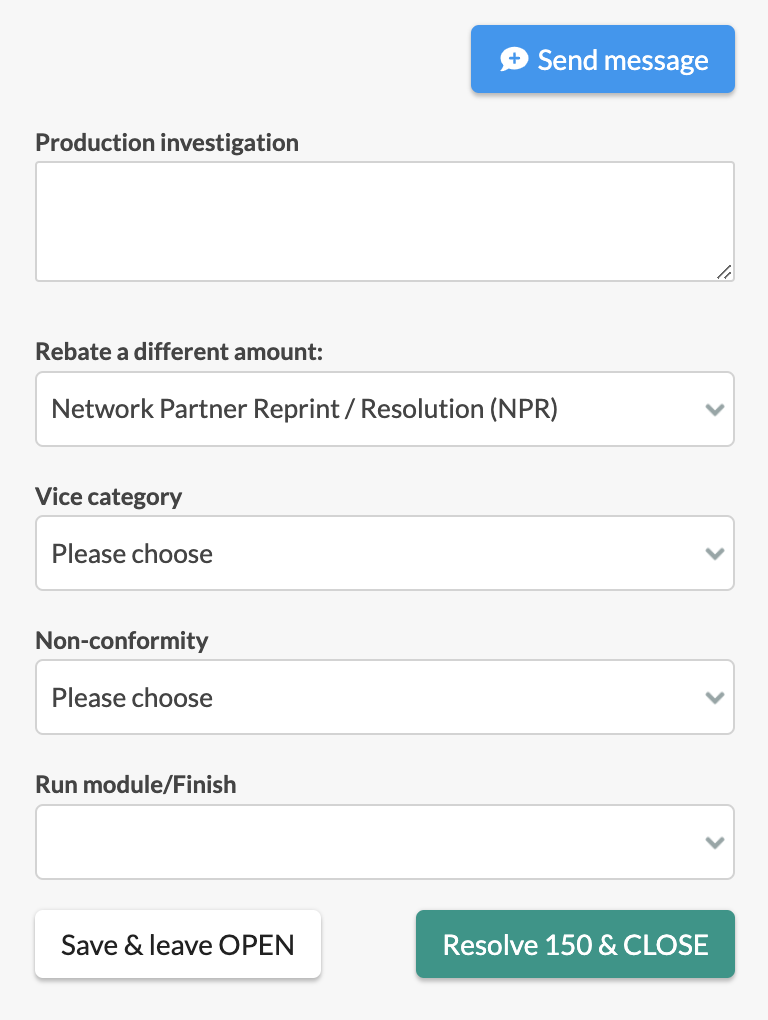
Quality issues are our Partners way of conveying customer complaints about an end product, and getting a resolution to the customer's satisfaction.
When a Partner creates a Quality Claim, their concern if sent directly to the Production Hub Department or Works Maker that produces the product.
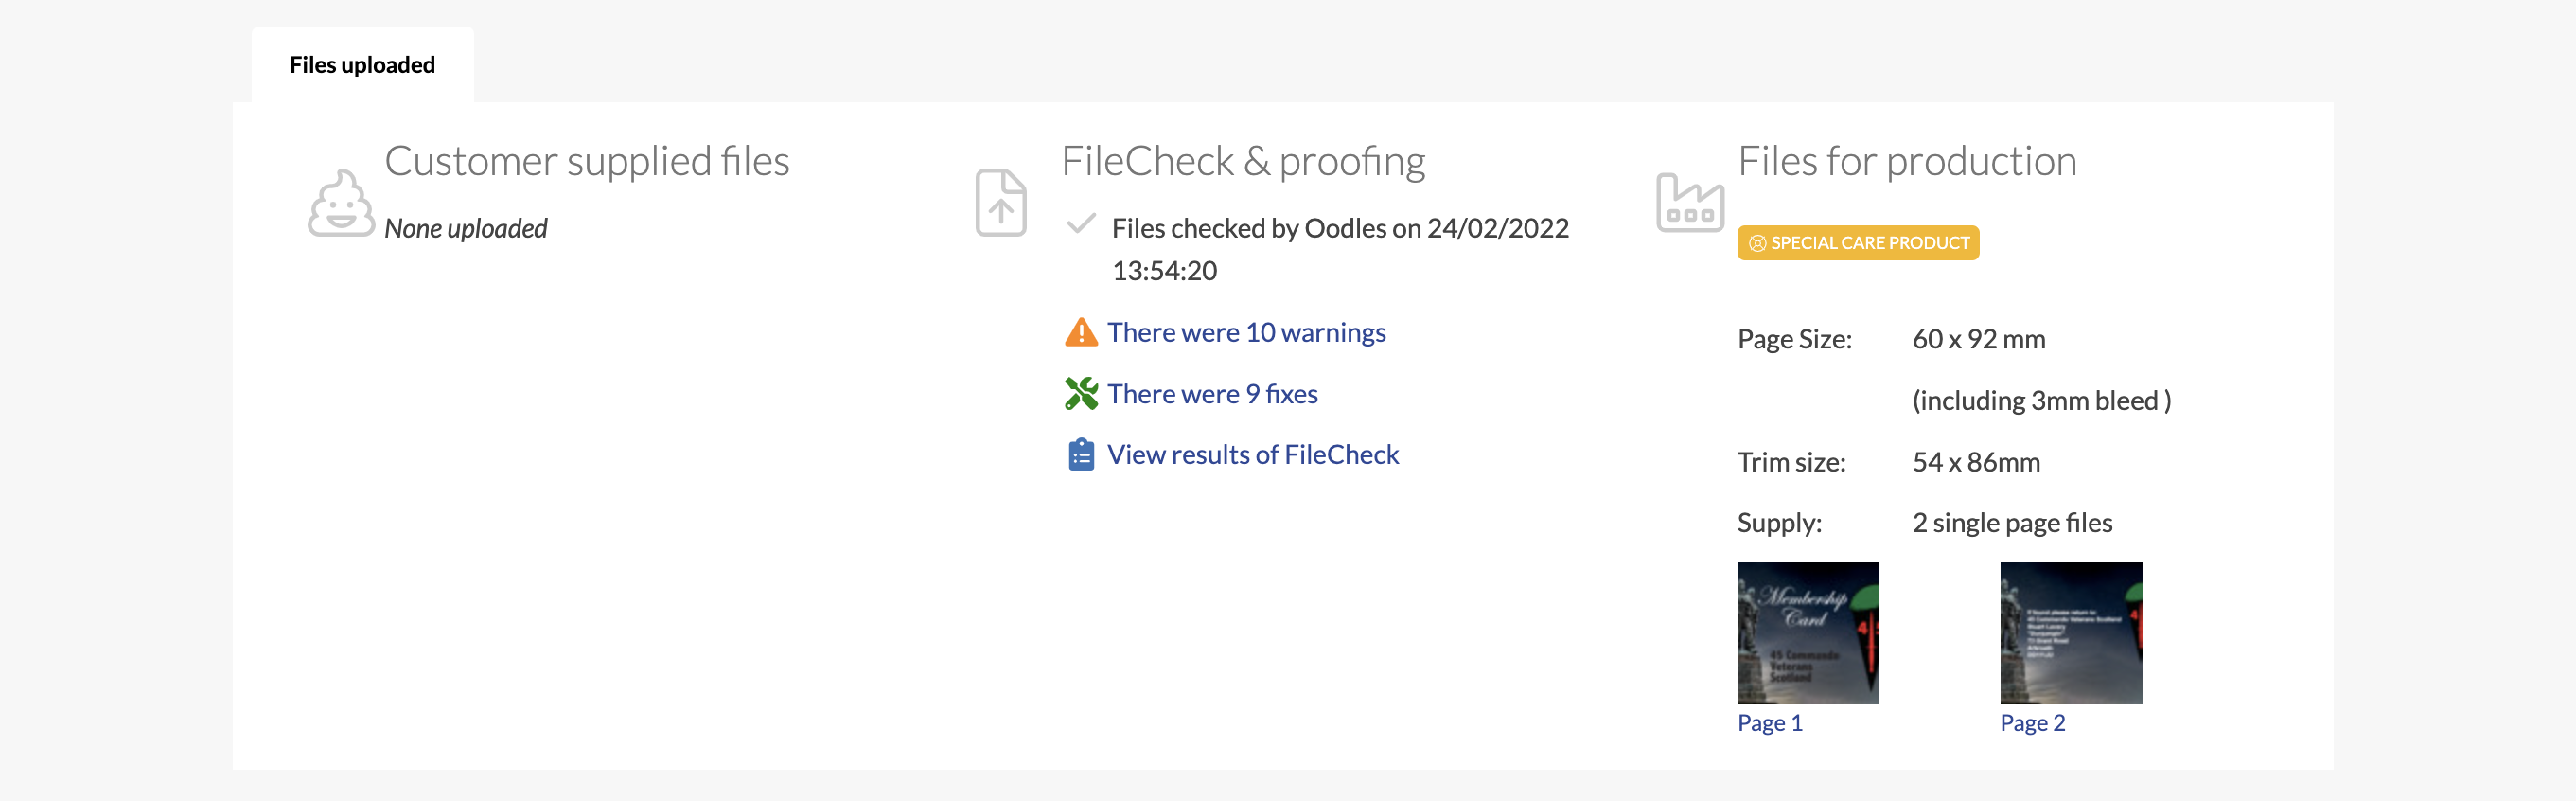
Click the link in the email and you'll be taken to the Issue reported page, where you will see the product specification.
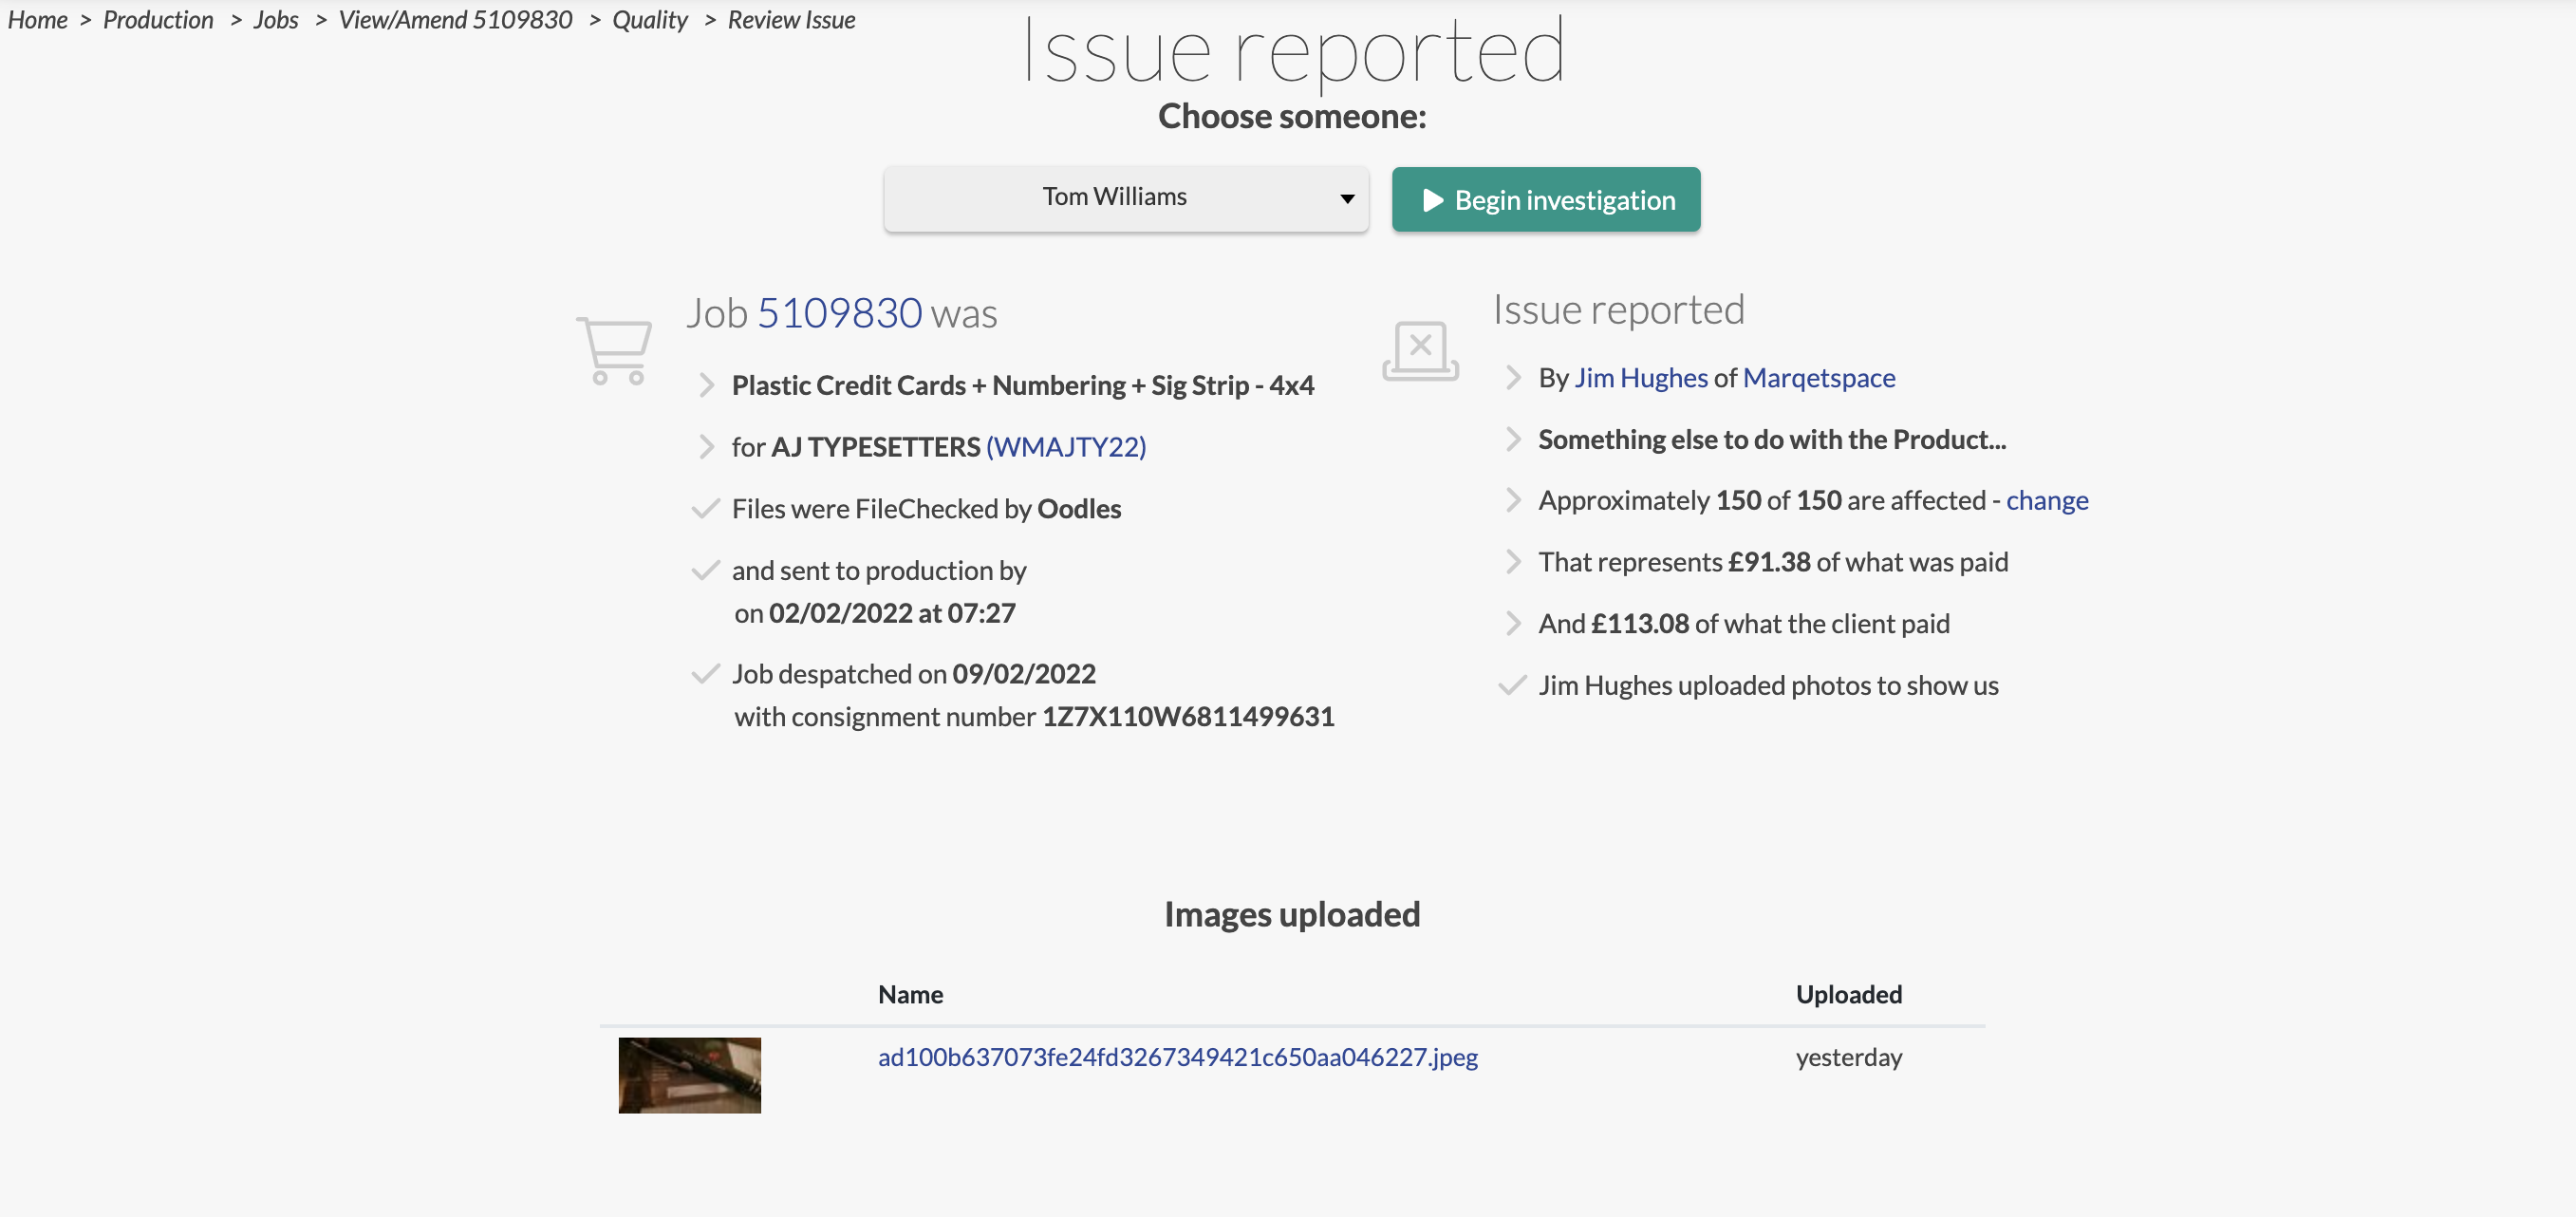
Further down the page you will see the graphic files submitted by the Partner.
The outcome the Partner has requested is shown in the first speech bubble along with details of the issue.
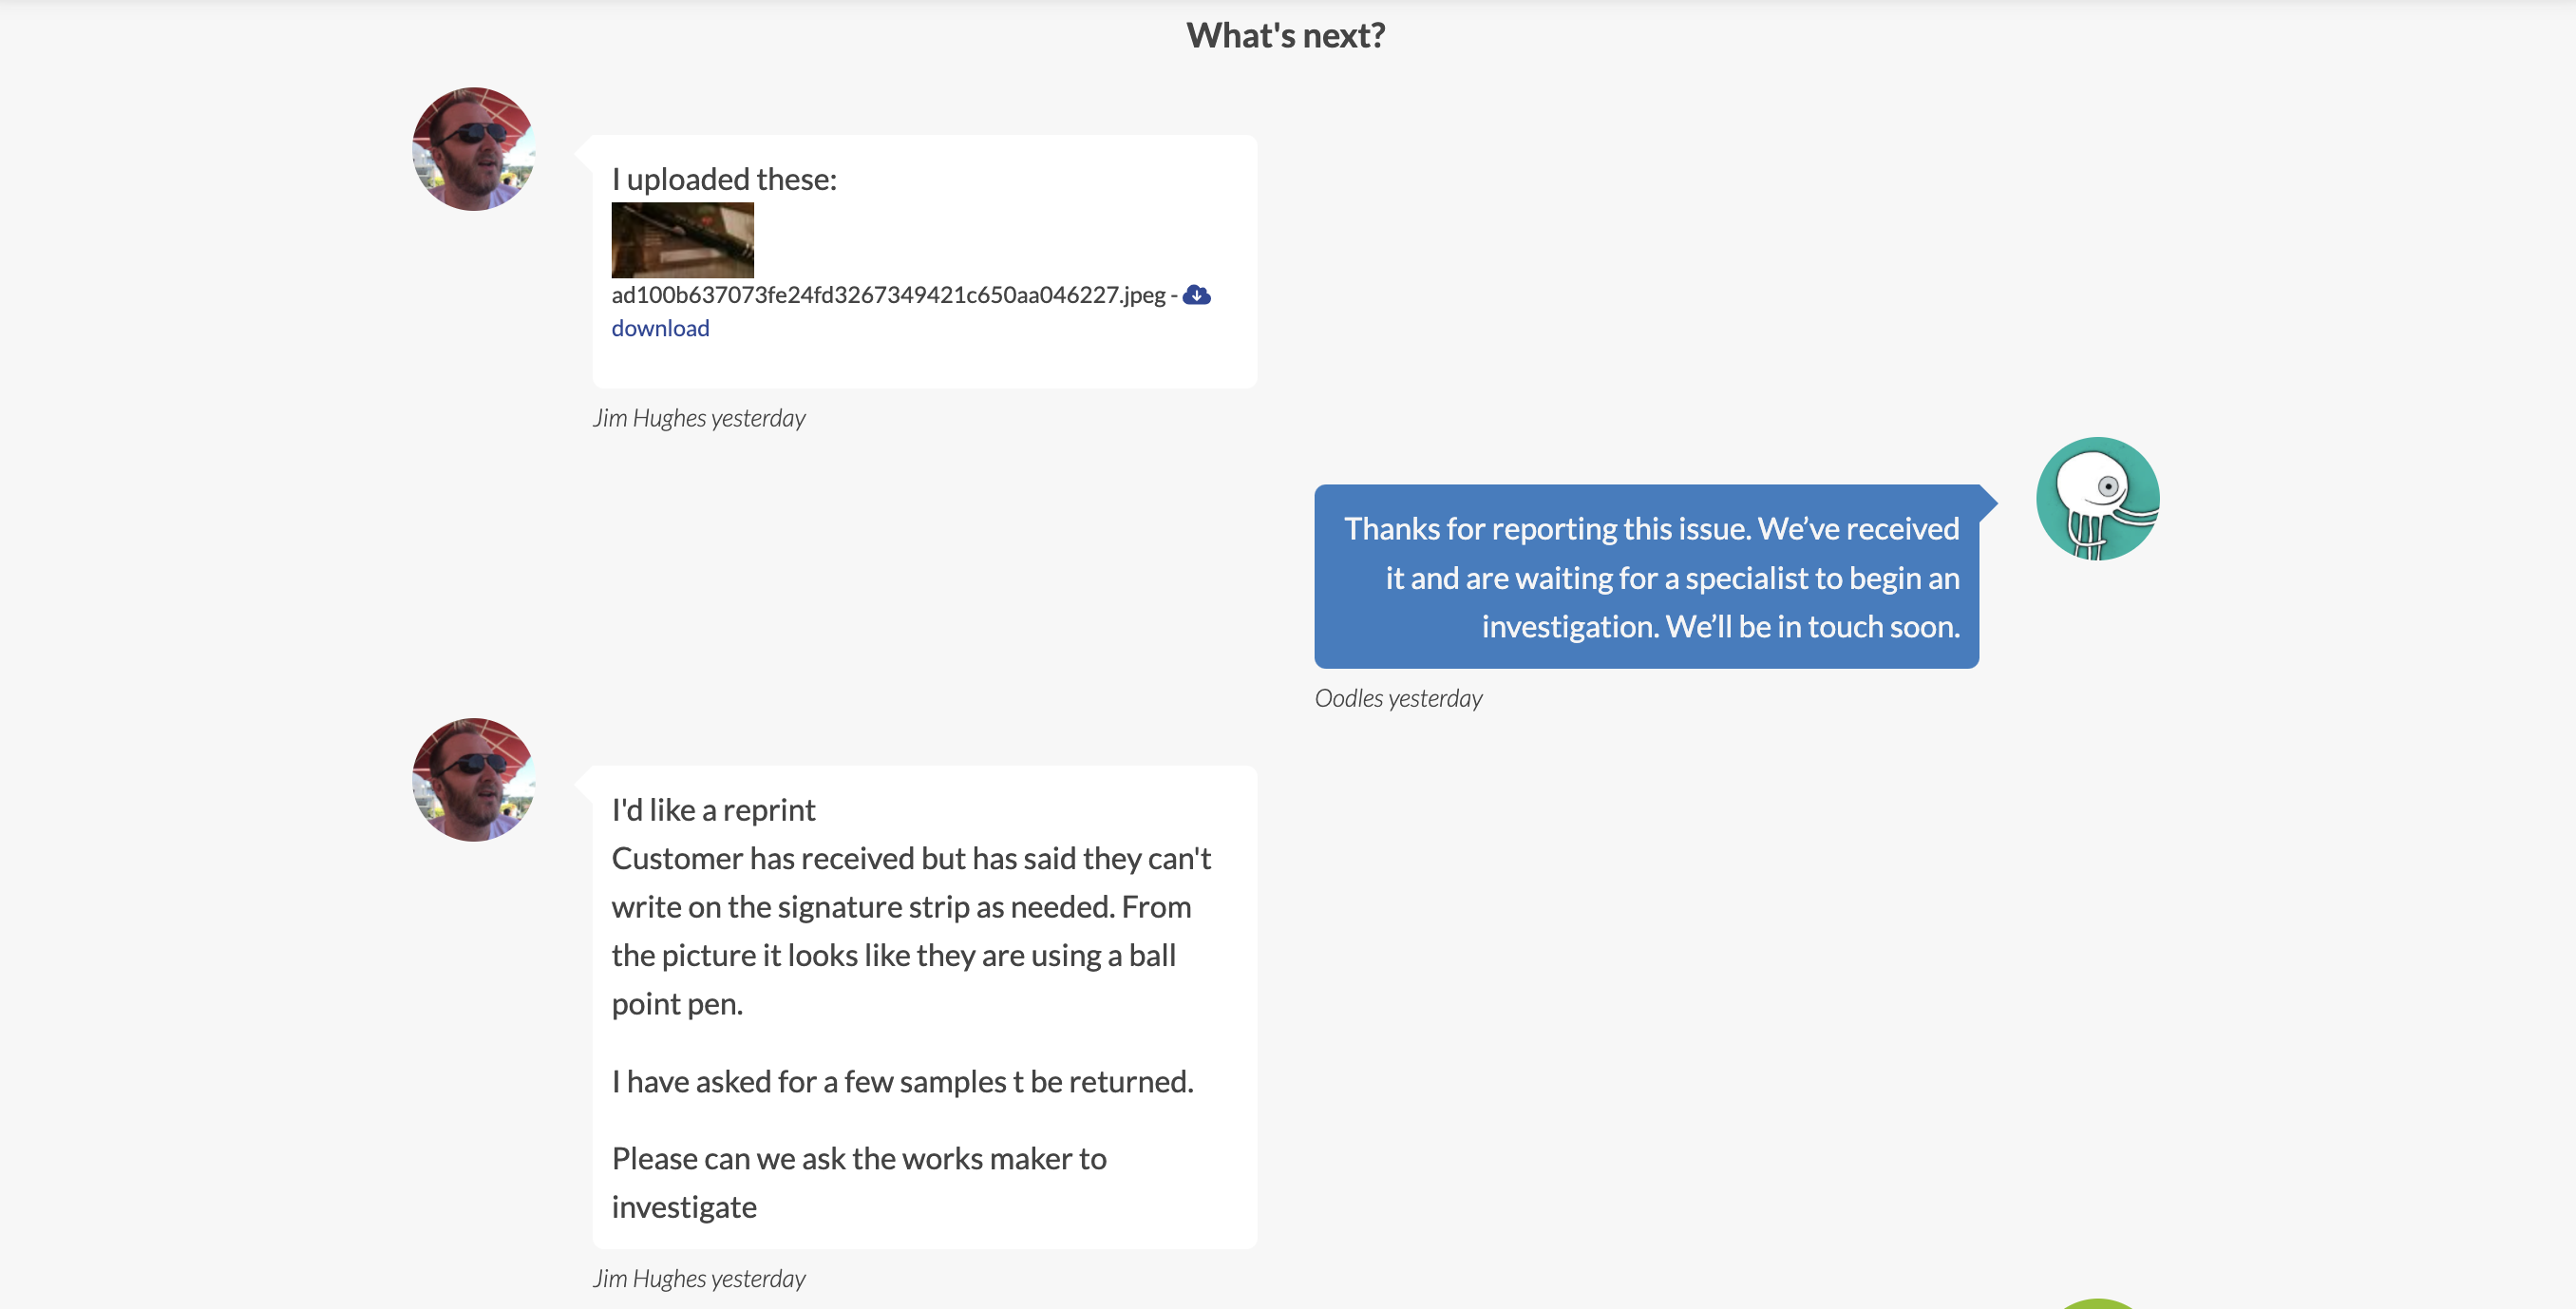
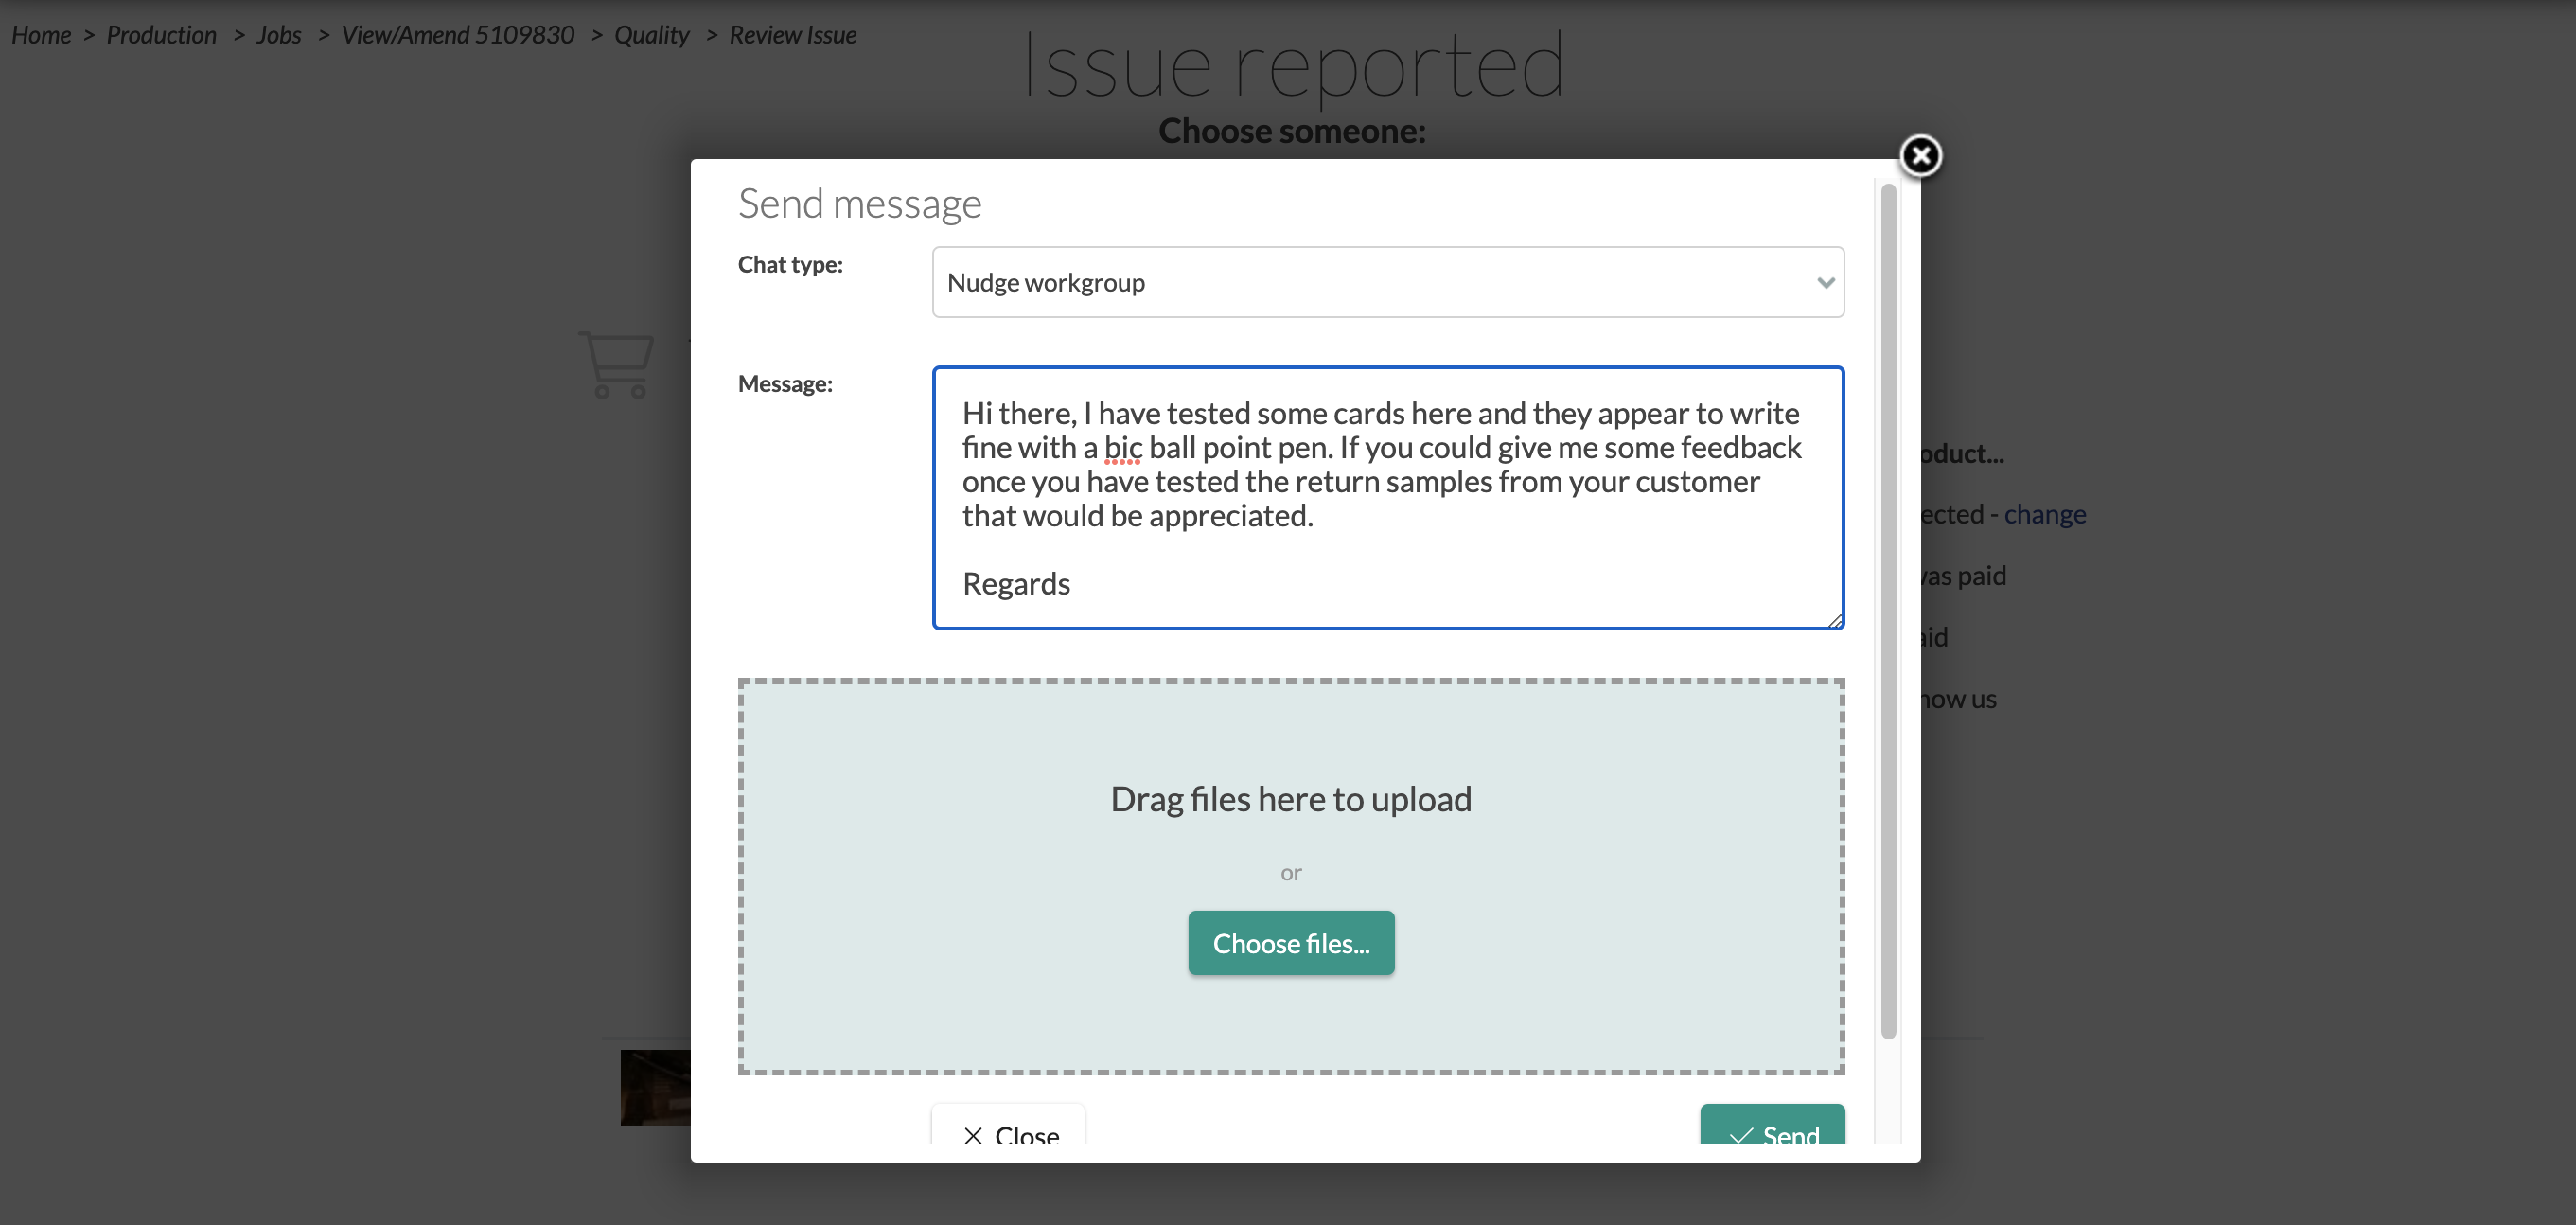
To reply to the Partner select send message and then enter your response. You can also upload attachments, if required, at this stage or request images or further information.
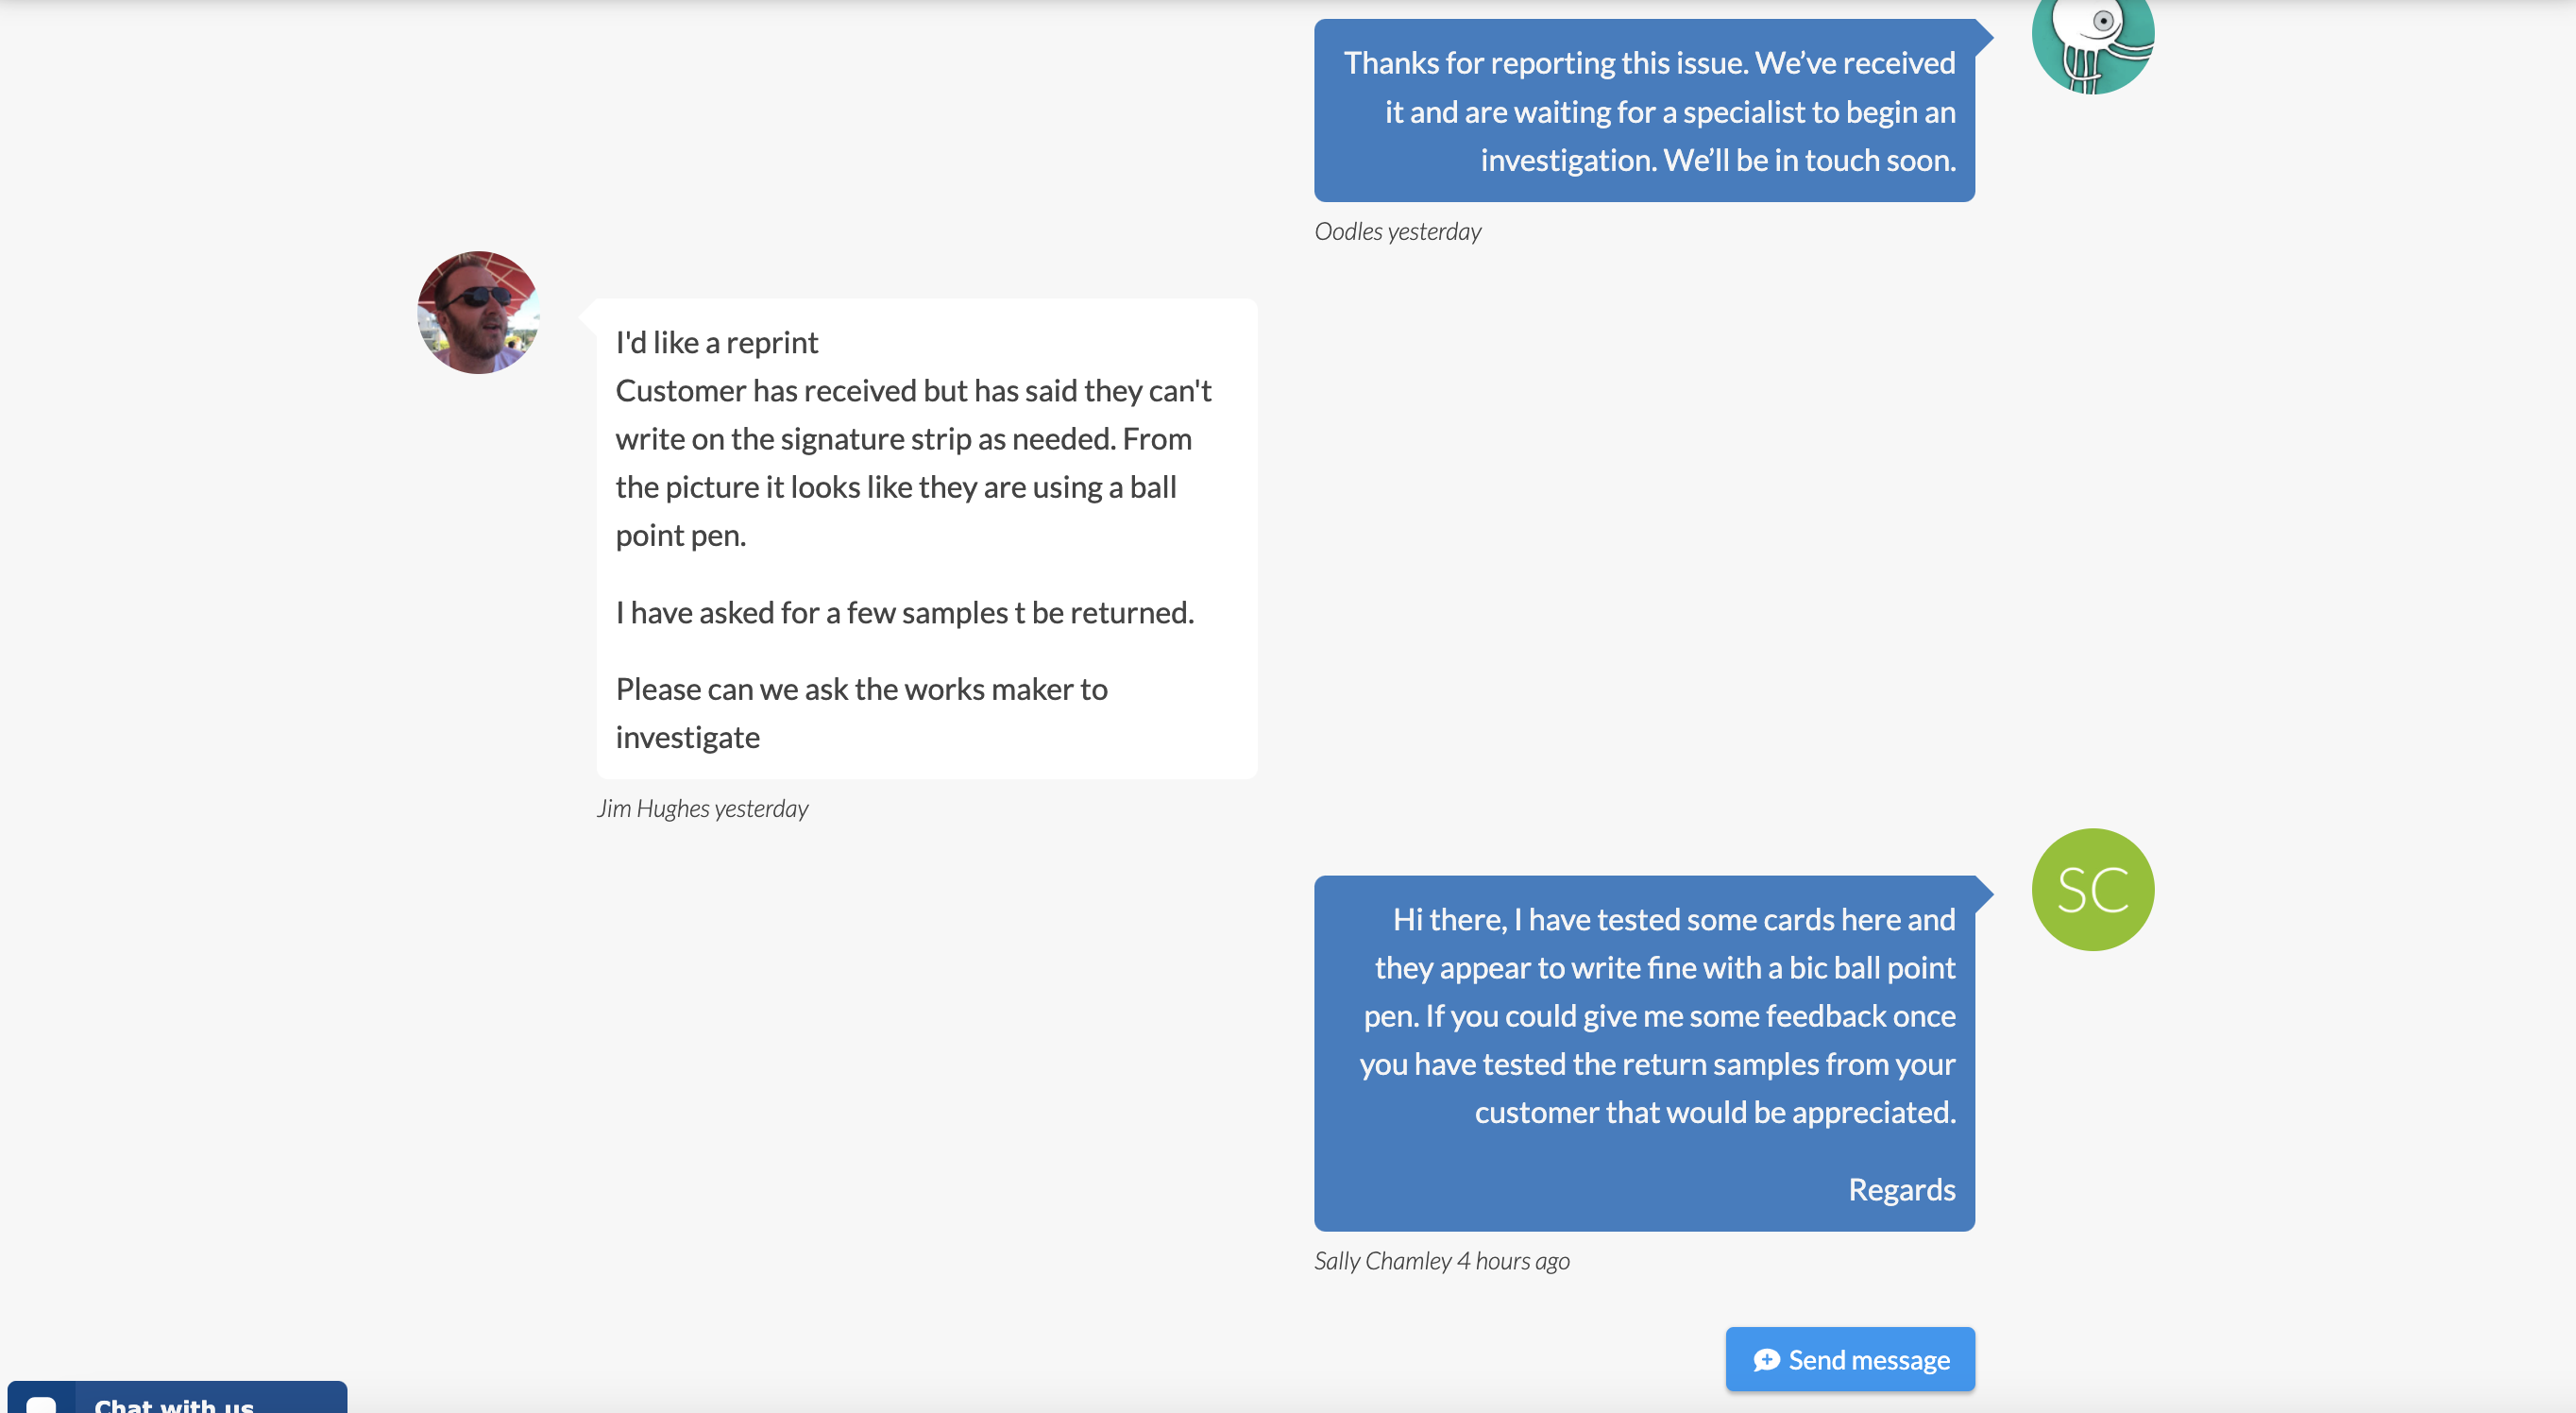
Your response will appear as a new speech bubble in an ongoing conversation.
Once your investigation is complete, using only the rebate field, select the relevant outcome:
Once done select Resolve and Close