Support for

Client Files
|
|||||
Uploading Files
|
|||||
Online Proofs
|
|||||
Client Templates
|
|||||
When a Customer places and order online and uploads files, those files appear under
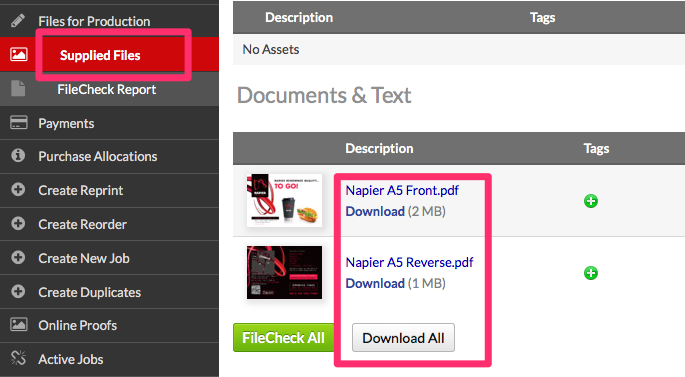
PDFs appear under the Documents & Text section. Images appear under Images & Logos section.
Some image file types are not supported by our Online FileCheck software, you'll need to save them as Jpegs or Tiffs to process them for printing.
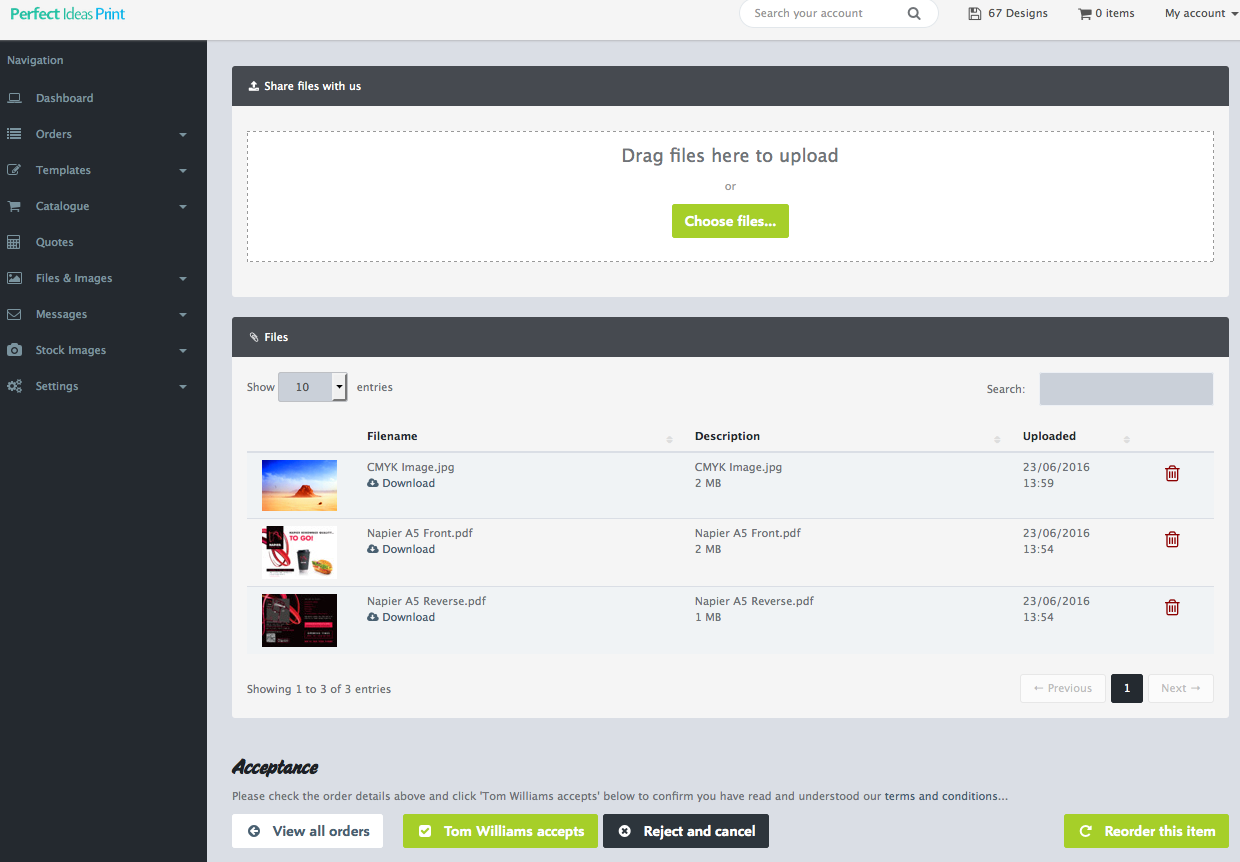
The customer can upload Text files, image files and previous artwork to a job via their online account ().
They do this when sharing files that can be used to create new artwork that relate to a specific job or when resupplying files (that have failed our online filecheck).
Customers can also save files to their Files & Images App () for future use, these images are not linked to a specific job and are found in Flyerlink under .
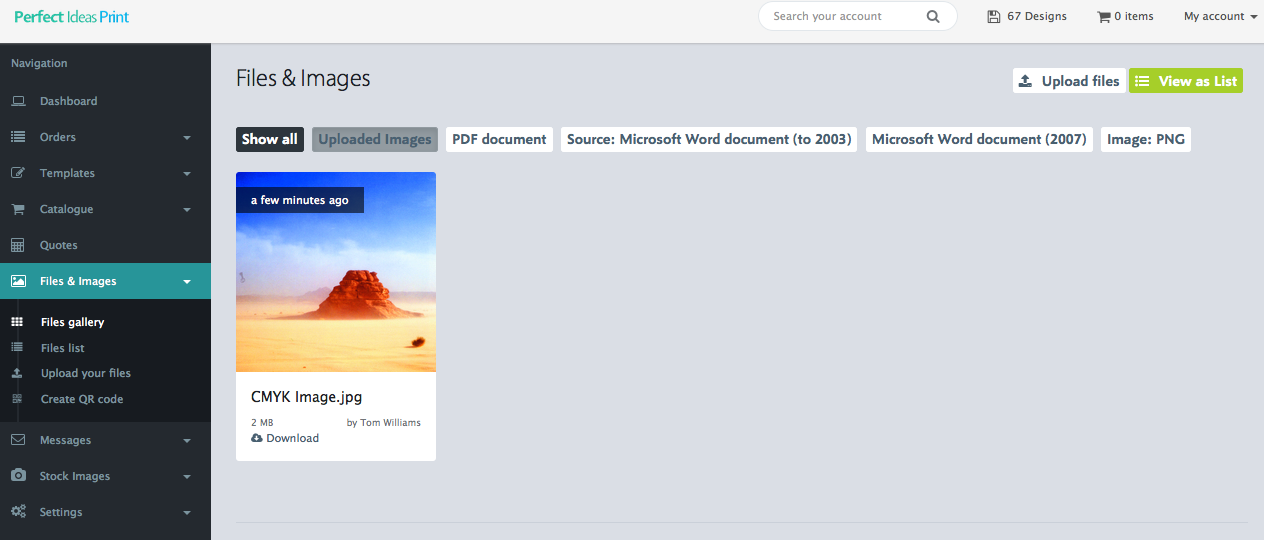
You can assign a tags to an image which groups them together inside an invisible folder.
Folder Tags can only be added by a Flyerlink user via .
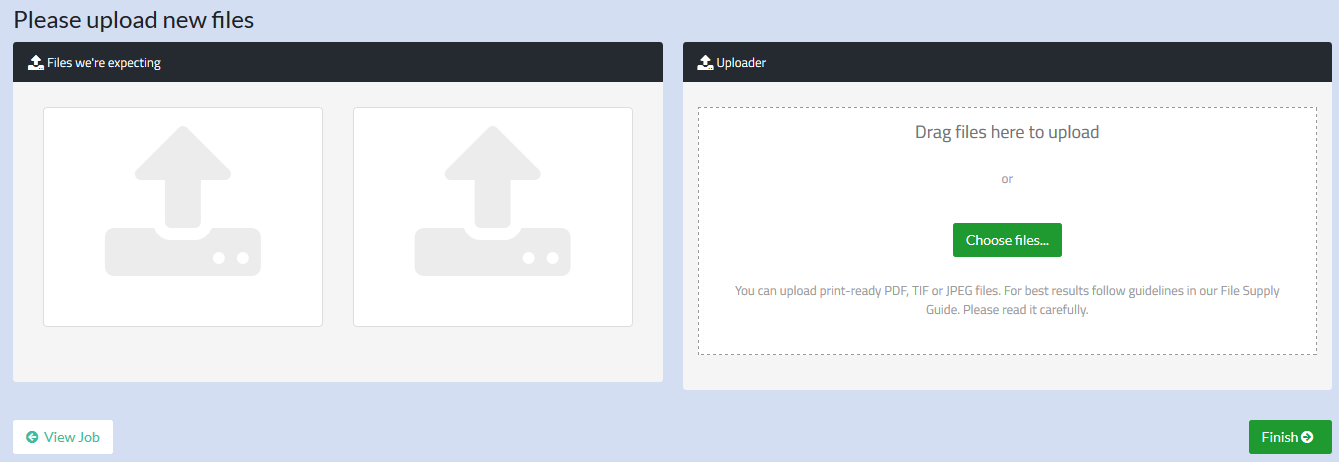
Look for the red circles on this page. Rename your PDF to match the filename shown and upload your PDF. Run FileCheck from the Job Summary changing the Job Status to 021.
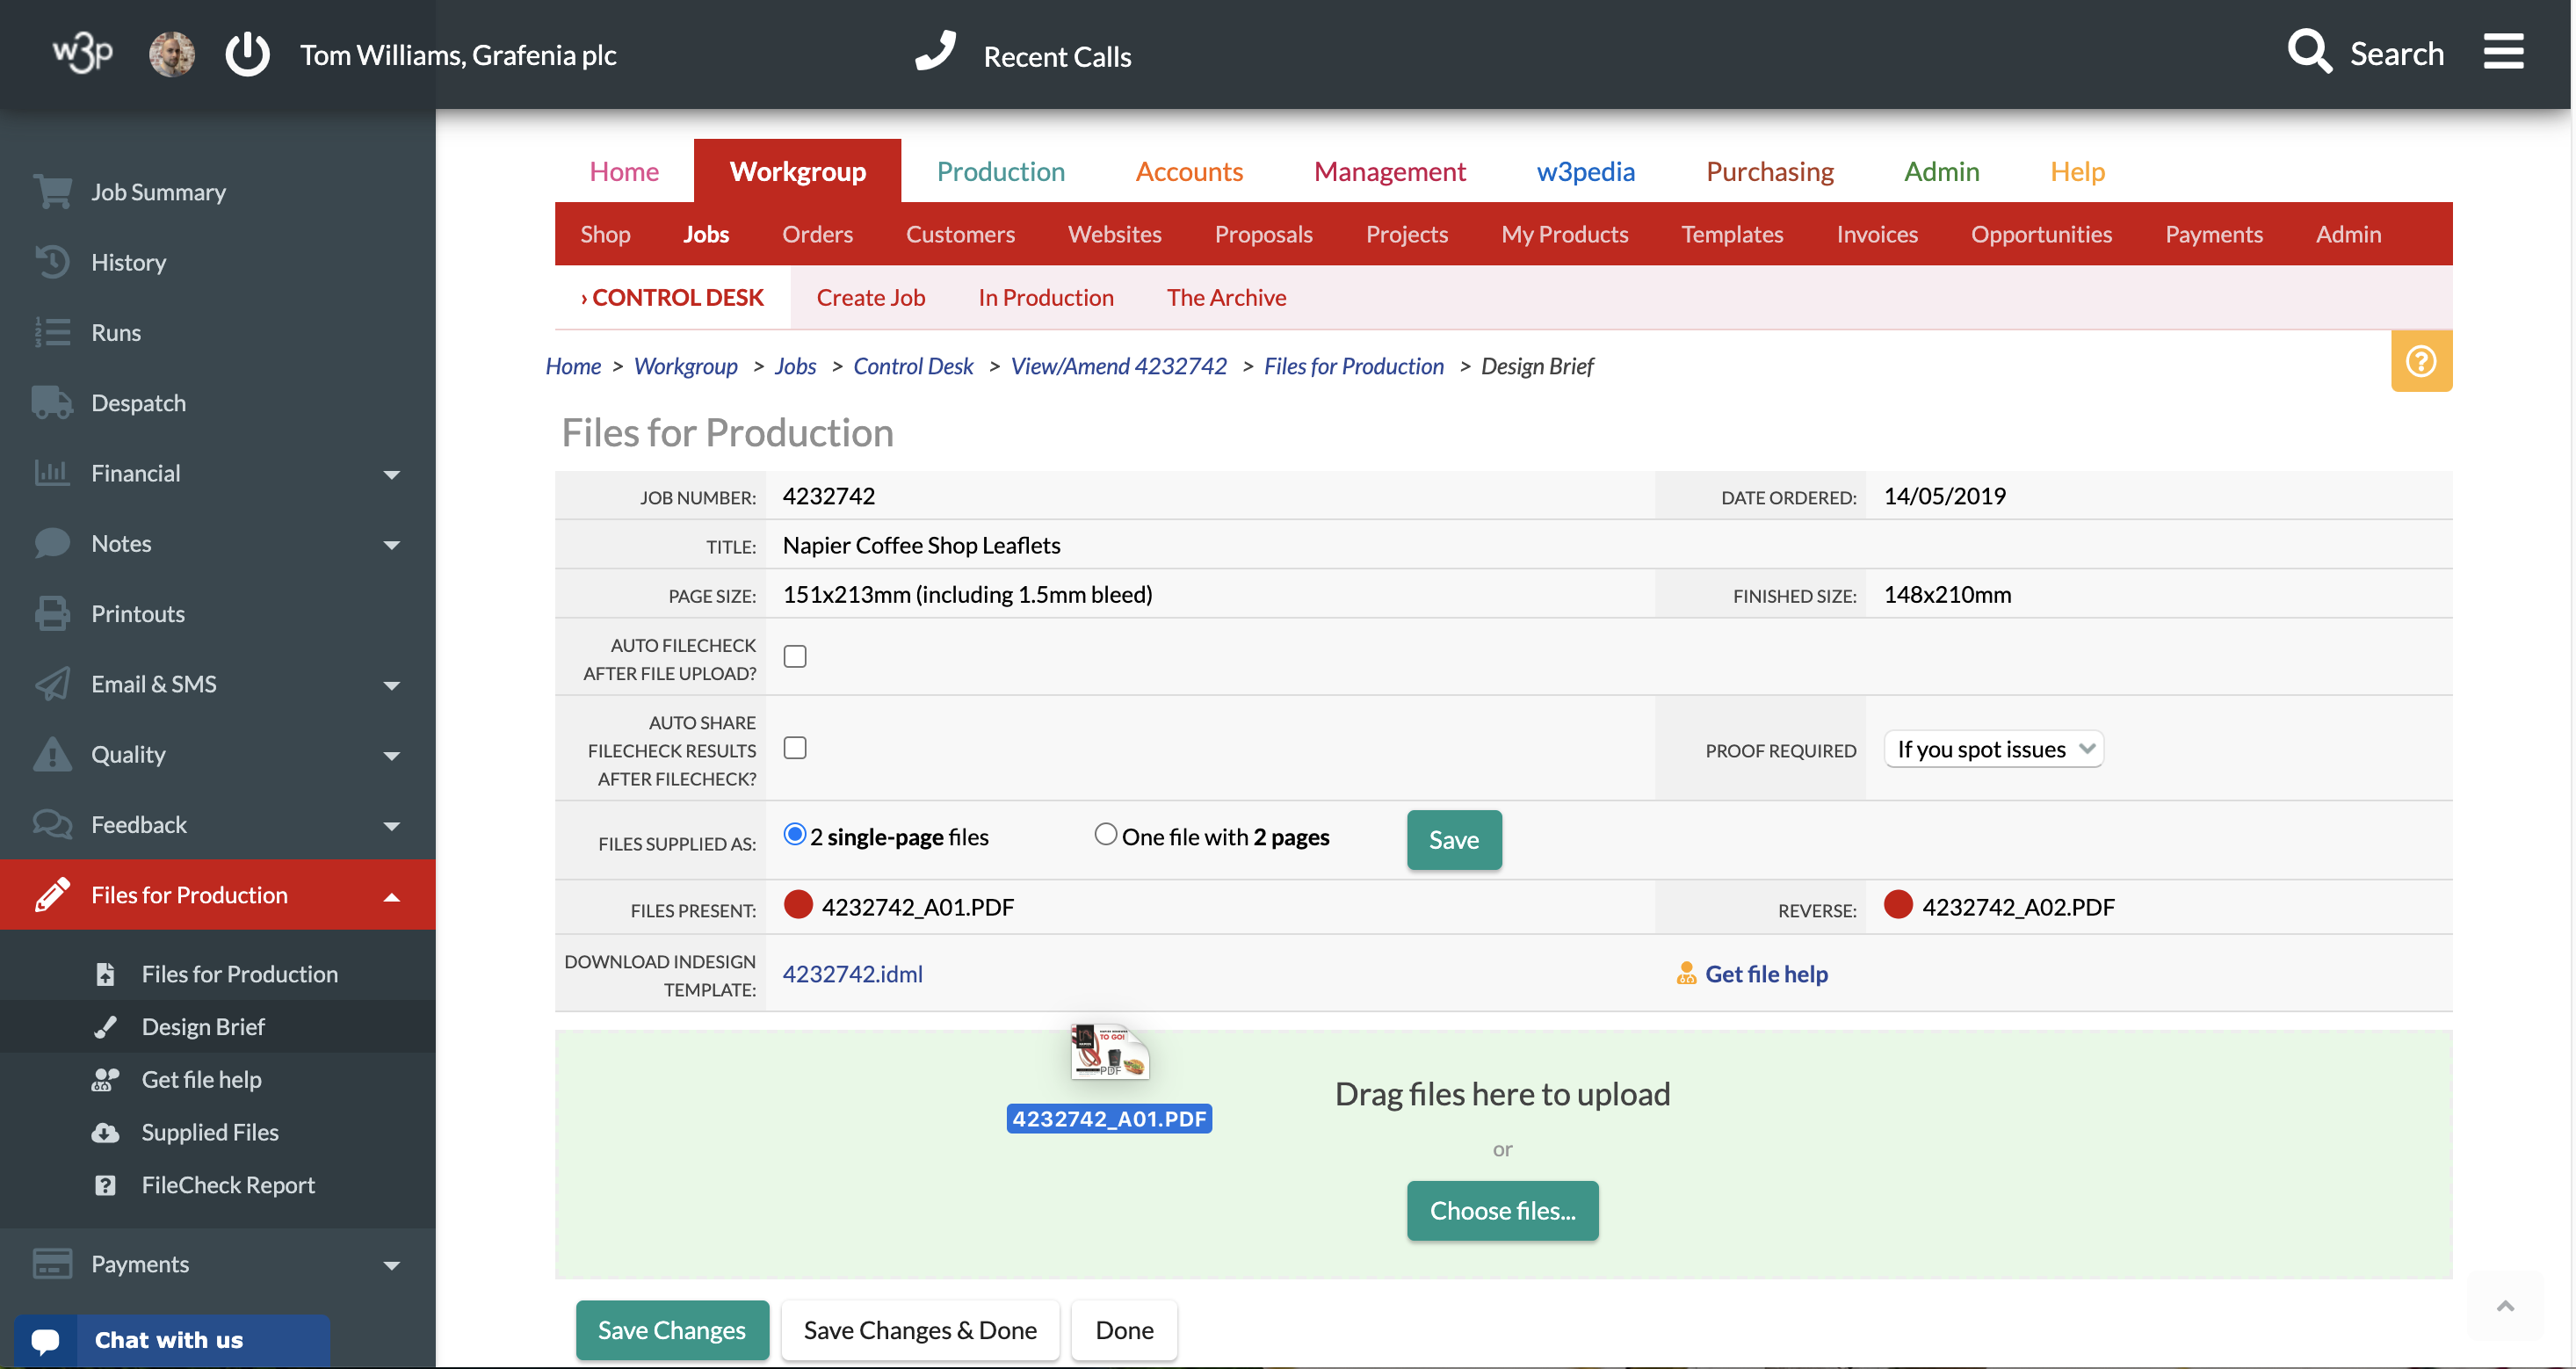
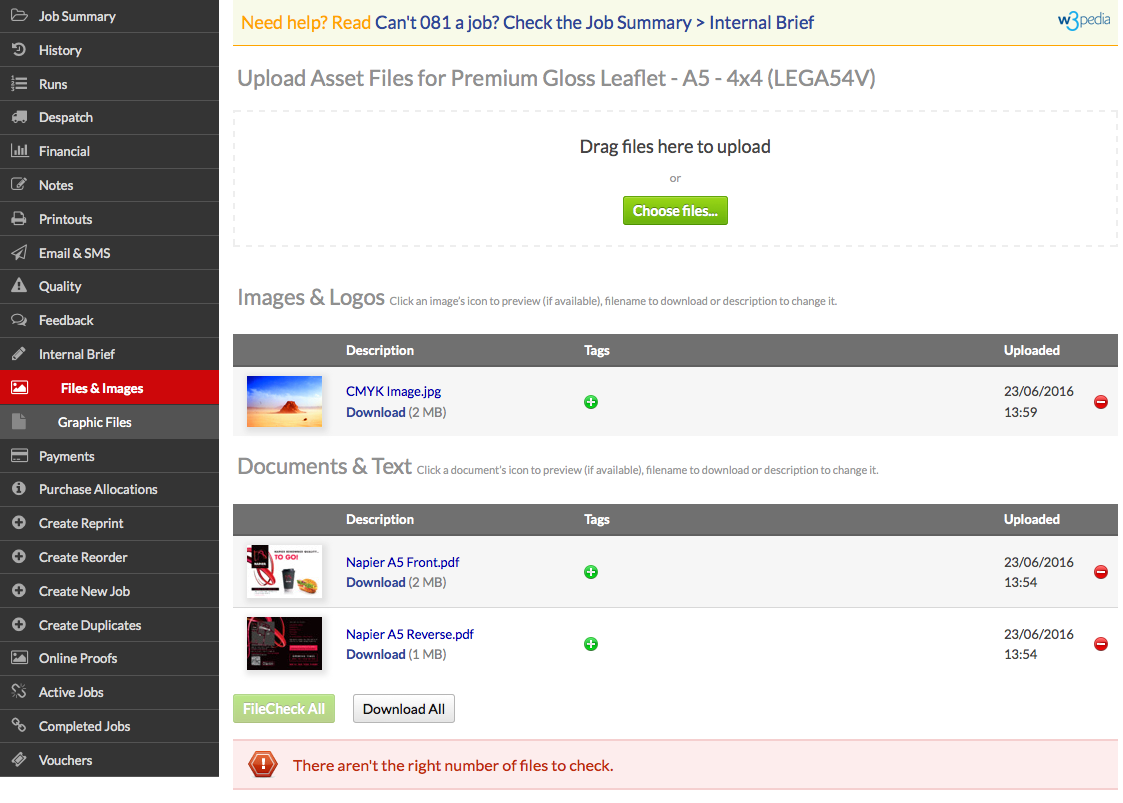
Drag your PDF into the upload window, the first page uploaded will appear as the Front/Outside once printed (regardless of how you name your PDF files).
Select the FileCheck All button to move the job through FileCheck and onto the Design Brief tab ready for Production.
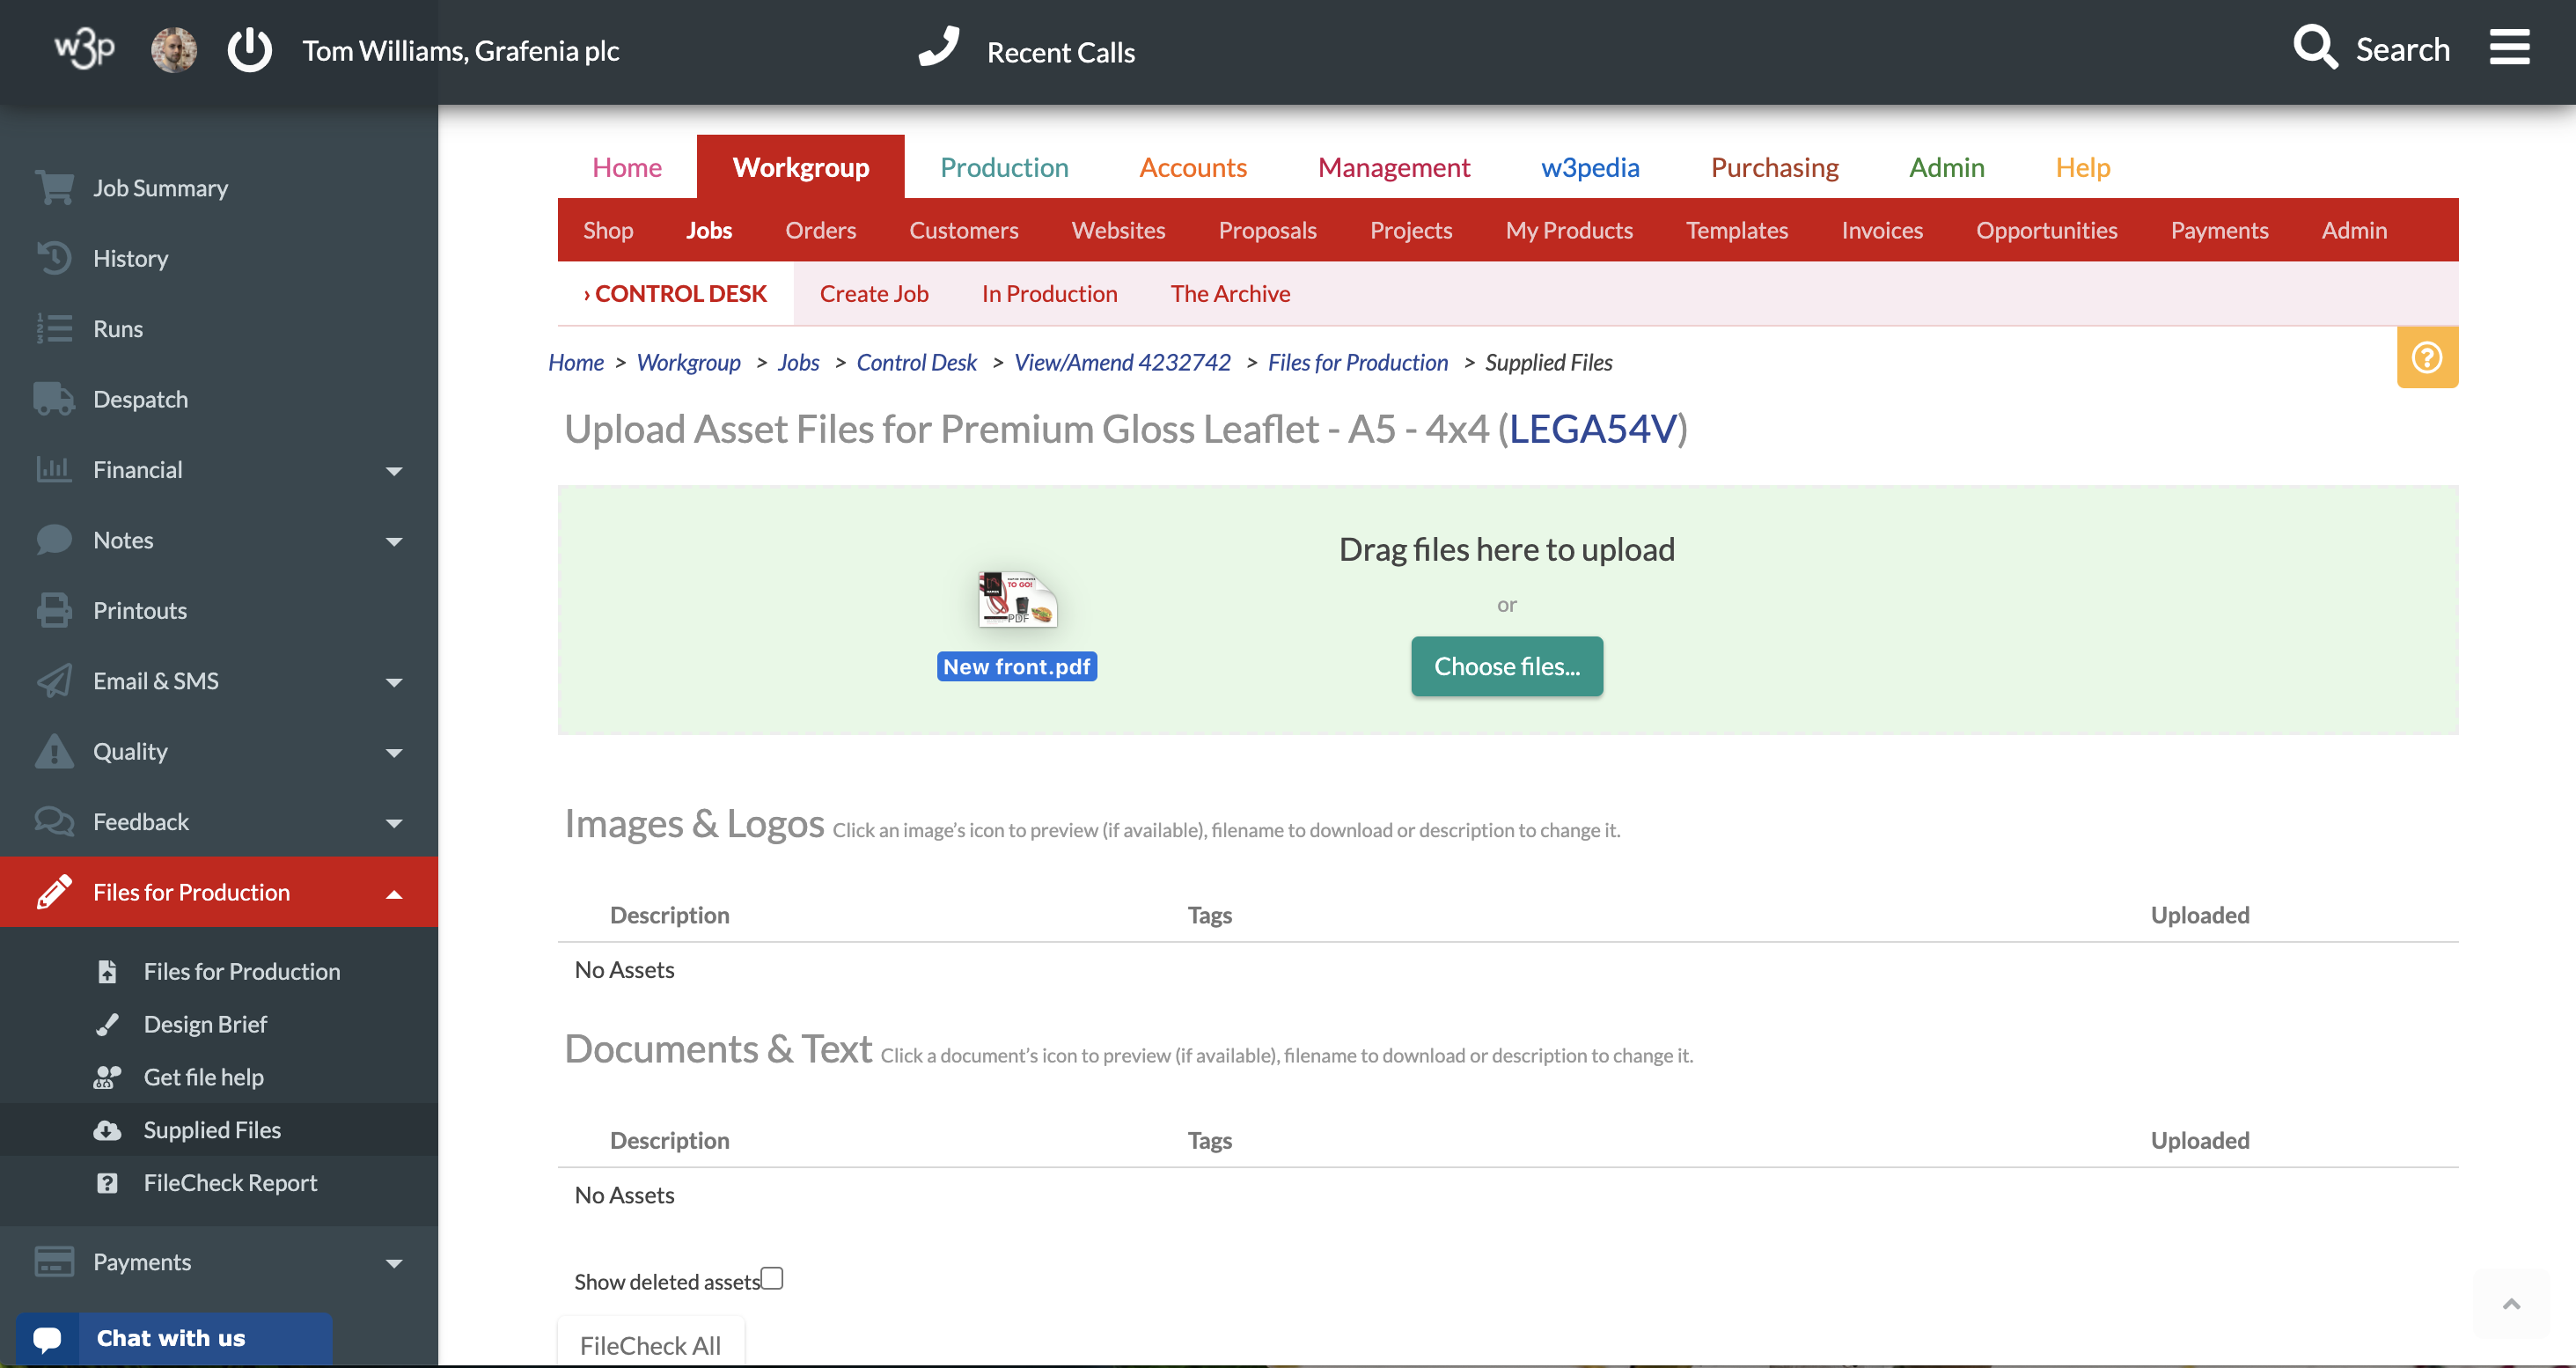
Jobs uploaded via Supplied Files pass through our automatic FileCheck software to appear in Files for Production. This workflow is not available for Excluded Products
Drag your PDF into the upload window.
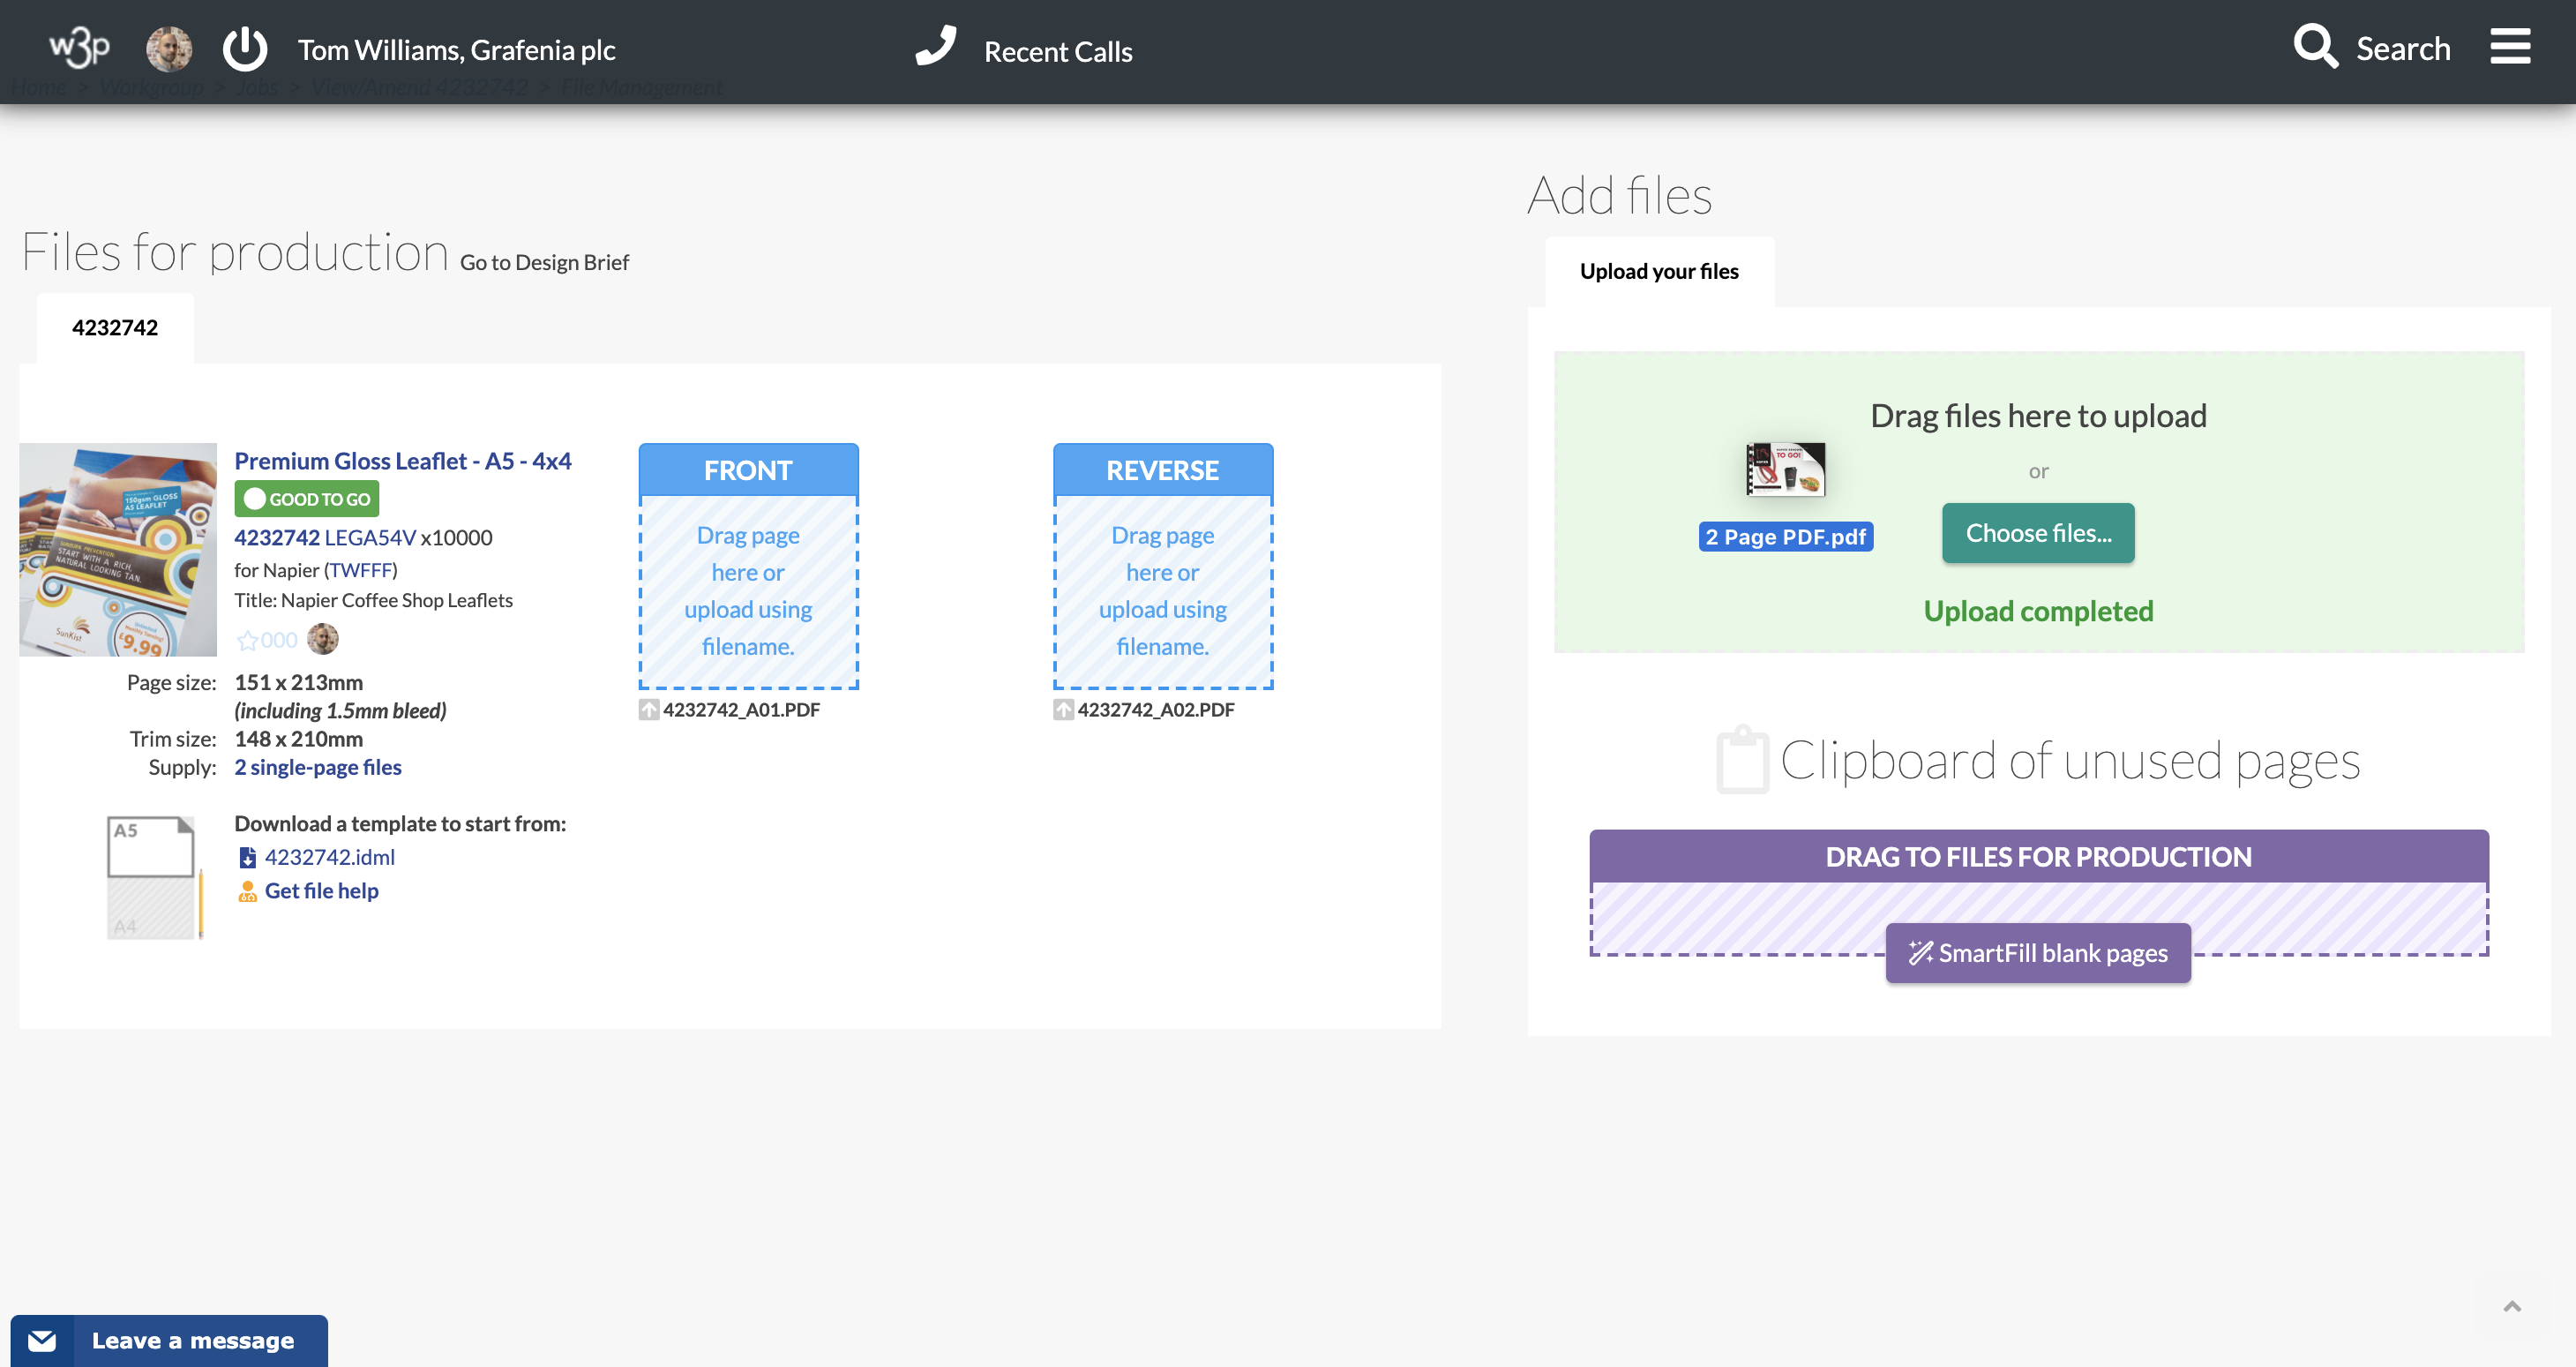
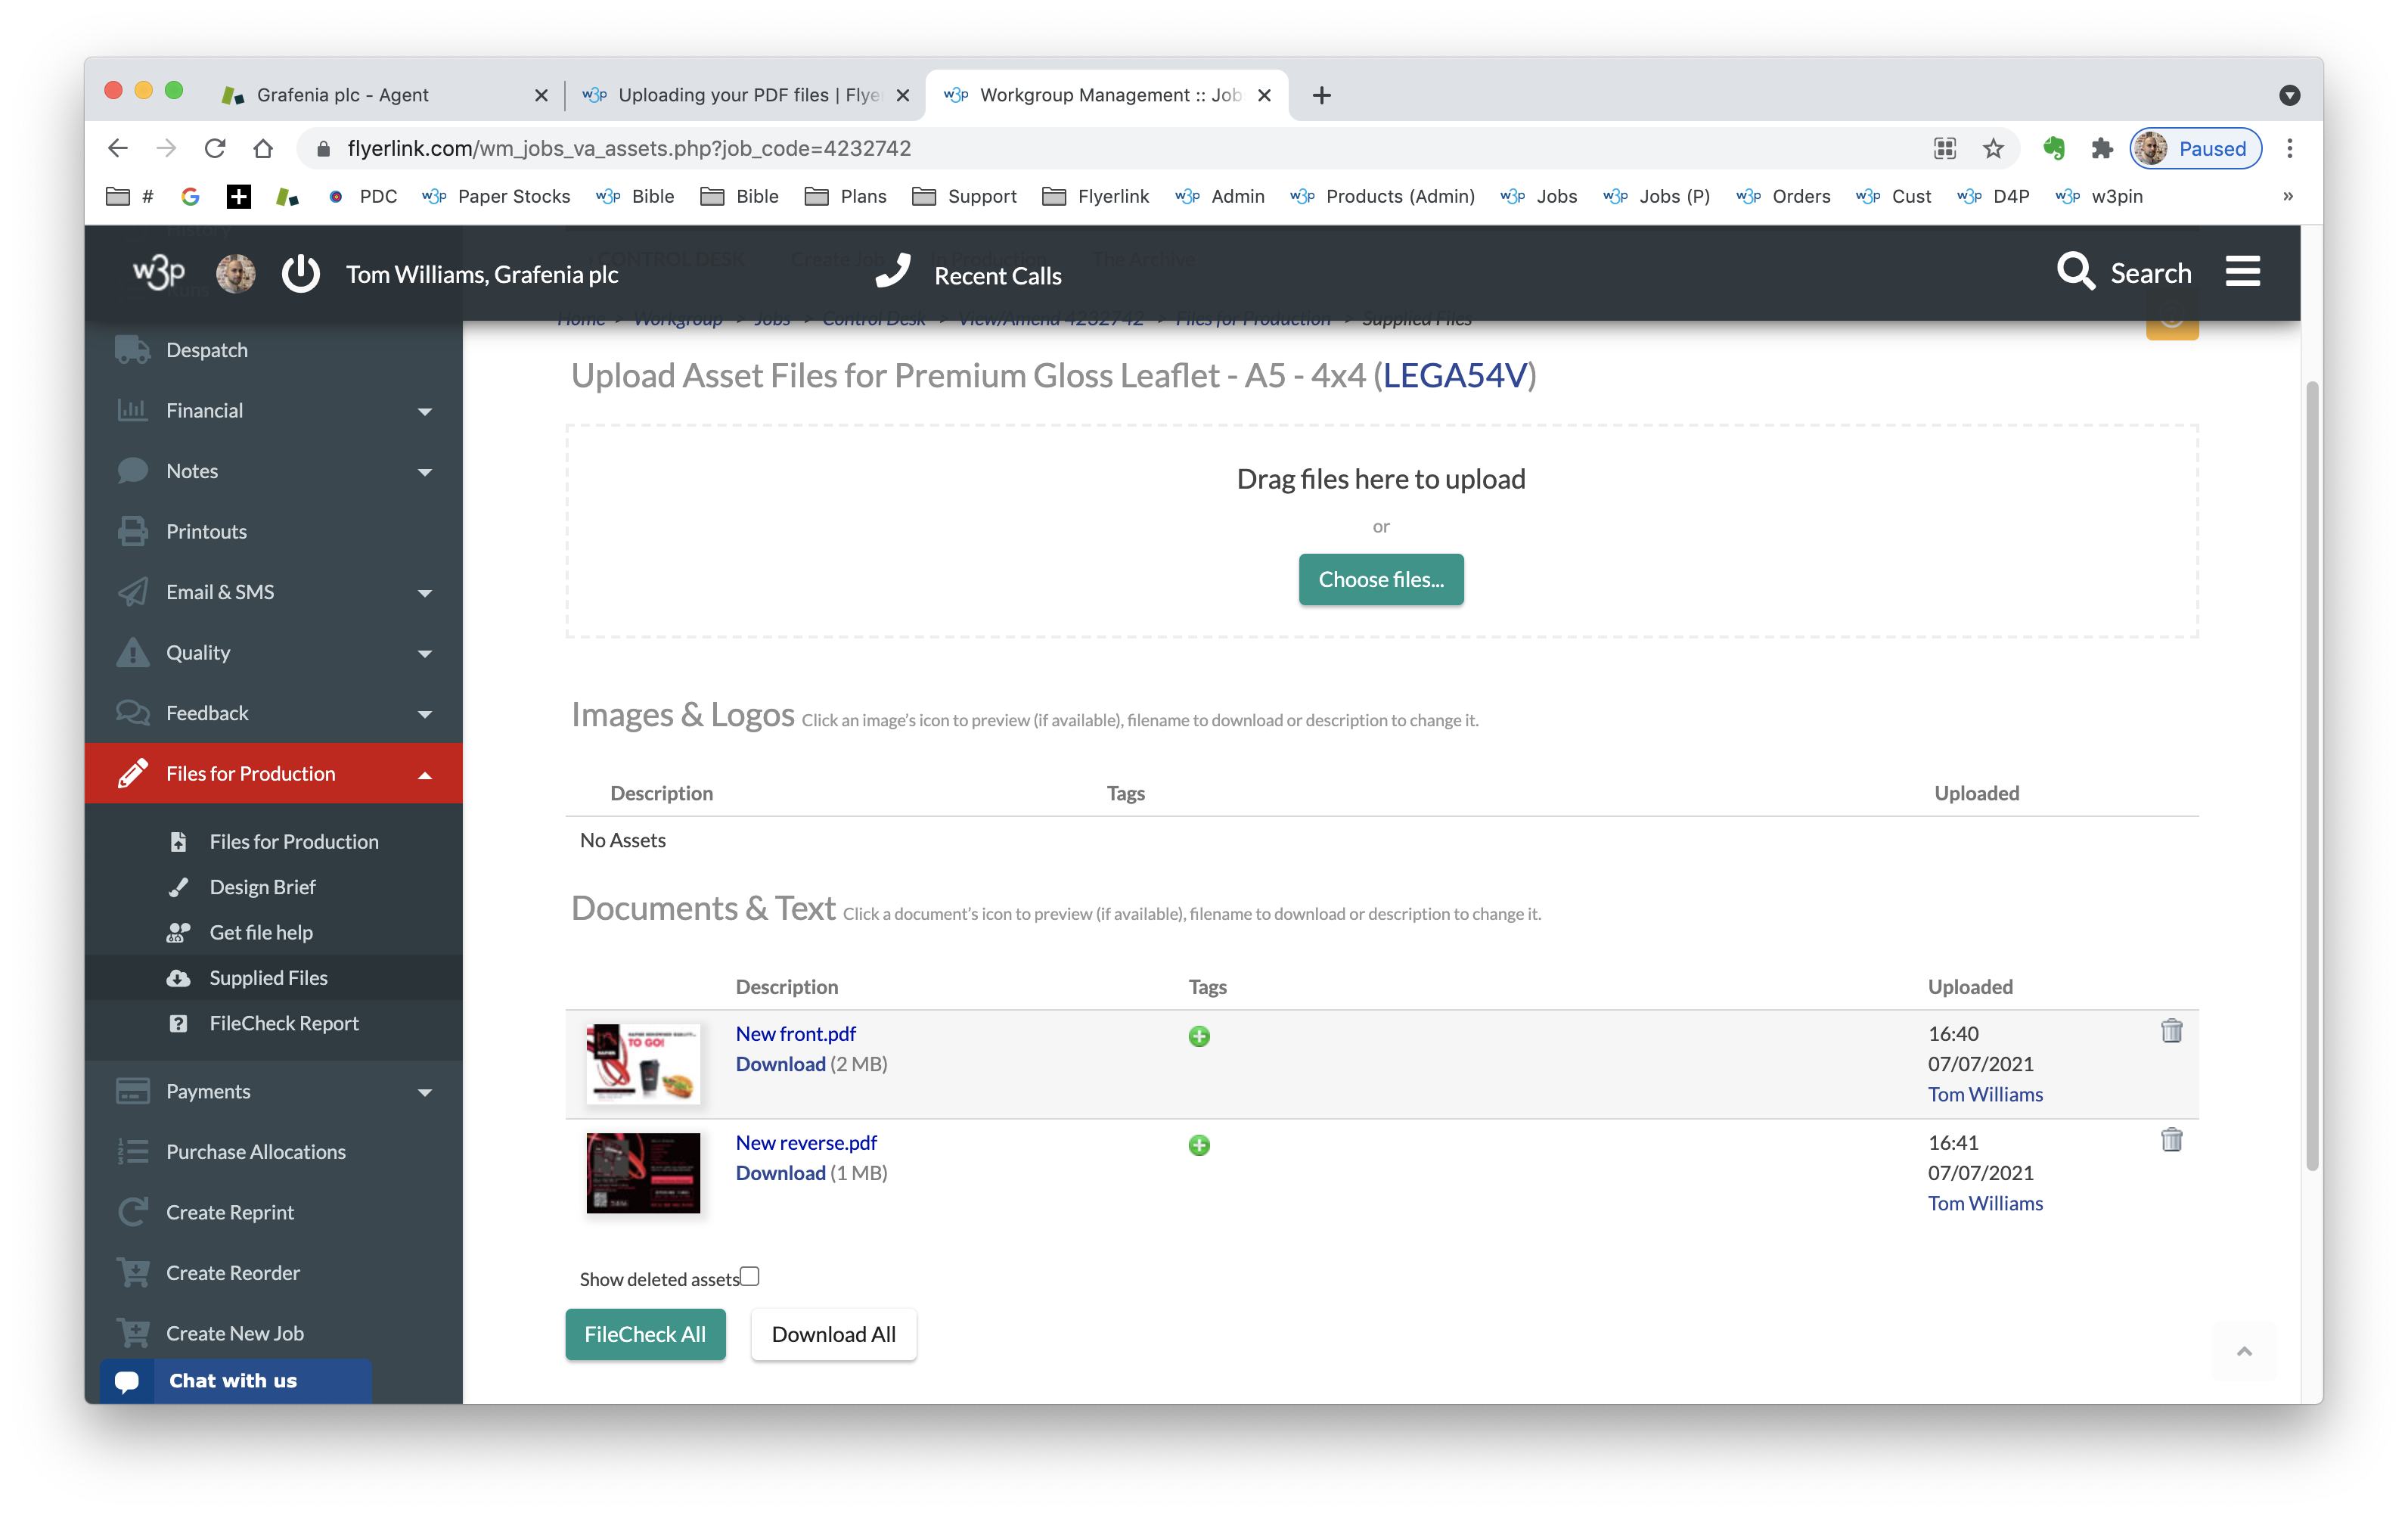
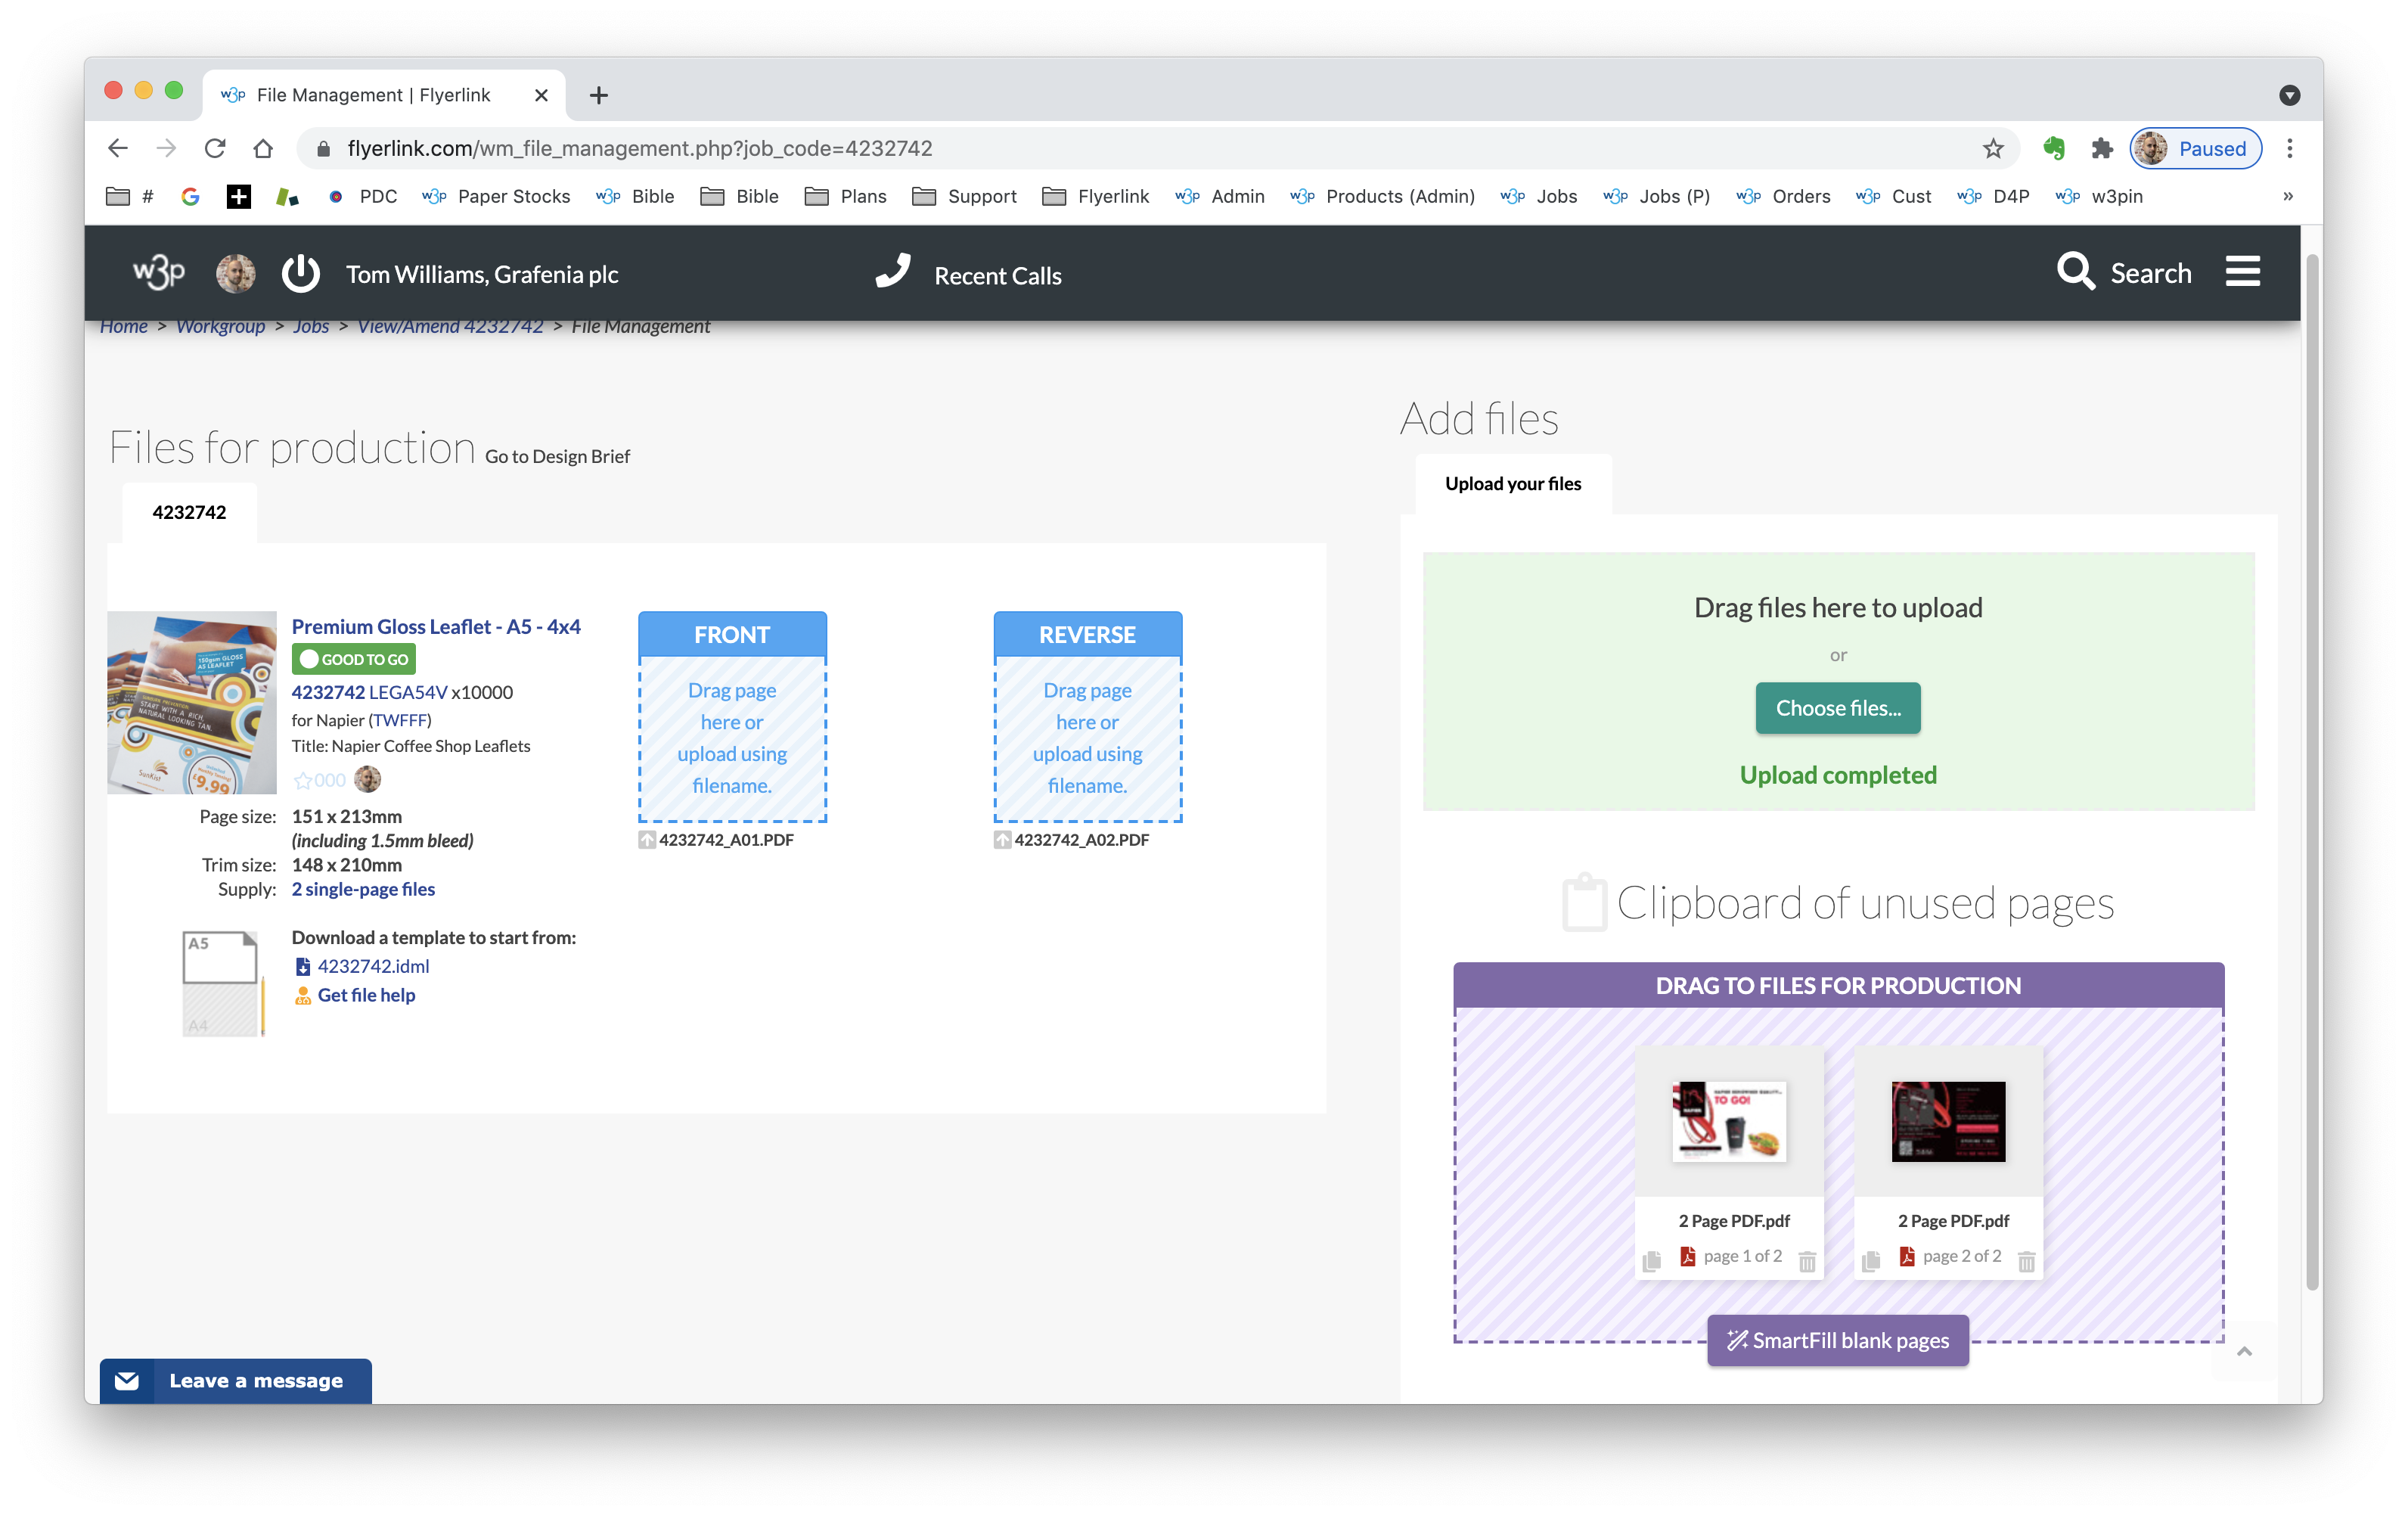
Once uploaded your files will appear on the Clipboard.
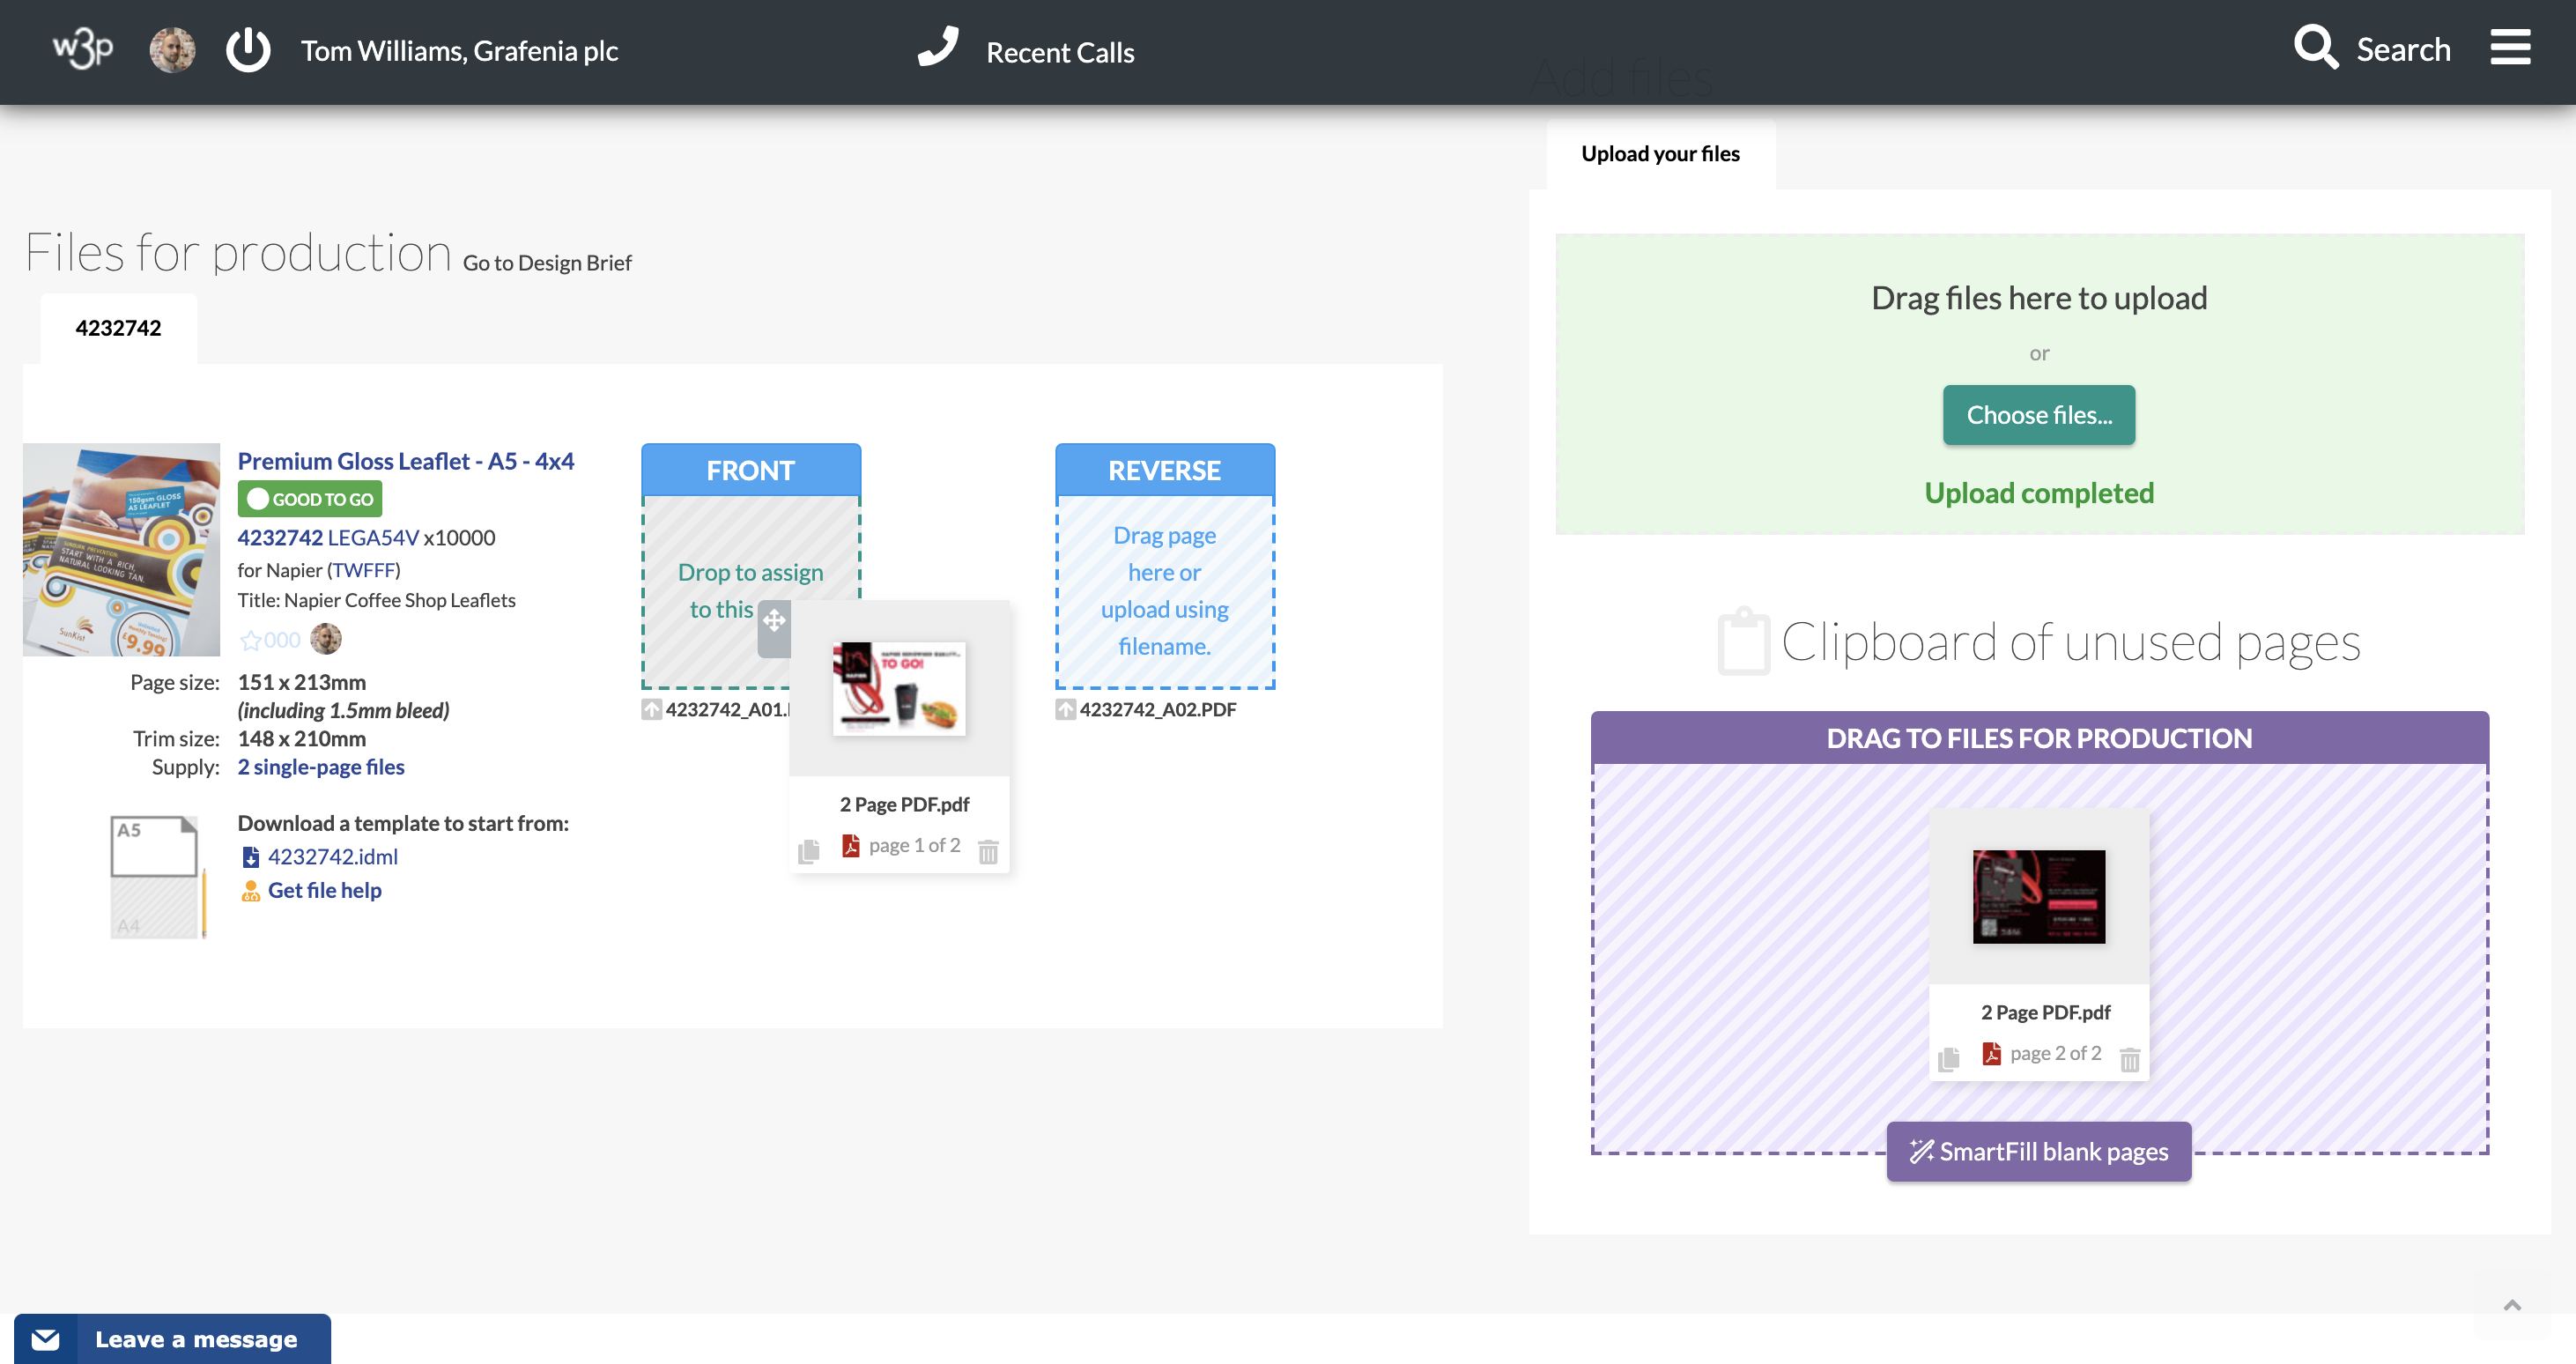
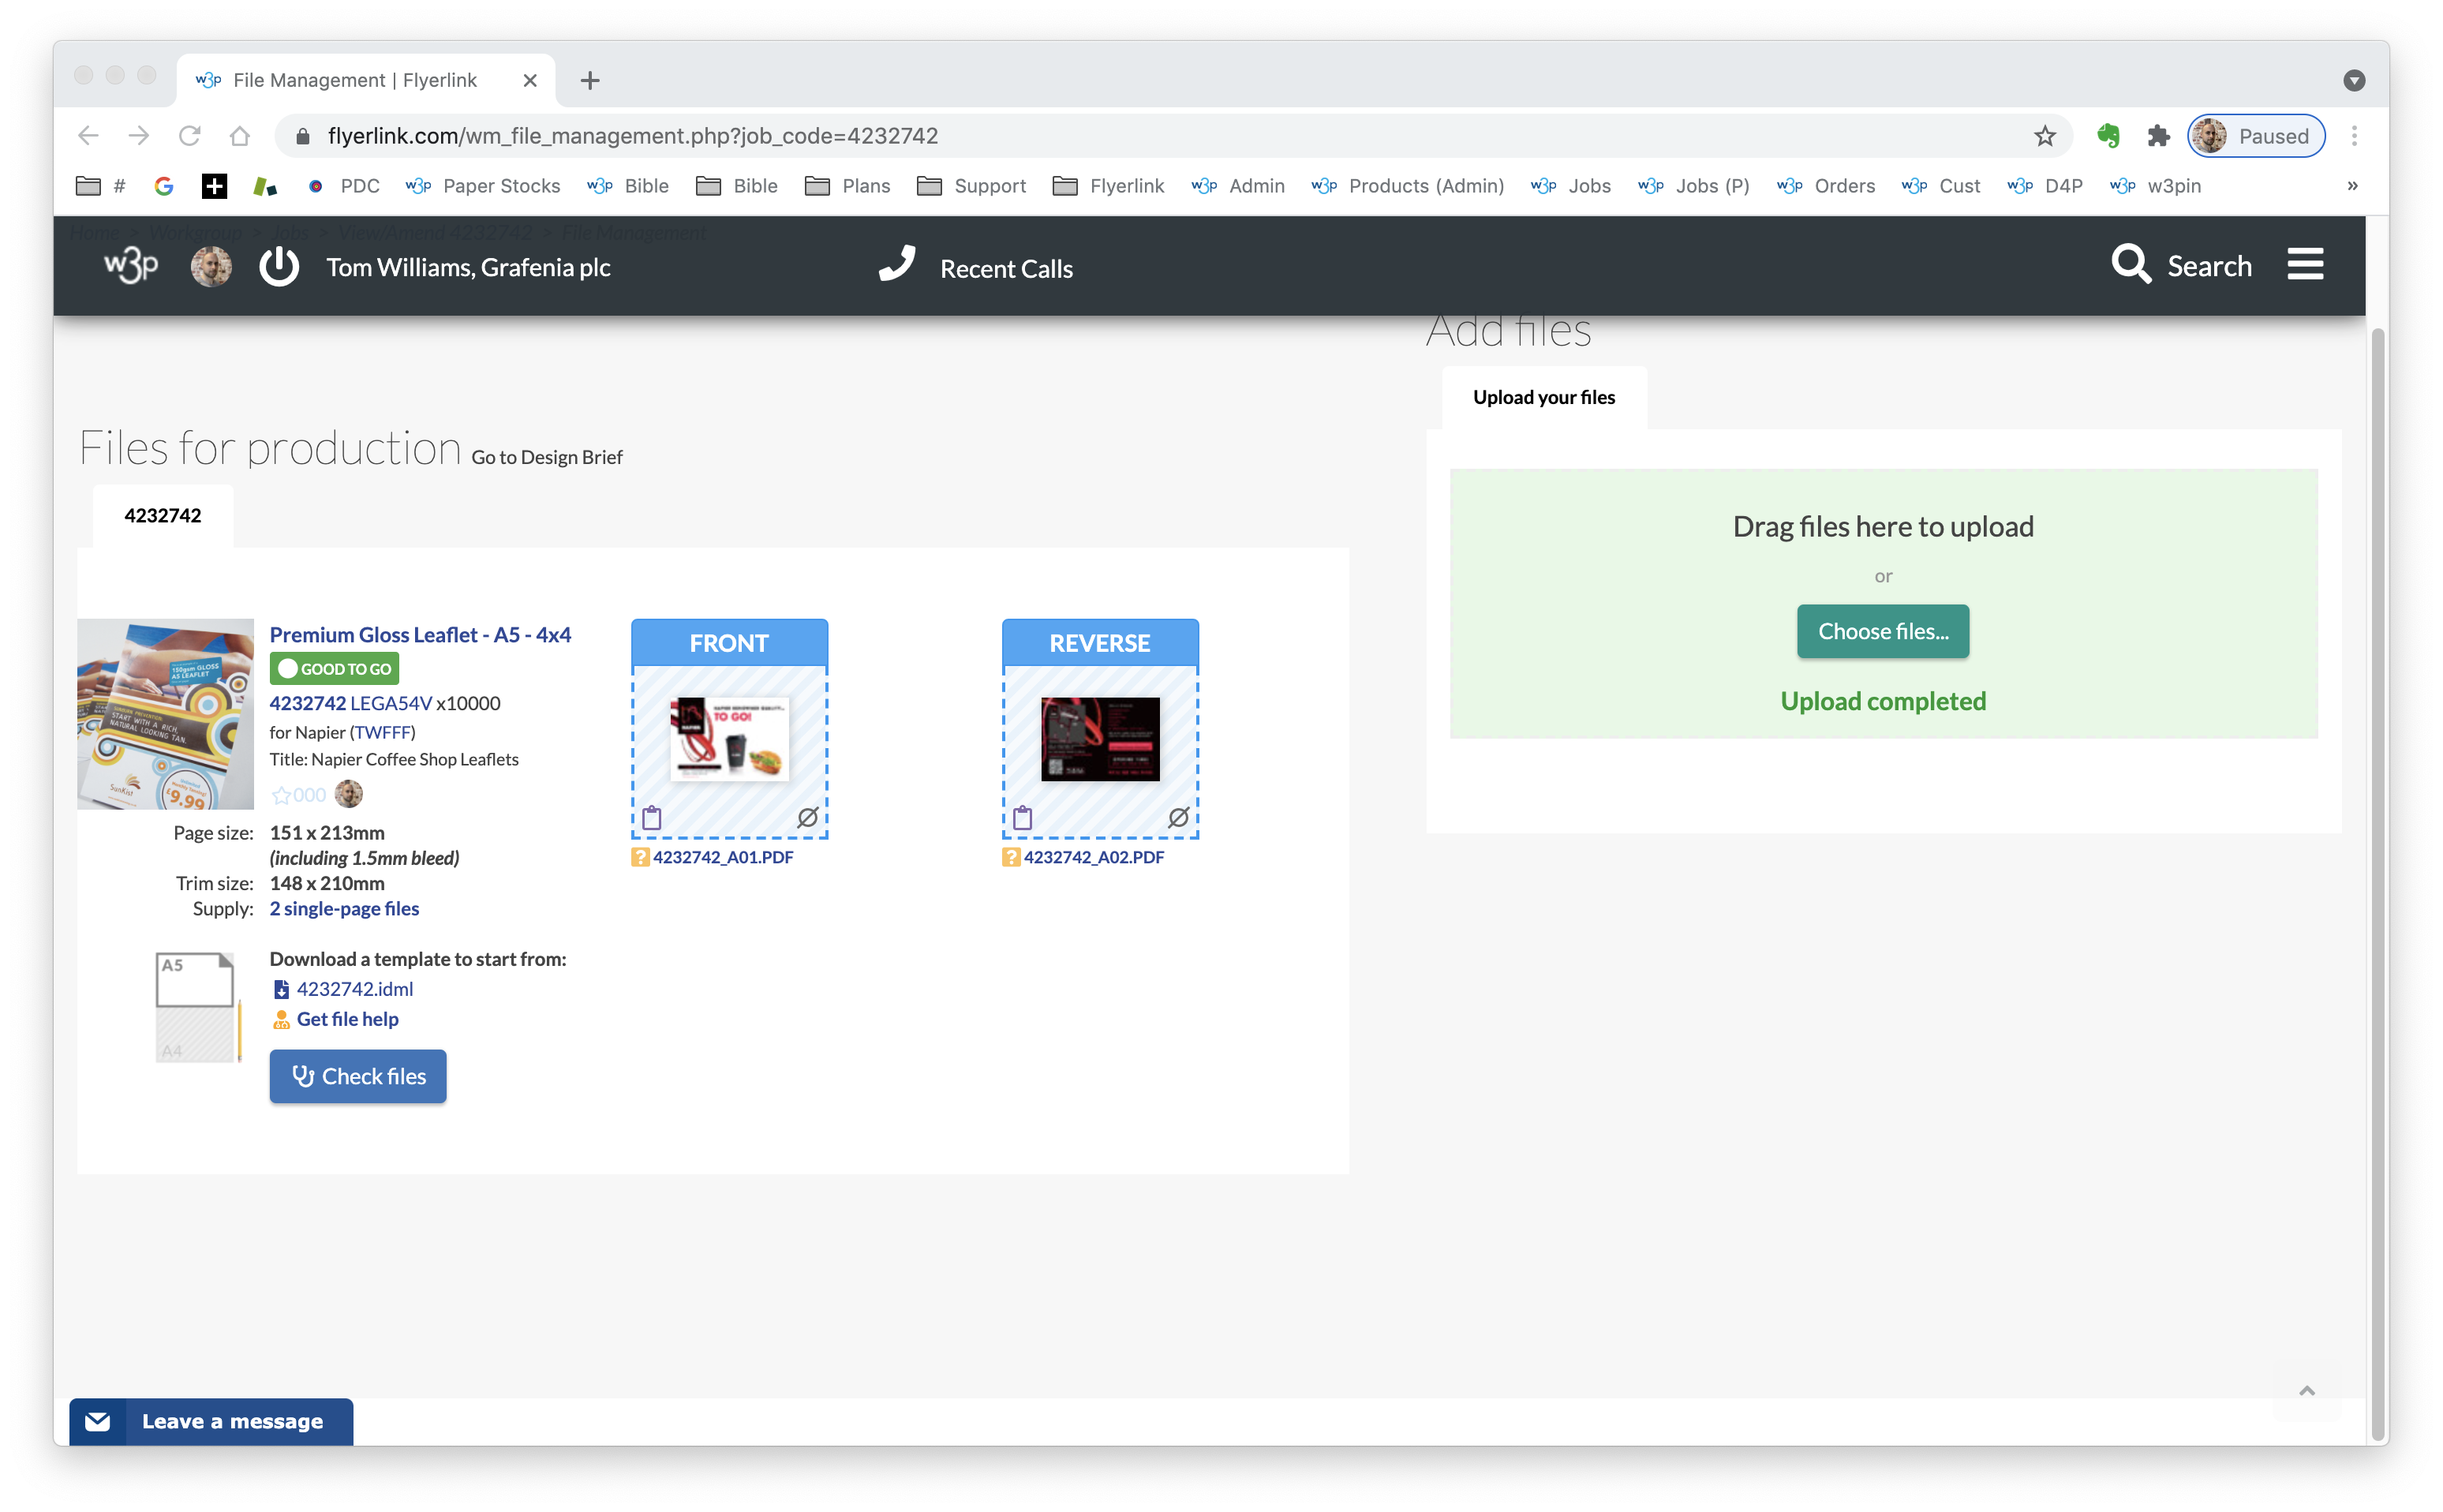
 Drag your PDF into position ensuring the Front and Reverse are uploaded correctly.
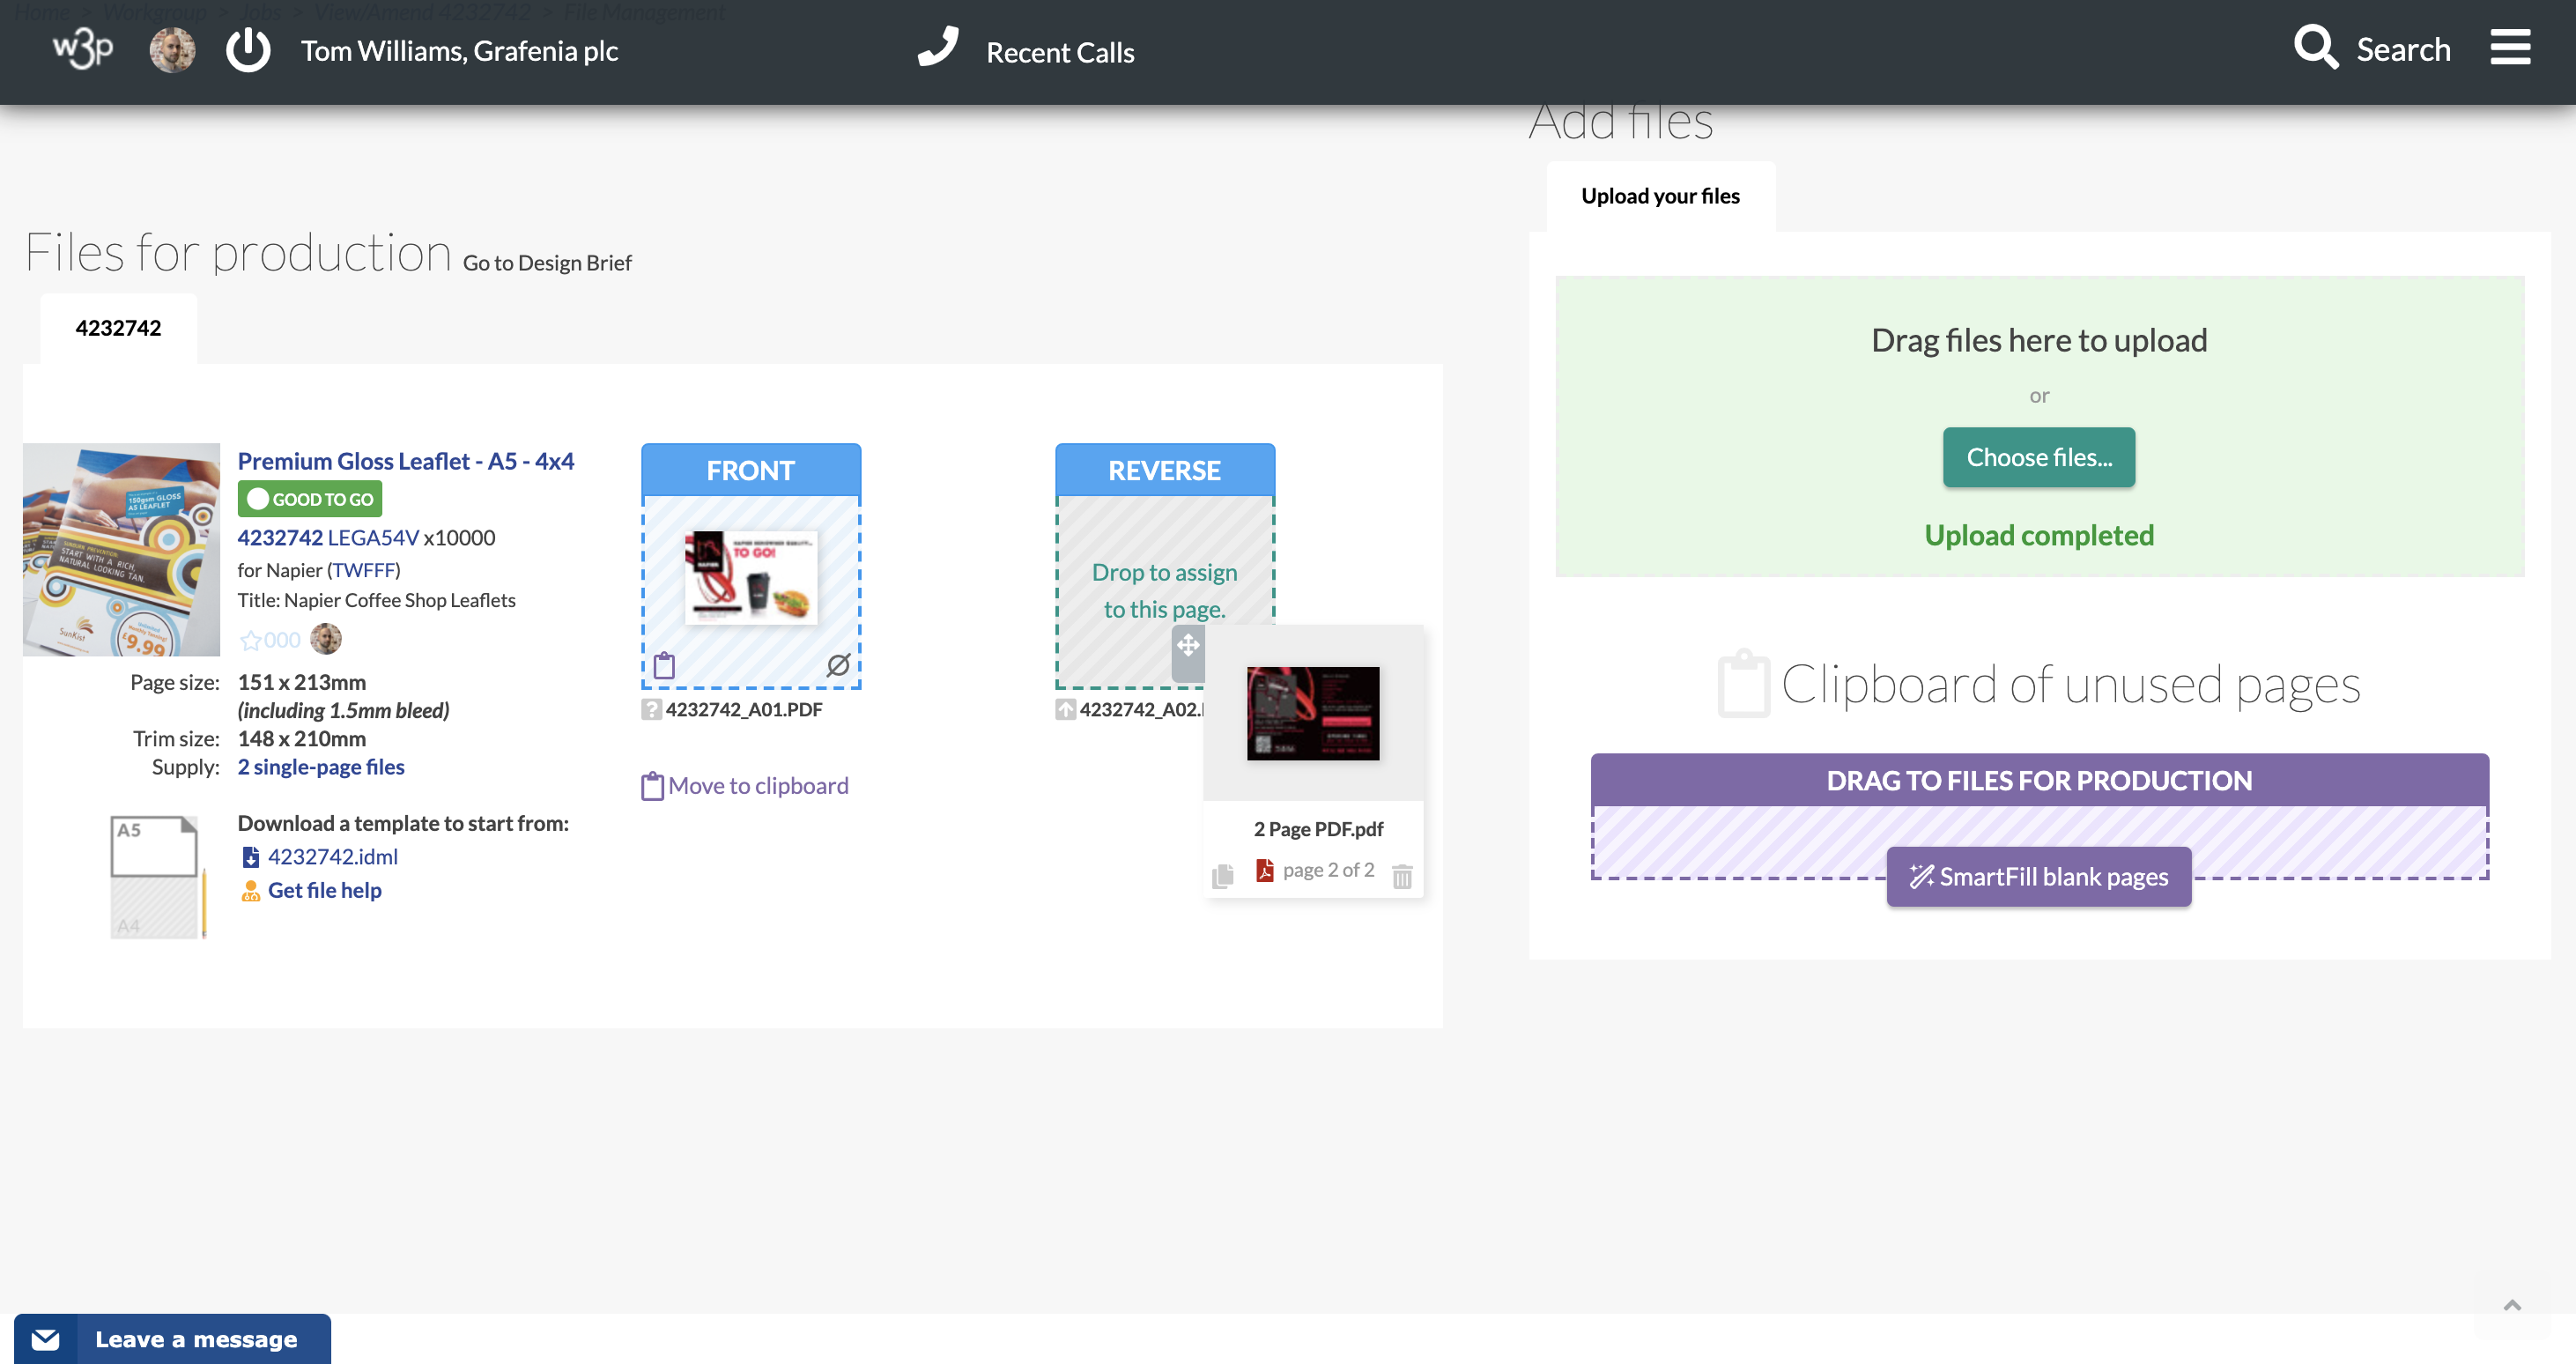
Once uploaded Flyerlink will check the Page Size.
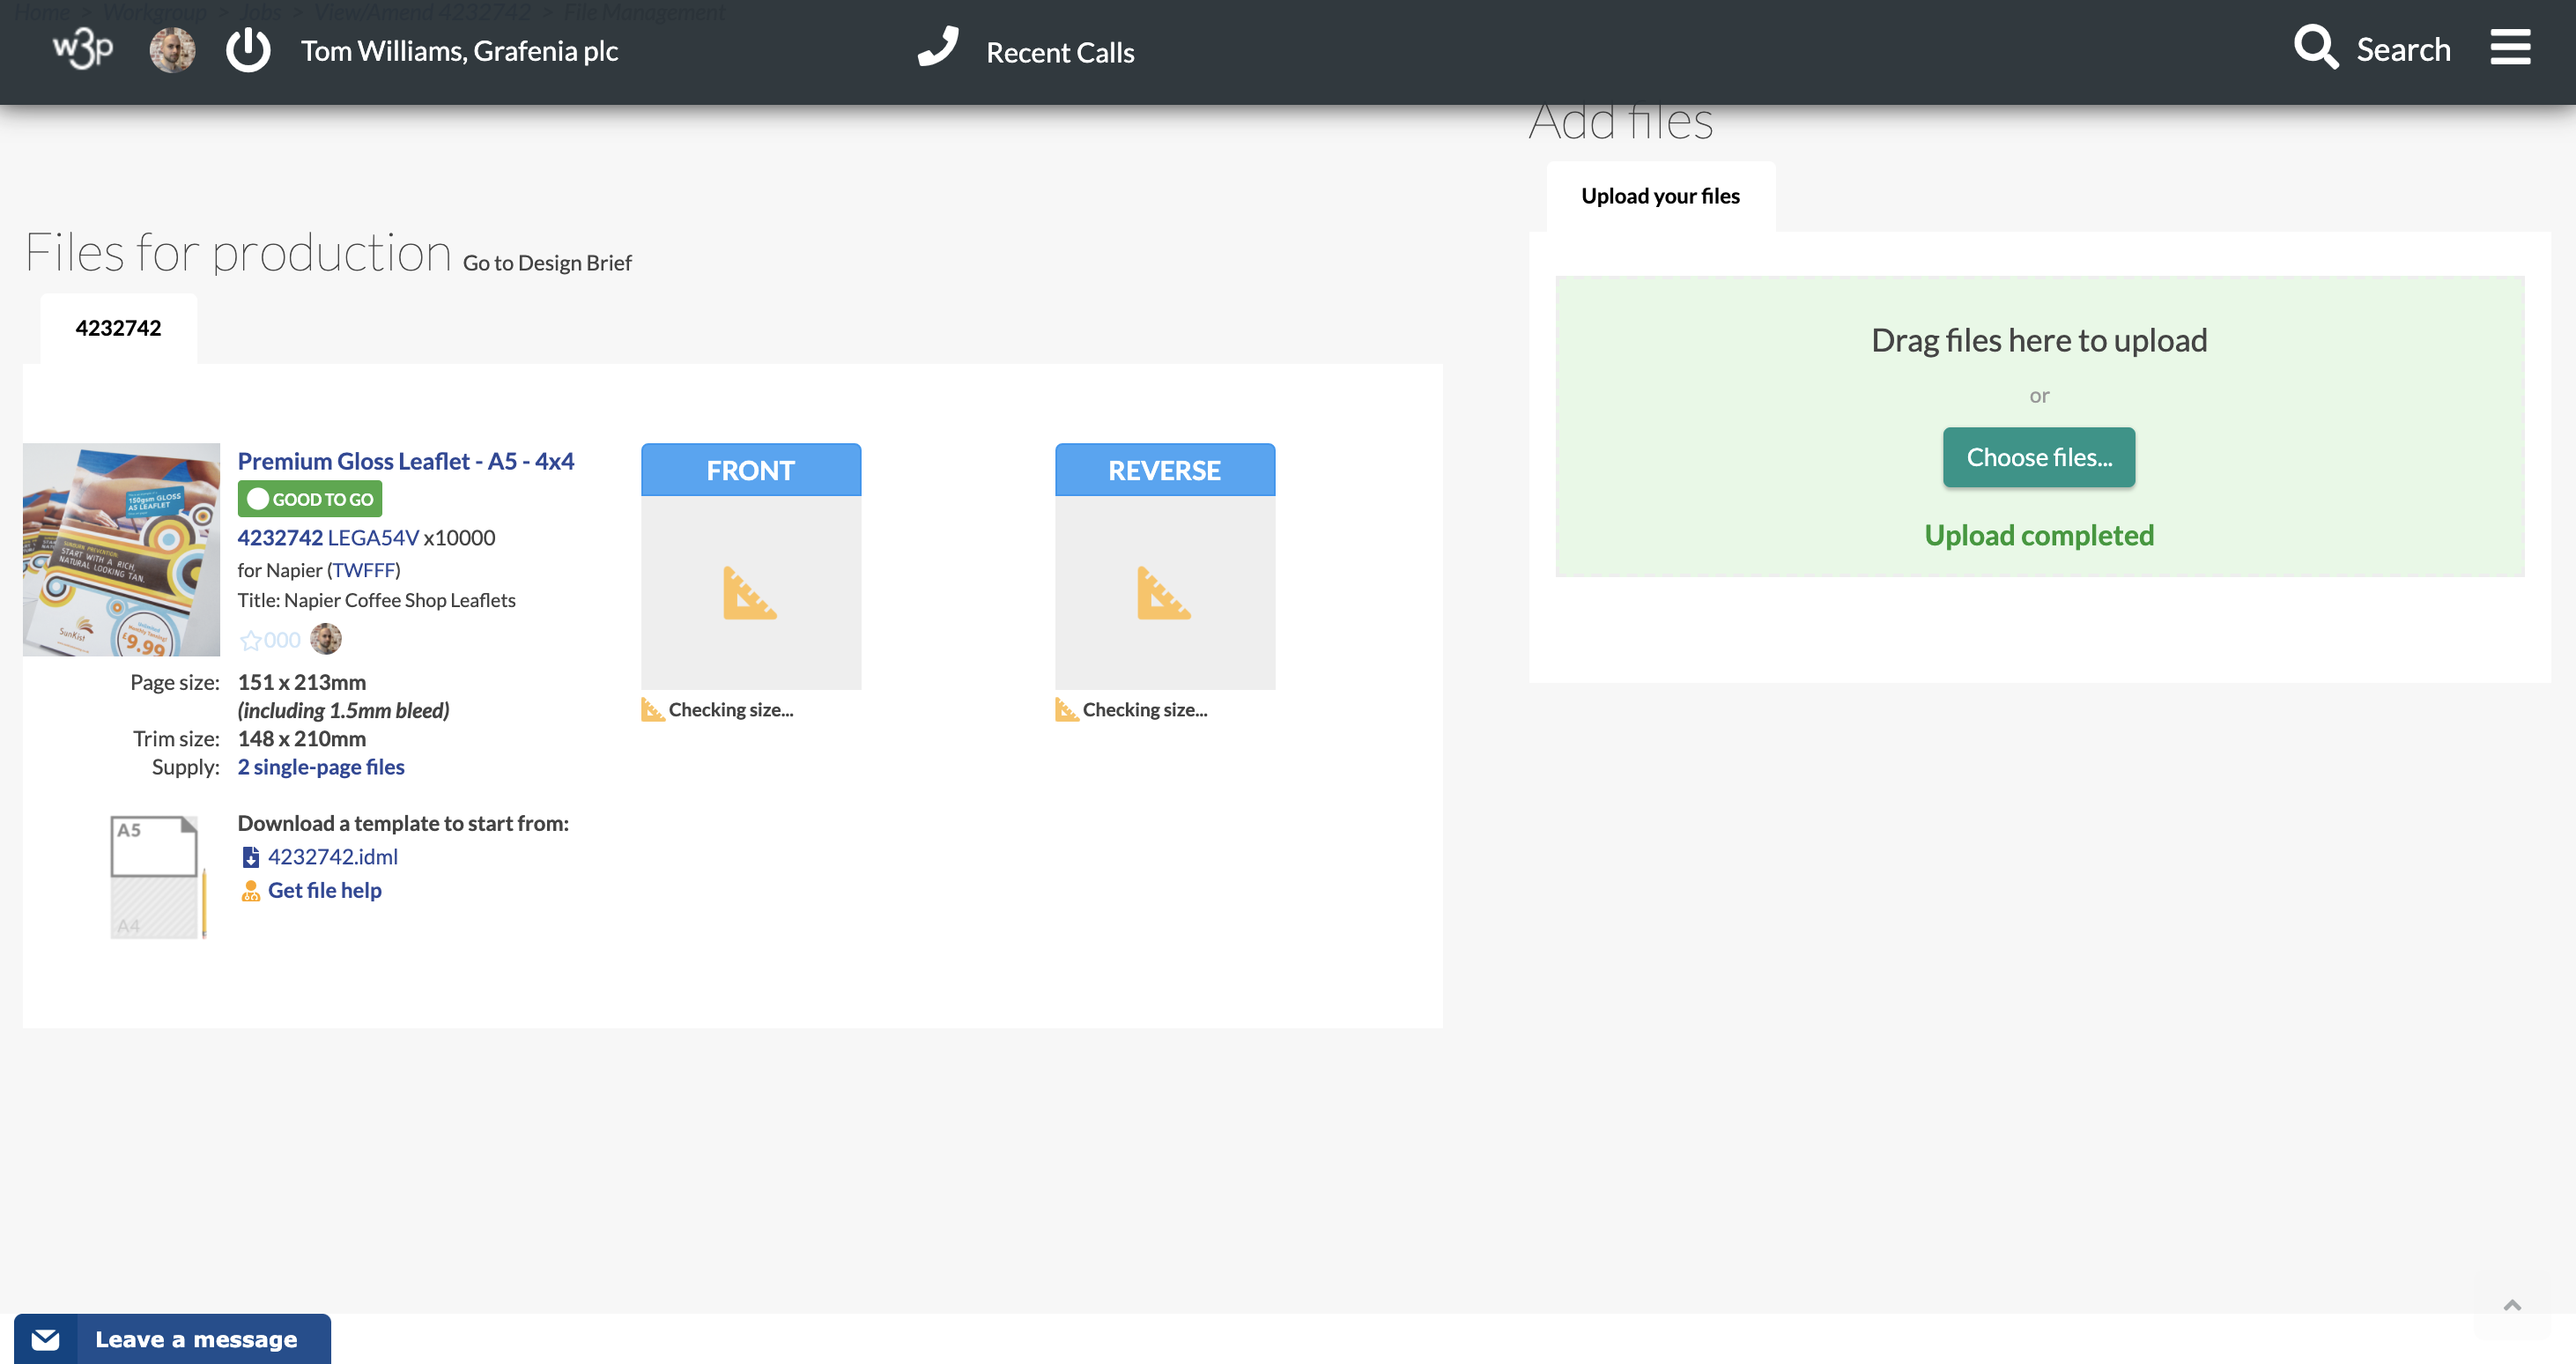
Click the Check files button to run the job through FileCheck and to move the PDFs onto the Design Brief tab ready for Production.
Removing Files from Front and Reverse Position
Click the Clipboard icon beneath the preview to move the file back to the Clipboard.
Deleting a PDF from the Clipboard
Select the trash can icon to delete the PDF
Duplicating a PDF
For multi-set business card you may wish to duplicate the common front or reverse, do this by selecting the Multiple Pages icon on the Clipboard.
Don't forget, you can request file supply help directly from within the print job you are working on. Head to

What is it?
It's a very, very simple way for clients to approve their artwork online.
How does it work?
Upload your Print Ready PDF files to the . When the files are in place, you'll see a new status 038:

Simply change the job to Status 038 and you'll be able to choose who to send the proof too, and personalise the email you send:

What then?
The client will receive an email inviting them to approve their design. When they follow the link, they'll be taken directly to the proofing screen.
The new BulletProof Approval screen
When they click the link, they'll see all pages in their design. (It doesn't matter whether you upload a multi-page file, or many single-page files, Flyerlink shows them in the right order):
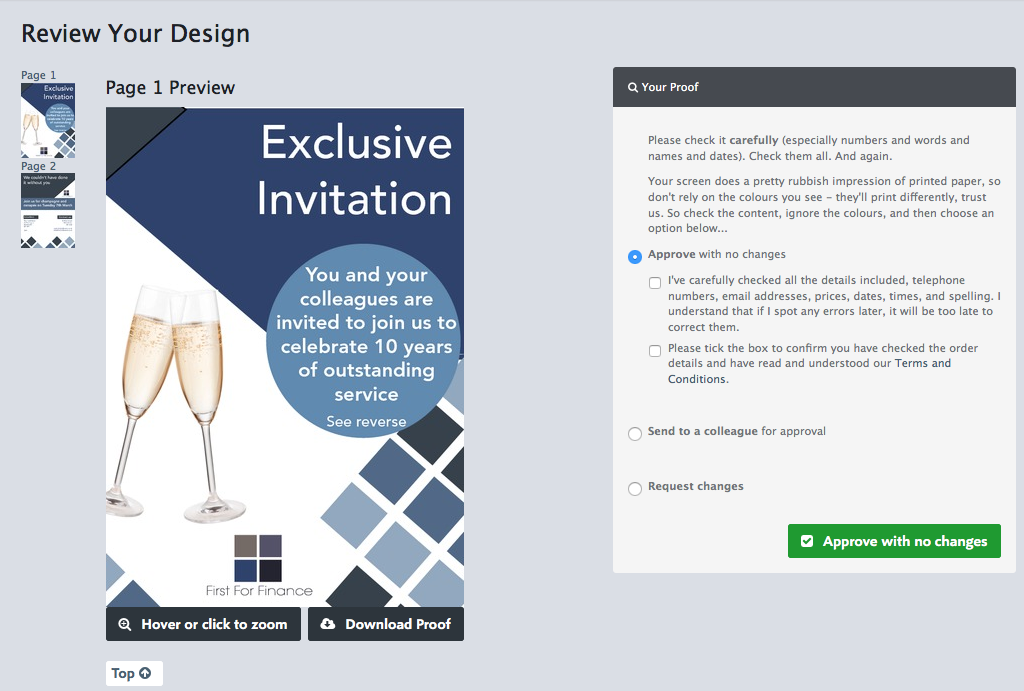
They can click to enlarge, which shows a huge watermarked, jpeg preview of their design. Or, using their mouse, they can rollover to see 4x magnification:

They can download a watermarked, flattened medium-resolution PDF to test print on their own printer by pressing the Download Proof button:
When they're done checking, they can Approve with no changes, or request changes. Flyerlink will notify you with a newsfeed and email and change the status accordingly. If they've approved, the files will be move to the filestore ready for you to 081. If they request changes, we won't copy the files back so you don't accidentally 081 them (although, if you 071 them first, they'll be copied back).
We show the order acceptance tick box too, if they haven't already signed an order form or accepted the terms & conditions of the order. (If they have, we hide that section).
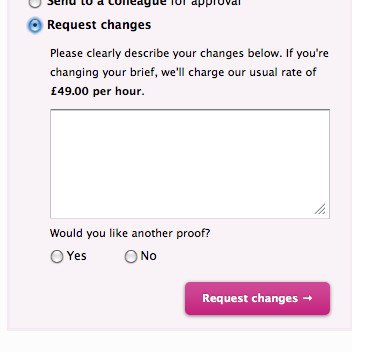
What if they want changes?
We let them know that changes may be charged at your usual hourly rate. If you want to change this, go to Workgroup > Admin > Workgroup and set what you want in Hourly Artwork Rate::
Can they annotate the proof?
Following client and franchise feedback, customers found SmartReview difficult to learn and complex to use. We've dumbed-down the interface of BulletProof to be as simple as possible. This means its not possible to see colour-separations, make measurements or add annotations.
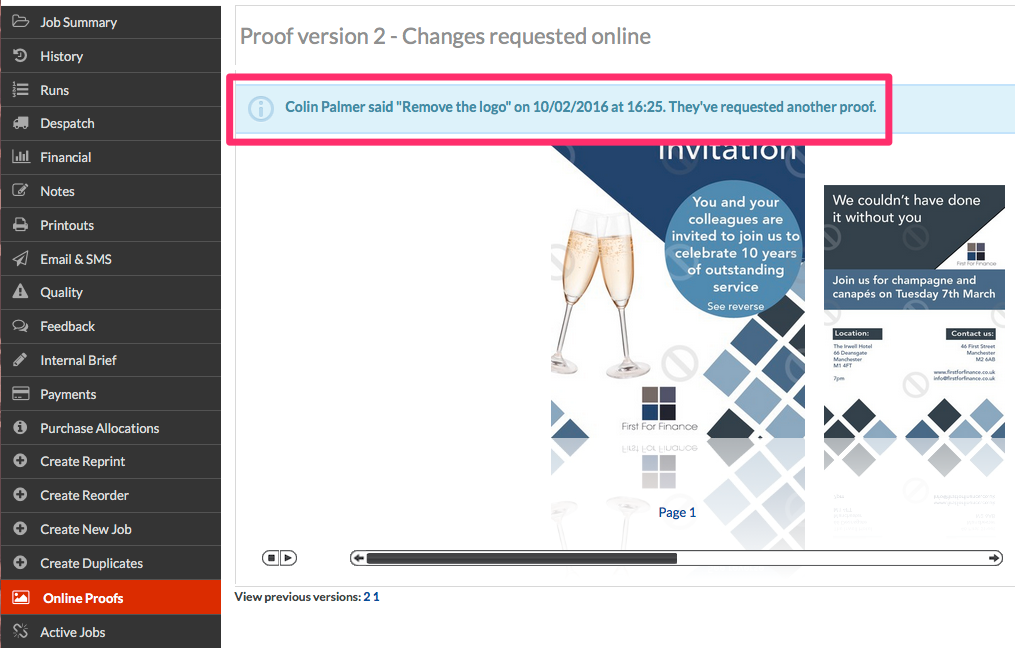
Where can I view their changes?
Every time you upload a file and change the status to 038, we make a new revision. We keep hold of the previous revisions and you can view them at any time. Go to Workgroup > Jobs > View/Amend > Online Proofs to see the current proof and any customer changes:
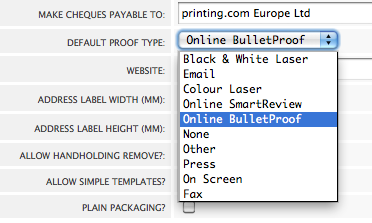
Can I make this their default proof type?
You can choose a default proof type for all your customers at and choosing an option from the Default Proof Type: dropdown:
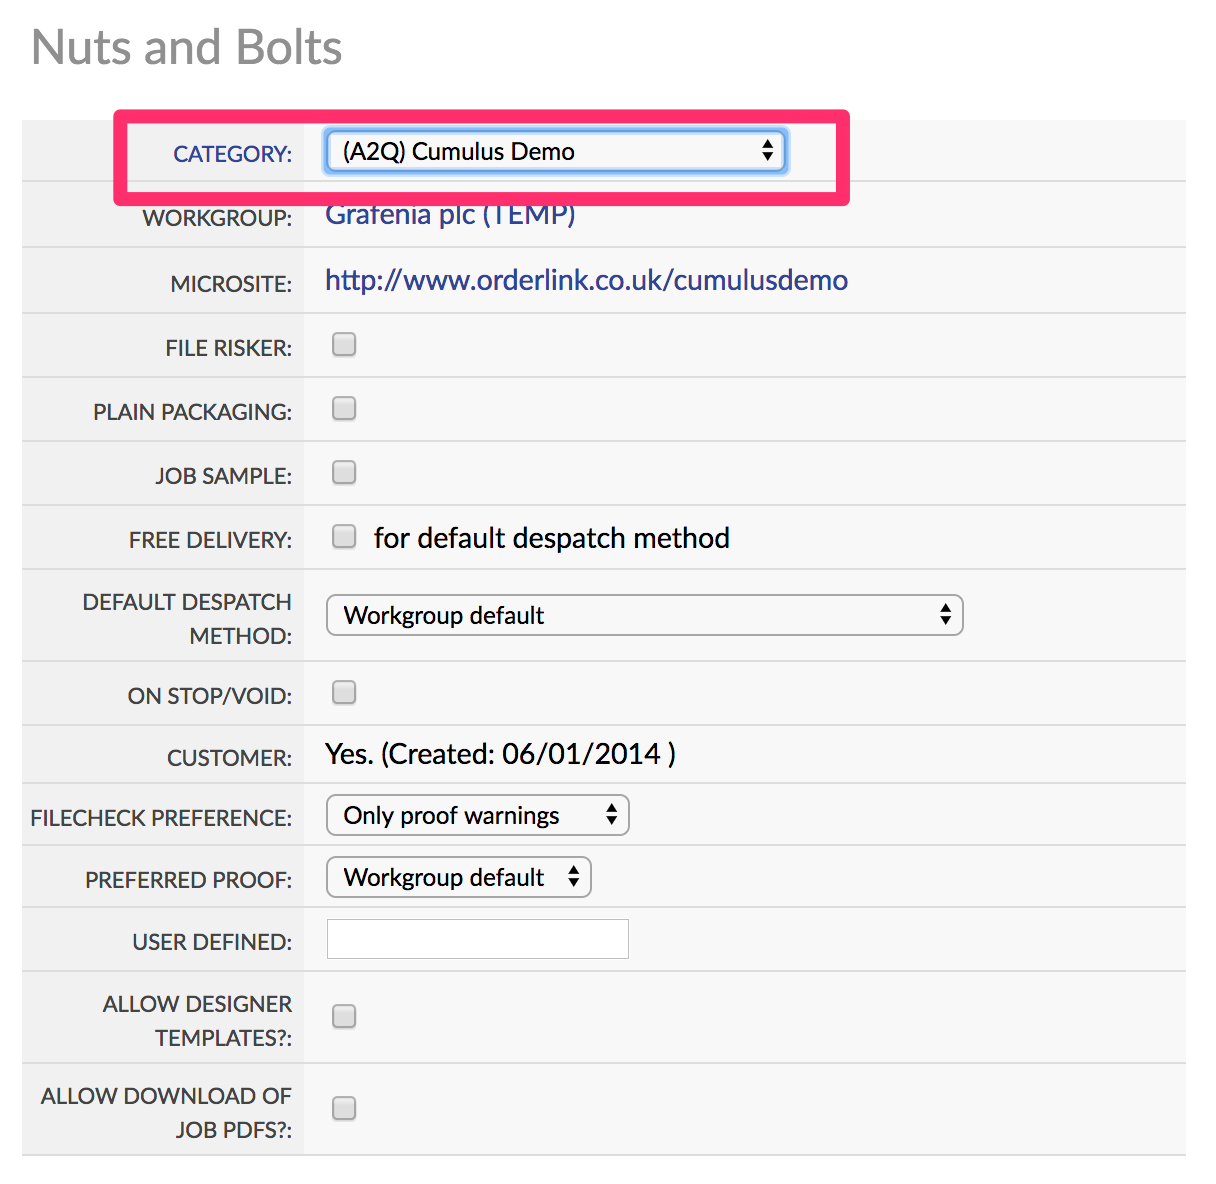
You can now also choose a default proof type for an individual customer, from the Nuts & Bolts section of the Customer screen. Choose Workgroup Default to use the settings for your whole workgroup, or set each customer individually:
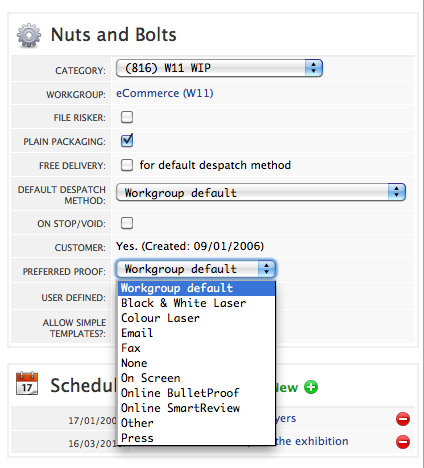
Both these setting apply to new jobs created from now.
Anything else?
Sometimes the person placing the order isn't the person who needs to check the design. That's why we've added a "Send to colleague" feature:
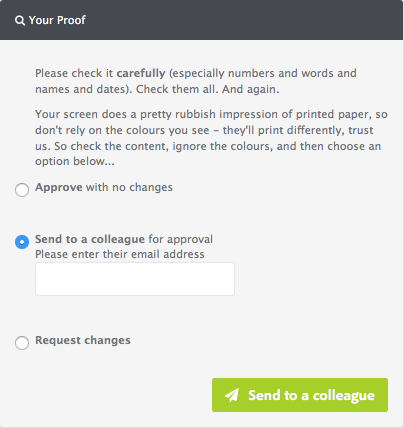
This lets the customer enter the email address of anyone they'd like to send the proof to (they don't need to be a my.printing.com user, or be listed in Flyerlink). We'll send a link on their behalf, which allows that person to view the proof, approve or request changes. (They won't have access to the rest of the client's account - just the ability to check the proof). Everyone is notified when they've done it.
Does the client have to sign in to approve?
No, we send them a secure token which enables them to see the Proof without signing in.
What if the client already supplied the file?
If the client supplied the file, we recommend preflighting the file and sending them back a FileCheck Results proof. See article 6091 for more info.
What about templates?
The user editing the templates approves the file online. If an administator needs to 'sign off' artwork see How do I set up administrators & what can they do?
Does it work with BrandDemand/Orderlink microsites?
Yep.
For our fabric range you can also include 3D models in proofs
First add the print-ready files to
Next if you see a menu
Head here to add the thumbnails to a 3D model
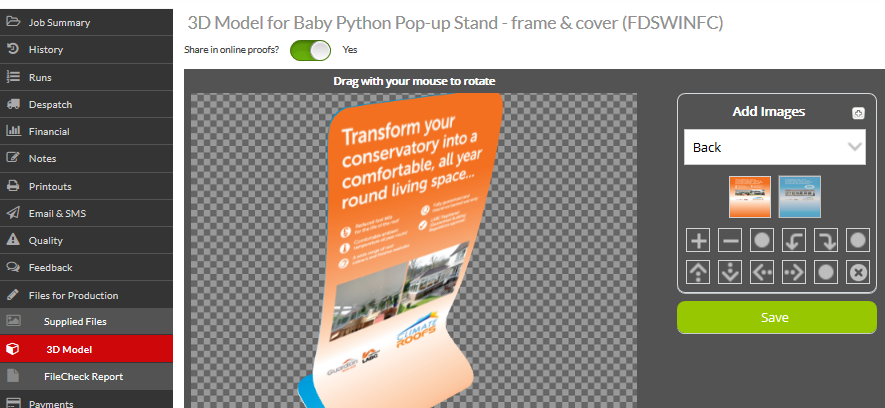
Save your change and set the share in online proofs option to yes
The client will see a 3D model in their online system

For more see 3D models for proofing
FileCheck Results is a form of Online Proofing which lets clients approve their artwork for print online, or identify issues that need addressing before production.
Flyerlink has two in-built forms of Online Proofs:
a) FileCheck Results (status 037)
b) Bulletproof (status 038)
Both show clients the artwork and allow approval, rejection or changes. However FileCheck Results is designed for customer-supplied files, while Bulletproof is for proofing artwork you've designed for the client.
FileCheck Results can only be used after files have been through our Preflighting system. Customer-friendly preflight messages are then shown to the customer alongside the proof.
To send a FileCheck Result to a client
1) Move the client-supplied files into your .
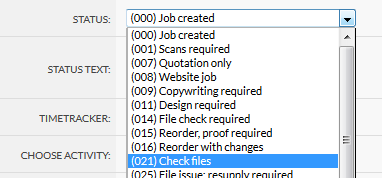
2) Change the Job status to 021 to send the files into preflighting.
3) Once the files have returned, head to
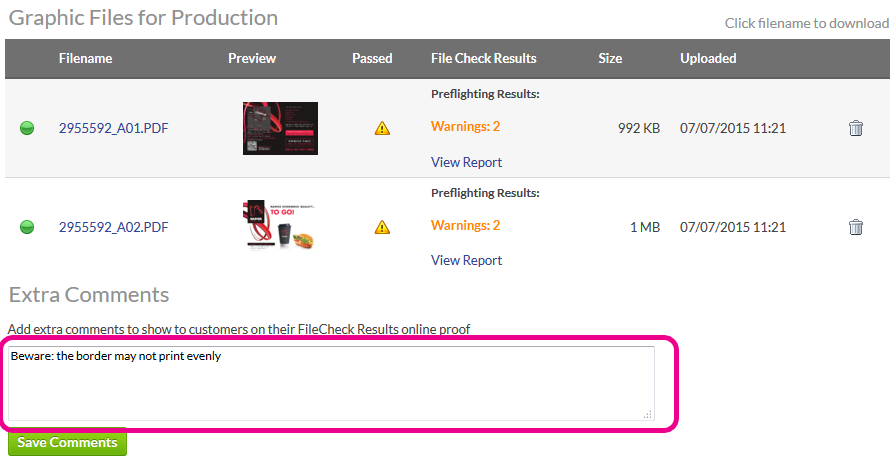
Review the FileCheck results and the new PDF
Add any extra comments you would like the client to pay attention to, such as a warning if a border is in the design that it may print unevenly.
4) Head back to , you'll see a new status 037.
5) Choose the status 037 and you'll be able to choose who to send the proof too. Your email will include a link that directs the client to their microsite to see the proof, without needing to sign in.

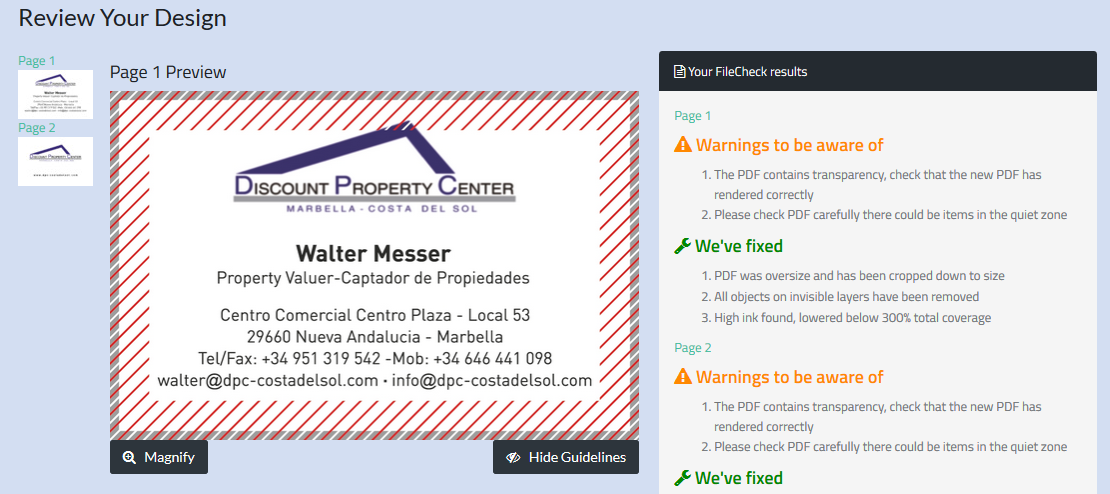
The client will receive an email inviting them to review the FileCheck Results their design. The email will contain a link to a special FileCheck Results page.
The online proof shows all pages in their design, regardless of whether they were uploaded as single page files or multi-page:
They can click to enlarge, which shows a large jpeg preview of their design:

By default, the client's design will be surrounded in guidelines to show where the Quiet Zone and Bleed are. When the guidelines show, there's a key to explain the hashing to clients, and that important design elements should be outside the hashing.
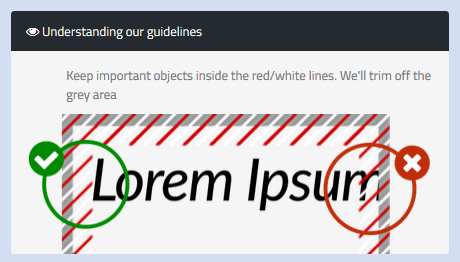
The guidelines can be turned on or off, to see the design and if the design elements are in danger.

FileCheck Fixes & Warnings
The FileCheck Review page show a list to clients of any fixes made in preflighting or any warnings highlighted that could aversely affect the quality of the print.
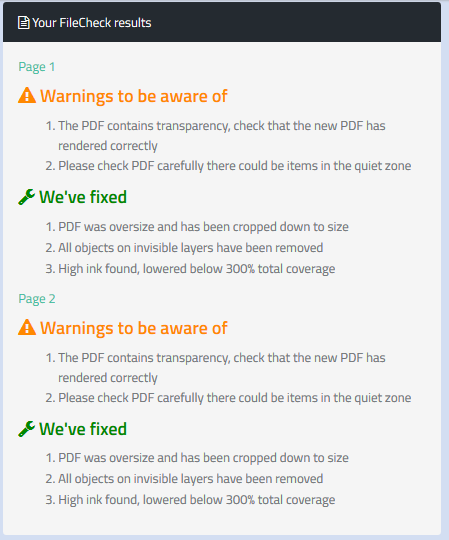
Based on the warnings and the design, the client can choose whether the file should be approved for print or whether changes are required.
FileCheck Fixes & Warnings :: Customer Options
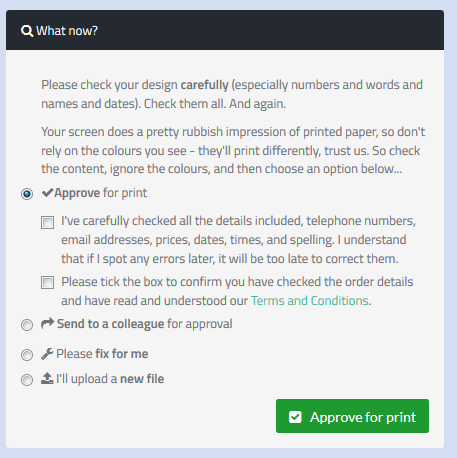
When the file passes preflight, there are 4 options available to customers:
a) Approve for print
If the client is happy with the proof, and is aware of the warnings, they can approve the design.
The job status will be then be updated to 077, and the studio is sent an email asking it's been confirmed and is ready for production. You can then change the job status to 081.
b) Send to colleague for approval

If the client wants a second opinion, they can enter a new email address. We will then send an email to that address with a link to the page and an authentication token, so the colleague can then look at the design and accept or reject it.
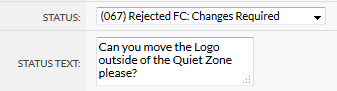
c) Ask the studio to fix the file
The client can also ask the studio to fix the file for them.
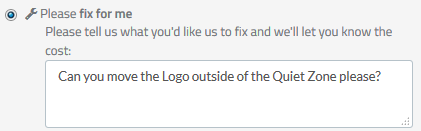
The job status will be changed to 067, and any text entered by the customer will appear under the job status in Flyerlink.
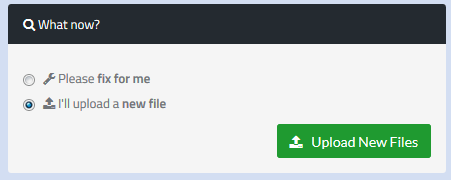
d) Upload a new file
Finally the client can reupload a new file.
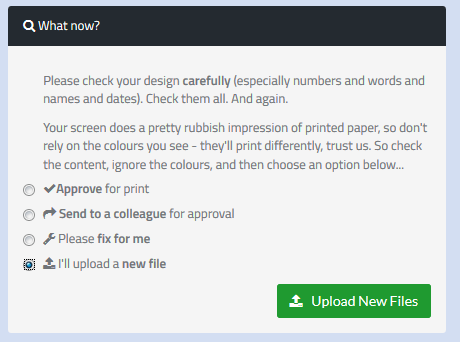
This will change the job status to 057, and give the client a chance to upload replacement files in a dedicated resupplying artwork page.
Once new files are supplied, you will be sent an email and the job status will be updated to 014 FileCheck Required
Filecheck Errors
If the supplied file fails to pass through Preflight, the file cannot be approved for print.
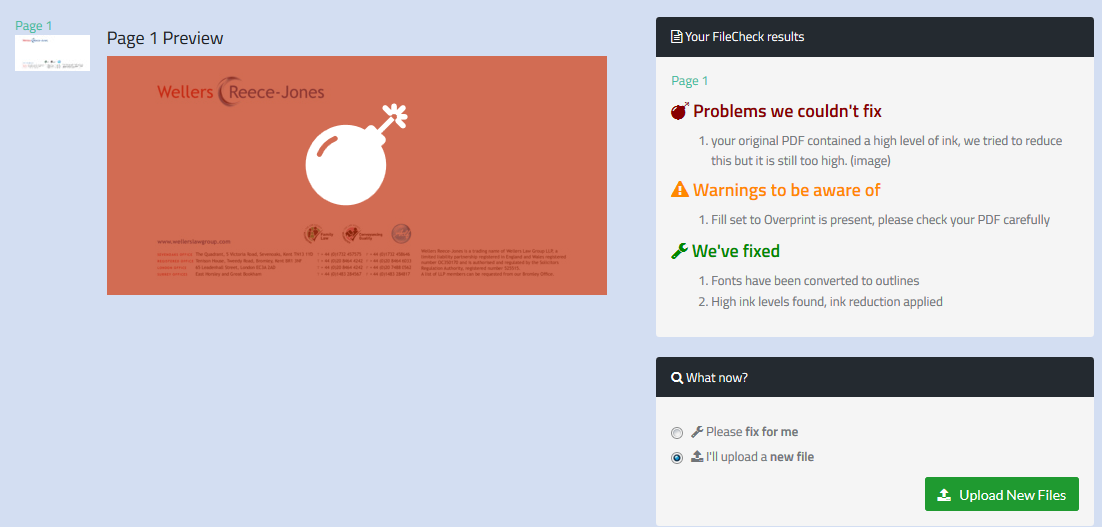
Any pages that fail will have a bomb overlay to show they aren't fit for production, and there will be an extra list of reasons explaining what the problems we couldn't fix were.
FileCheck Errors :: Customer Options
The Options available when a design fails FileCheck are for either the client to upload a new file or for the studio to fix the issue for them.
Sometimes a file passes preflight, but you don't want customers to be able to approve the file.
If you want to restrict the options, on
.png)
Press the Send to 024 button before you then share your file check results. We will remove the file from , and limit the options available in preflight results to your customer to prevent the file being approved for print.
Another option you may want is to retrieve files that fail and are at status 024.
To retrieve failed file, head to
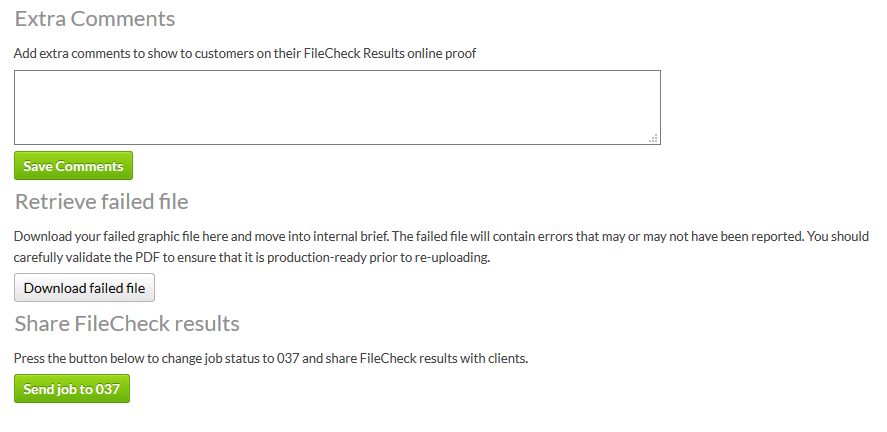
Press the Download file button, and we will move the failed file into your and download the file.
When you preflight the result, there will still only be 2 options available to the client, to fix the file or to upload a new one as there are errors that will affect the print quality. But you are able to download the file and fix the issues yourself using this option.
Please note: the download option will only appear for a short time, while we still have the file in our preflighting outbound area.
For our fabric range you can also include 3D models in proofs
First add the print-ready files to Workgroup > Jobs > View/Amend > Files for Production
Next if you see a menu Workgroup > Jobs > View/Amend > Files for Production > 3d Model
Head here to add the thumbnails to a 3D model
Save your change and set the share in online proofs option to yes
The client will see a 3D model in their online system
For more see 3D models for proofing
Here are links to the guides that help you to build editable web-2-print templates using InDesign and w3p. Once built, these online templates can then be used by clients to edit artwork and place print orders via their dedicated online ordering system.
This section covers some background information on web 2 print templates and also some advice on fonts.
While templates are normally designed to be editable by clients using INDT or IDML files, you may not want any of the template to be editable.
You can set up a template to be an Uneditable PDF template, instead of the default INDT option.
This is useful for clients who re-order the same PDF often, but don't want to have to look through their previous orders to re-order. You may also want to use this if you've built a design that hasn't been ordered yet and to show the PDF in your client's template area.
Head to
Choose the Uneditable PDF option
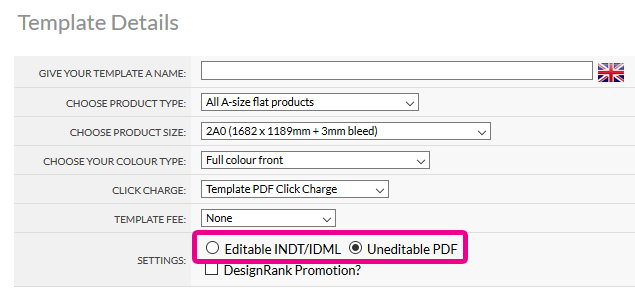
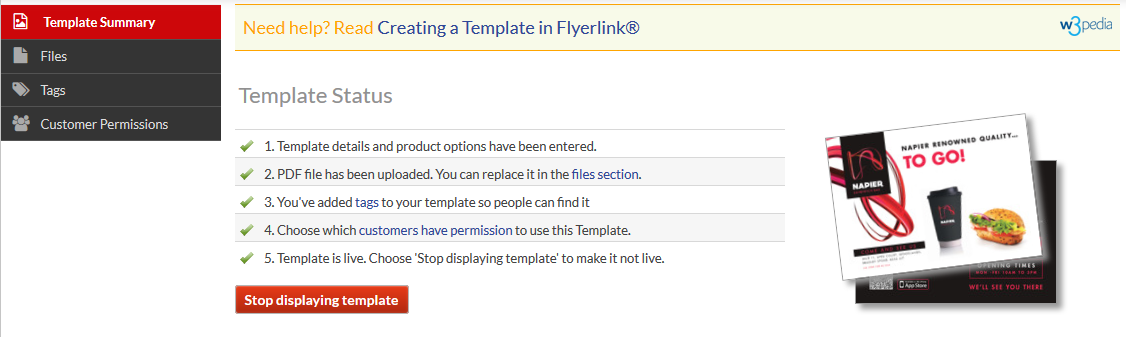
You'll see slimmed down options for Uneditable PDFs, since all you'll need to do is upload files, add tags, choose your product and customer permissions, then publish.
You can change a template from Editable INDT/IDML to an Uneditable PDF until files are uploaded. You can only upload PDFs that match your template size and colour type.
Your uneditable PDFs will show in the template folder alongside other indesign templates.
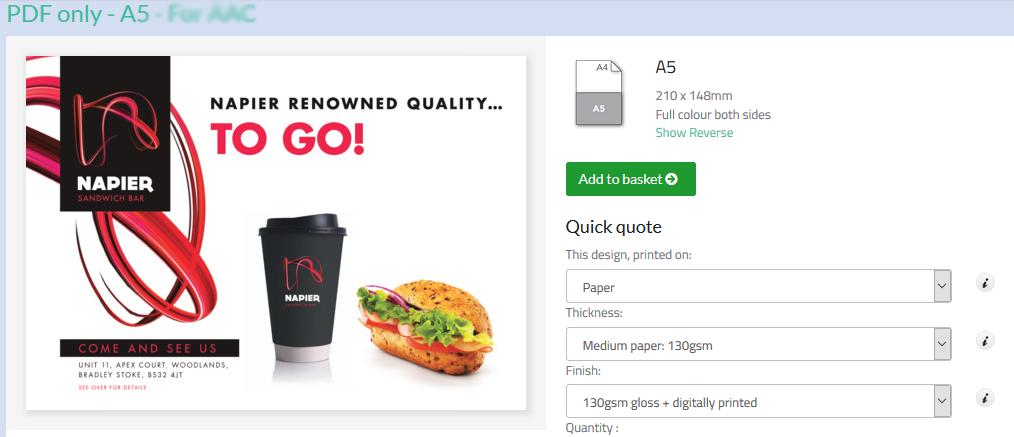
However when someone orders the template, they won't edit it, instead it will go straight into their basket with the PDF uploaded. The PDF will then show in your and folder. If you have auto021 enabled, the file will automatically go through filecheck after it's ordered.
The graphic file complies with the artwork specification, as detailed in the Designing for Production documentation.
Bleed is included within the document page size (Do not use document bleed settings with templates)
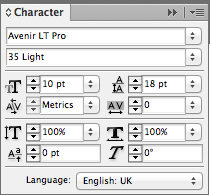
Only fonts from the Template Font List in Flyerlink® are used, all others are converted to outlines or are used within a rasterized image. To check which fonts are being used within your document go to. Use the button to identify where unsupported fonts are used within the document.
System fonts are not being used in the file.
Whilst we list 145MB as our maximum file size, there are other elements that can affect the build and load time of a template. There are no absolute limits on size - it's a combination of:
All non-editable objects are on the -Background layer (the lowest stacking layer within the Layer Palette). Layer should not be locked.
All editable objects are on individual layers with a unique name (use InDesign's Layer Visibility Tool (The eye icon) with Select All to locate rogue artwork elements).
All editable objects (Text and Image boxes) have rectangular frames.
Naming conventions and layers are locked where appropriate; e.g. c_ServicesList
Copyfit layers (c_Name) only contain one font, font size or font style, in a single text frame.
The TGI Finishing layer has been added to the -Background layer.
Unnecessary hidden layers are all deleted, including TGI layers.
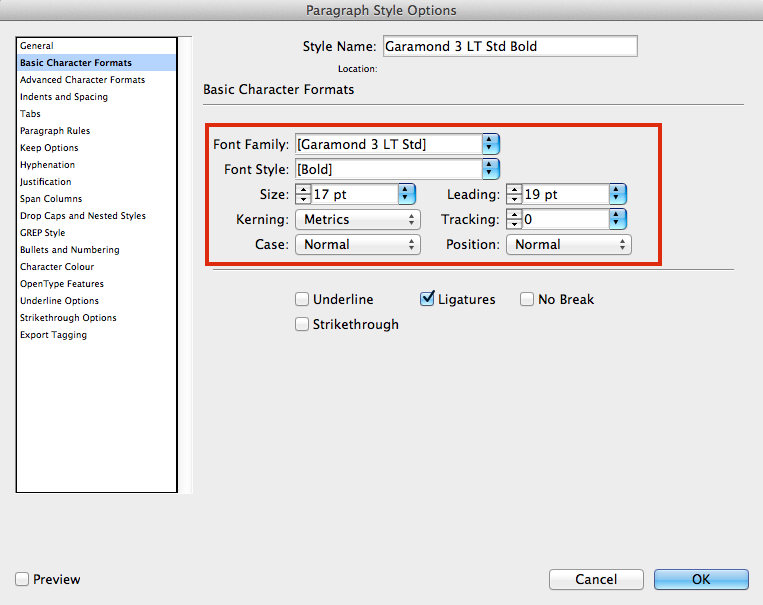
All fonts required in the final template have a corresponding paragraph style. All unnecessary paragraph styles are deleted.
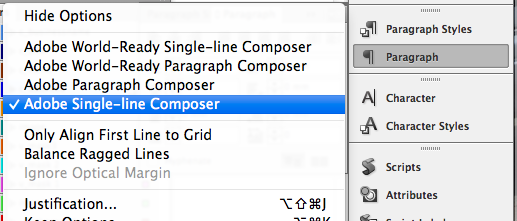
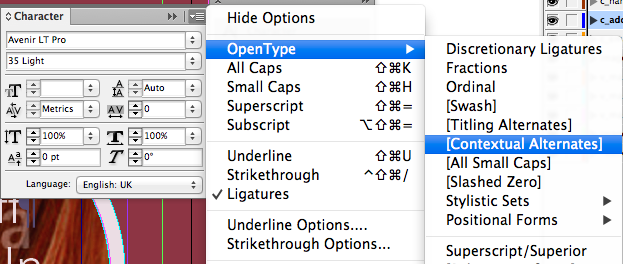
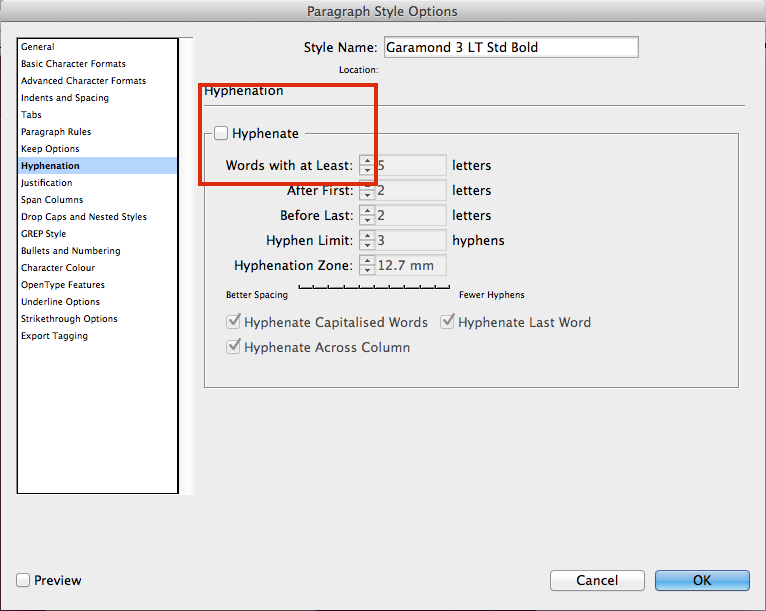
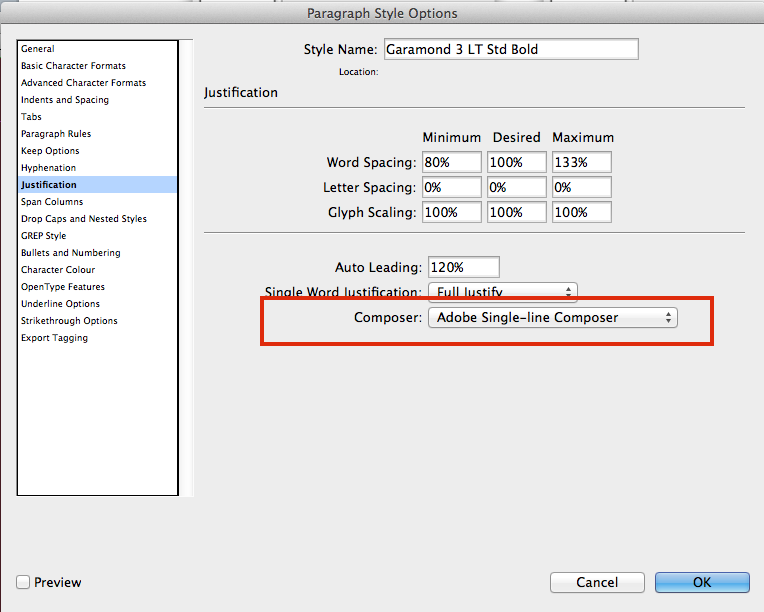
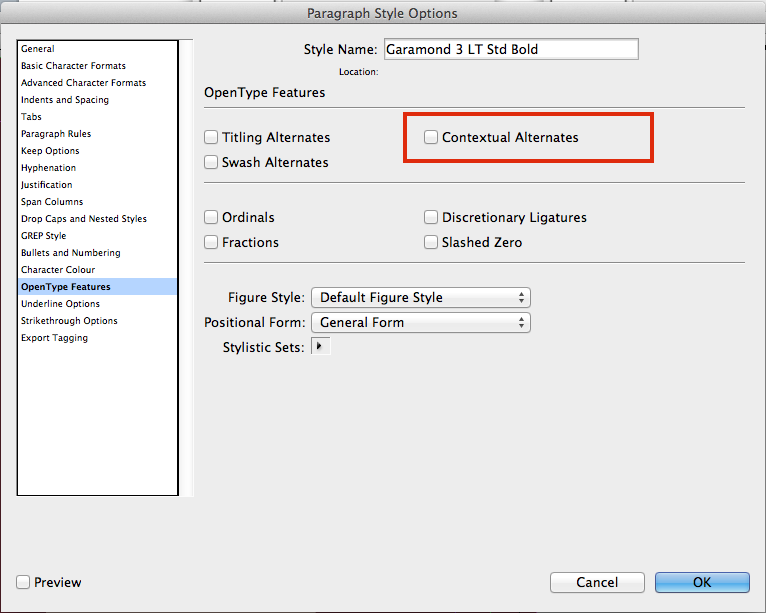
All fonts are set to Adobe Single Line Composer, Hyphenation is not selected and OpenType Contextual Alternatives are switched off (see Things to Avoid for further assistance).
All colours used on Editable Text Objects or any additional colours required as an alternative option, have a named colour in the palette; e.g. s_Black.
The isn't set to Convert All Spot To Process.
All correctly labelled colour swatches are CMYK, and are not tints or gradient swatches.
All images are embedded.
Editable image layers are not locked.
All editable text frame zones are defined appropriately.
All editable text frames include enough 'breathing space' for ascending and descending characters.
The Hash symbol (#) is visible at the end of every editable text frame.
No overlapping editable objects.
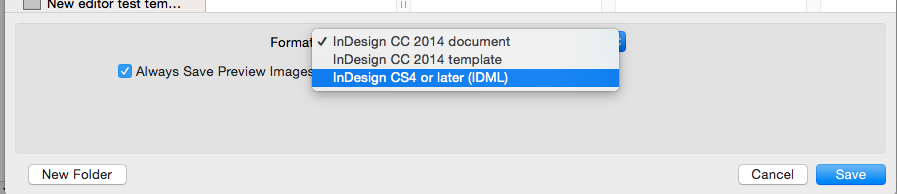
Save file as either an InDesign® Template file, .indt or InDesign® IDML file, .idml
Go to

Make sure none of these settings or features are used within Editable Objects. If you are unsure of how to check for any of the InDesign® features, please refer to
Vector images e.g. shapes, outlined text;
EPS files;
Transparency effects on an object, frame, fill or stroke e.g. opacity, drop shadows, feather, glows, blending modes;
Images should be flipped in Photoshop, re-saved and replaced;
Shaped image frames, all image frames must be rectangular;
Embedded images with non-alphanumeric names.
Outlined text (converted to paths);
Empty text frames;
No special character effects e.g. All Caps, Small Caps, Superscript, Subscript, Underline, Baseline shift, Strike-through;
Character styles;
Forced bold, italic or outlined;
Paragraph hyphenation;
Soft returns (also called Forced Line Breaks);
Text attached to paths;
Multi column text frames;
Linked (threaded) text frames;
Tables;
Tabs;
Nested text styles;
Padding;
Text Wrap (not supported on Background layer);
Rotated text within a text frame (rotated text frames are accepted);
Shaped text frames, all text frames must be rectangular;
Colour tint swatches or gradients swatches.
Go to and ensure that Facing Pages isn't selected.
Your Indesign® file should include the bleed within the page size, rather than use the Bleed and Slug options. When the template is presented to the end user, we exclude the bleed from within the editing window.
If creating templates using Adobe CC you must save your templates as a IDML file. If saving from CS4 to CS6 save as INDT.
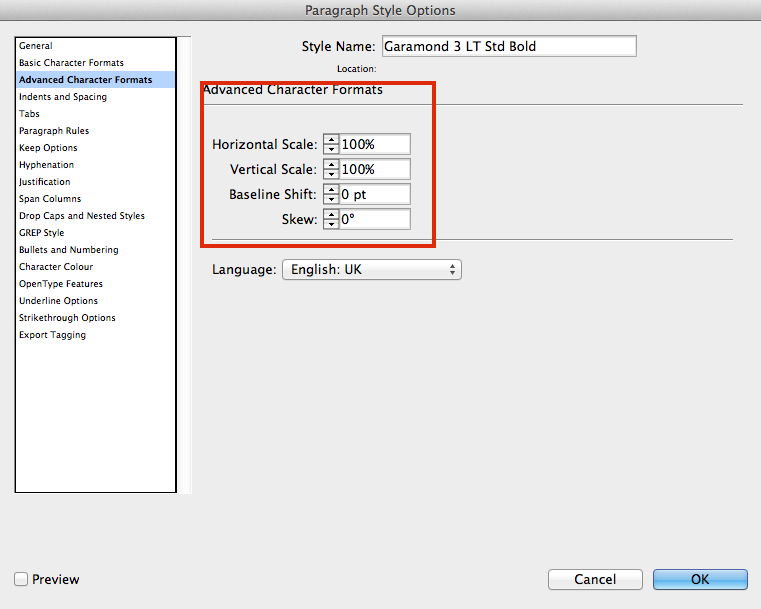
Go to and check the following settings. Altering these settings may affect content.
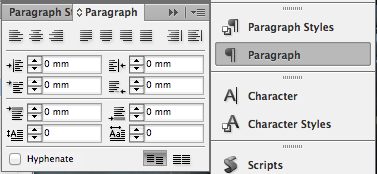
Check all your Paragraph Styles settings don't include any of the unsupported features.
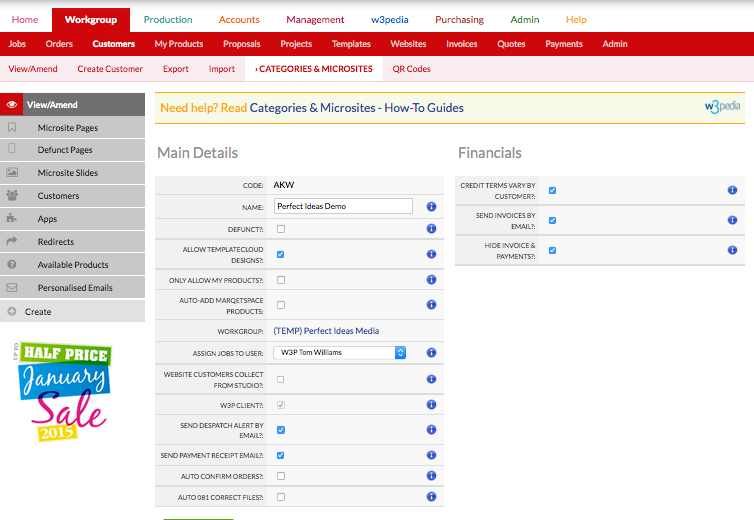
The Categories & Microsites Menu Tab in Flyerlink is the Control Panel for printing.com, nettl, BrandDemand, w3client and w3shop Microsites.
Menu Location:
Customer Account consists of a Main Account Contact and several Additional Contacts who work for the same business.
Each Customer Account is assigned a unique Customer Account Code to differeantiate them from other customers.
All Flyerlink Workgroups are set up with a Default Microsite that all customers are assigned to when first created found under
You can move customers to different Categories/Microsites using the dropdown menu under Nuts & Bolts.