Support for

Telepath
|
|||||
Client Portals
|
|||||
Quotes
|
|||||
The Matrix
|
|||||
Stock Photos
|
|||||
Nettl and printing.com studios are given a complimentary local telepath phone number that is used on branded marketing collateral.
The telepath number is used by default for all your marketing collateral
The more you publish the number the more calls you'll get in and the more intelligent lookups
When someone calls the telepath number, they will hear a voice artist explain the number is being redirected to their local nettl studio
When that call comes through, you will see in Flyerlink the telephone icon in your menu updates to show there's an active call
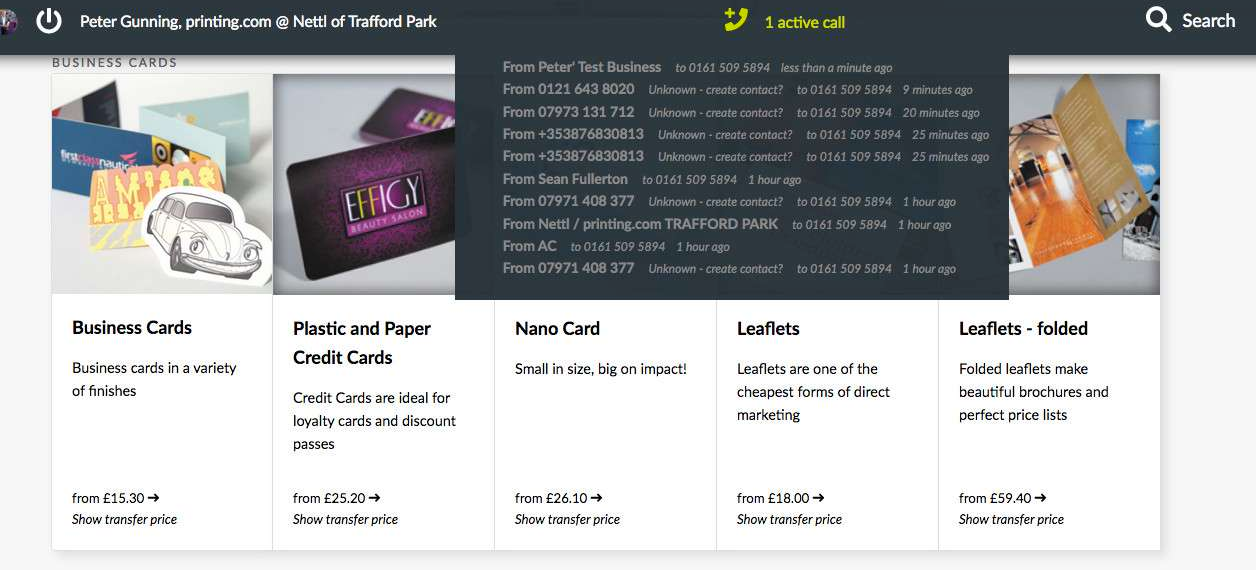
Click the active call and if the telephone number is already in Flyerlink for a known customer we'll add a link to view that customer in Flyerlink.
This can save you time needing to ask the client for their recent job details, name and address. If they call you can find out who they are and gain vital context about what they might be calling about.
If the phone number is a new one, or not associated to an existing contact, you can come back later and click recent call to show a list of the telephone numbers that have rang in
There's a link to create a new customer and when that's done they'll be automatically assigned the telephone number the client rang in with
If it's an existing customer, you can find that customer and add the telephone so next time they ring you know exactly who they are.
Nettl and printing.com have a 0800 number that is shown to customers before they're logged into the shop.
If one of your customers dial in, we lookup existing telephone numbers to redirect them to their local studio
Failing that the client is recommended local studios based on their location and put through to the one the client chooses.
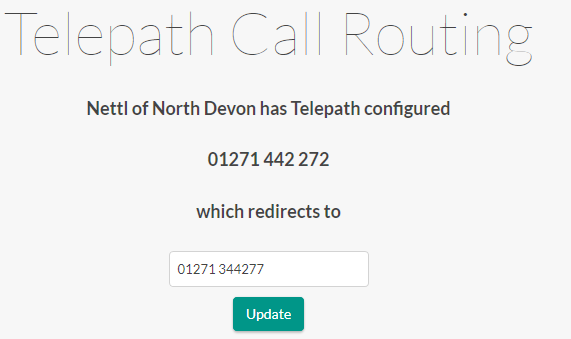
How do I change the number telepath routes to?
Head to
Update the telephone number it redirects to
Do I need to pay extra for this phone number?
The telepath number is included in your licence fee
You will need to pay for minutes on the telephone line that telepath redirects to, as before, but there are no extra charges for the teepath routing, intelligent customer lookup, and no line rental charge for the maintaining of the number.
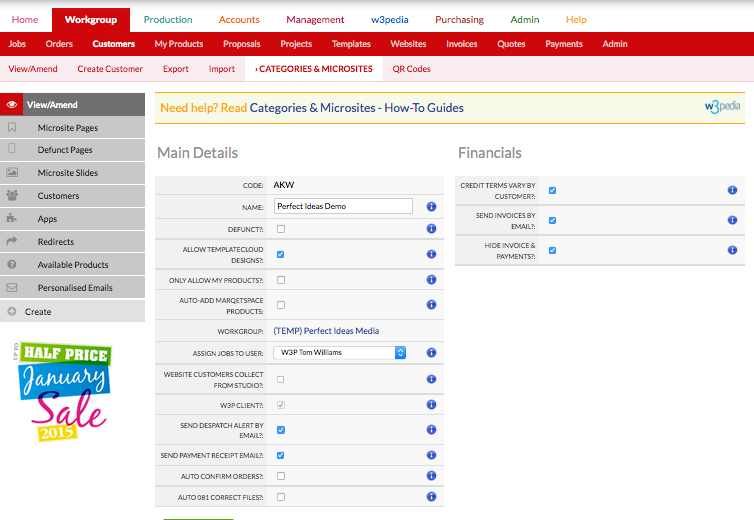
The Categories & Microsites Menu Tab in Flyerlink is the Control Panel for printing.com, nettl, BrandDemand, w3client and w3shop Microsites.
Menu Location:
Customer Account consists of a Main Account Contact and several Additional Contacts who work for the same business.
Each Customer Account is assigned a unique Customer Account Code to differeantiate them from other customers.
All Flyerlink Workgroups are set up with a Default Microsite that all customers are assigned to when first created found under
You can move customers to different Categories/Microsites using the dropdown menu under Nuts & Bolts.
1. Select your w3shop Category
2. Under Microsite Style, edit your Theme, Fonts, Colours and upload a personalised website header image.
3. Add common web pages to your w3shop website.
4. Add Google Analytics, Meta Data and Descriptions to each page to help Google to find you.
5. Build your own products to sell online.
6. Cherry pick products you wish to sell from the Marqetspace product range.
7. Add a Payment Gateway to accept online payments.
8. Link your Domain Name to your w3shop website.
This articles explains how you can quickly remove templates or products from your w3shop/microsite.
On your microsite, you can use the Available Products filter to choose exactly what products you want to show. But there's another way you can restrict the TemplateCloud Designs or Products on sale for your w3shop.
All w3shops can list the TemplateCloud Design library, they just need to have "Allow TemplateCloud Designs?:" ticked on .

Then your Template Search page type will list all TemplateCloud Designs with a Matching Product.

If you only see a limited selection of TemplateCloud Designs, it's likely the Templates are the only ones that match products available in your Product Search page.


If you untick "Allow TemplateCloud Designs?:", the only templates you'll find are those set up for TemplateCloud Match.
If you want to completely remove all products made from the Production Hub, Network Partners or Marqetspace Sellers, simply tick "Only allow my templates and my products?" on .

Your Available Products filter will then only list the products you've created on .

And your w3shop or microsite will only list the products you've created as well.

Flyerlink comes inbuilt with credit controls you can set against customers or microsites.
If you want to set up a credit limit for your customer
Head to
In the Financials section, change the payment terms from CASH to another option.
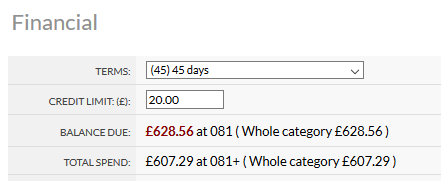
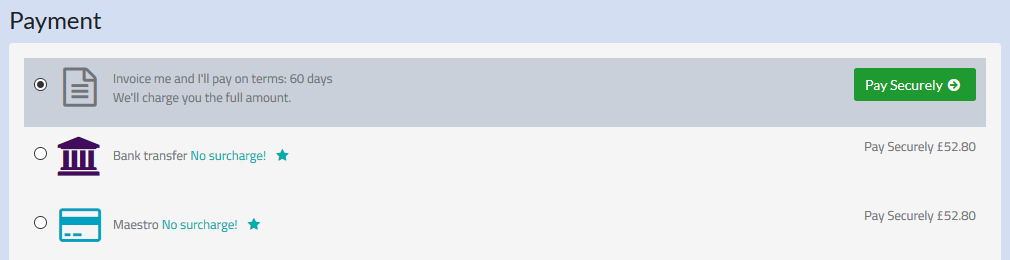
This payment term will be applied to all customer invoices, and will also show an offline payment option on the checkout payment page when they order online.
Once you choose a non-cash payment term, you are able to enter a credit limit.
When that credit limit is exceeded, we apply a job control to all jobs created in Flyerlink or ordered online that exceed the credit limit you've set.
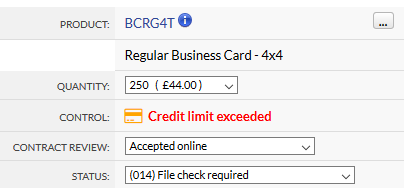
We also email your client explaining the credit limit has been exceeded and payment will be required to progress the job.
We also email the client and apply the credit limit exceeded job control if they exceed credit terms (by ordering with overdue invoices that require payment). As soon as the overdue invoices are paid online, we release the jobs they've just ordered allowing them into production.
You can see if the customer has outstanding invoices requiring payment by going to
You can also add credit limits to your microsites
Choosing the payment terms here will apply to your invoices, but you can set a limit you expect to be spent per customer or category.
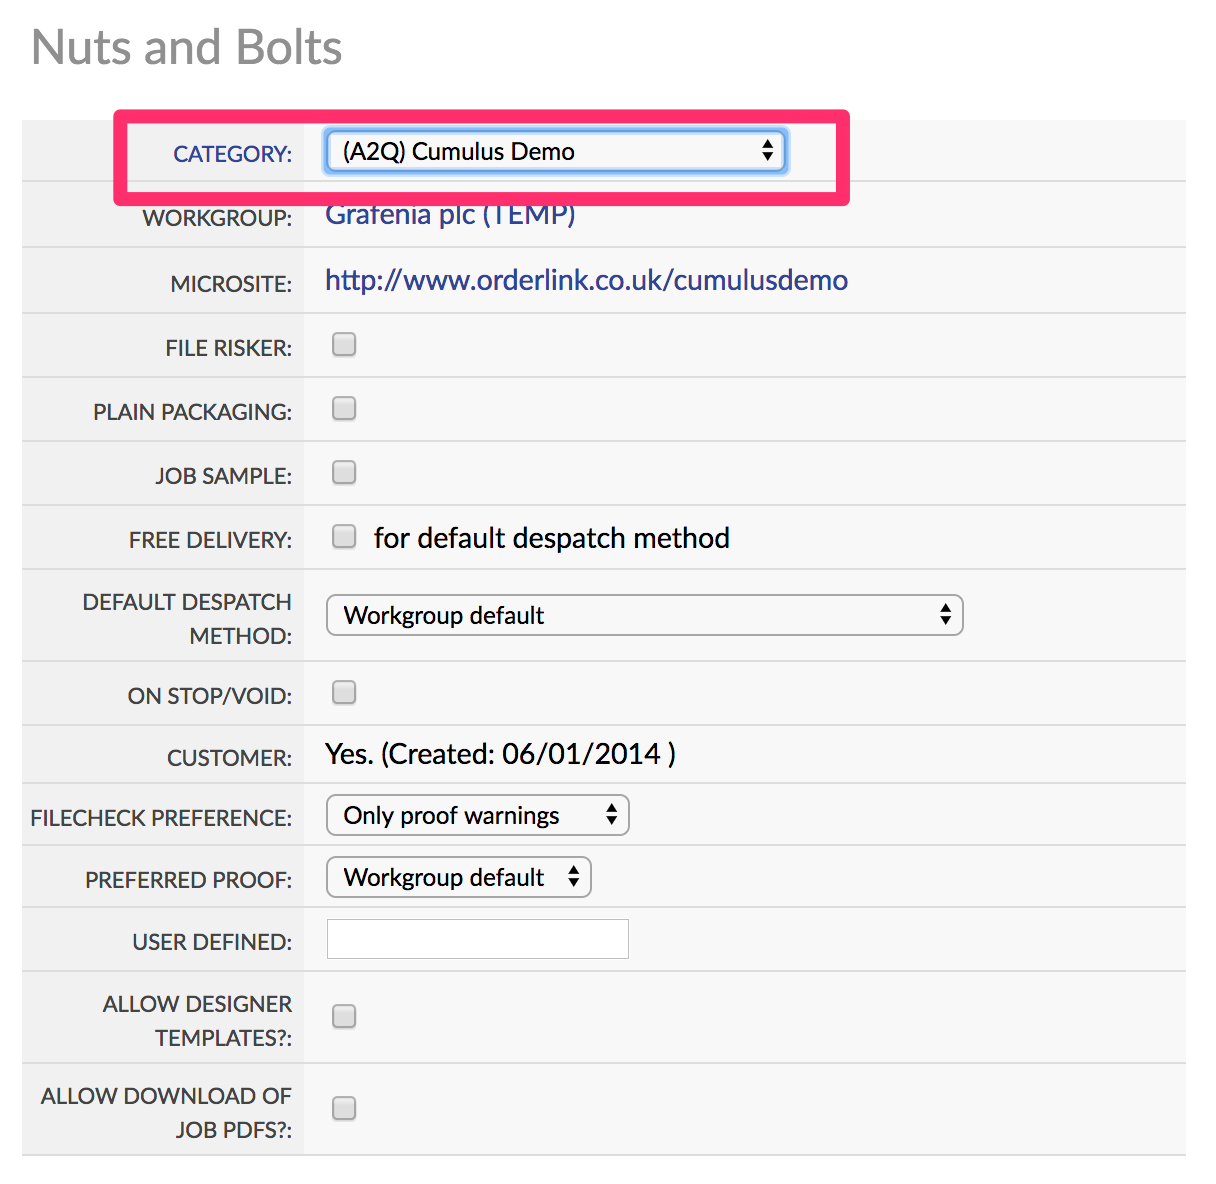
If you can't set a limit on an individual customer, you'll need to tick "Credit limits vary by franchisee/licensee/department" on

The automated applying of job controls doesn't happen if your controling credit by microsite.
Offering credit to customers is a risk, as you can incur costs for the order and fail to recoup payment. It is also useful for winning large contracts.
Check out our advice on the Payment Directive to see if you should offer credit to your clients.
There are two payment controls you can add to your jobs via
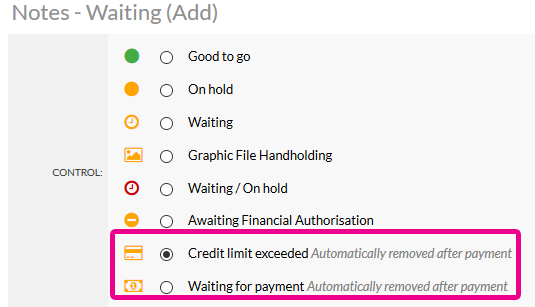
Choosing these opens up an email template to your customer, that you can edit.
After these controls are applied, if your customer pays for the job we will automatically remove the control and send an email to you saying the control has been removed and the job can be progressed.
With the V3 responsive version of w3client microsites and w3shop categories, you don't have to use all the apps or menus.

You can choose which apps are available to all customers for your microsite or w3shop, and even vary the apps for individual customers.
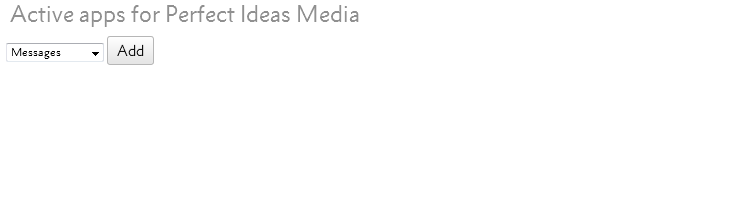
To change apps for all your customers head to
.
By default you'll see no apps, this just means you want all of them to show.
If you want all apps apart from the Files & Images app, simply add the ones you want and don't add the Files & Images app.
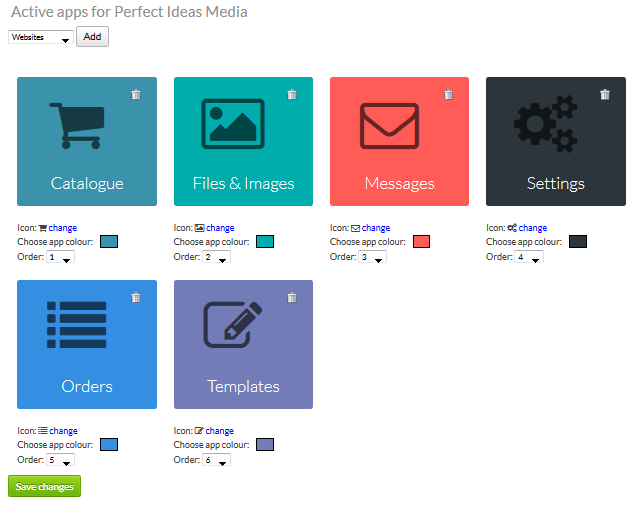
Then when your customers log into their microsite, they'll only see the apps you've chosen.
They also won't see any menu links to their missing apps
You can also choose different apps for individual customers from
.
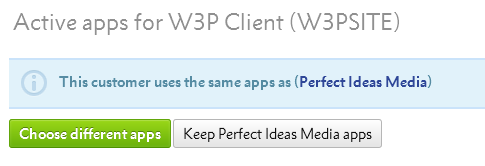
To start off with all your customers will have the same apps as your category. If you want different apps, press Choose different apps.
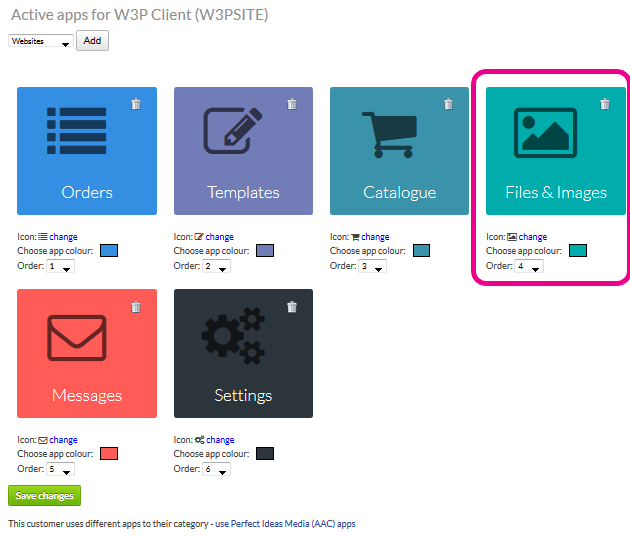
Then you can adjust the apps and add or remove some for just this customer. In this example, 1 customer can have access to the Files & Images app, while all others in the category don't.
If you need that customer to go back to the categories app, you can change them back anytime.
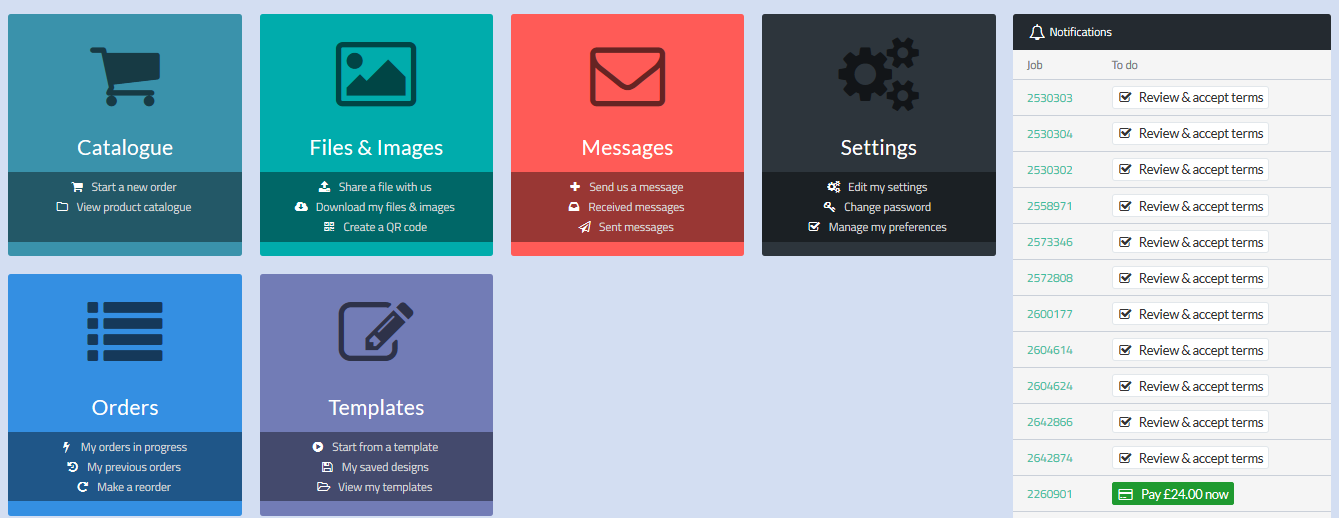
For each app you can change the:
With custom apps you are able to add links to any web page you want. For example, your client may want the microsite to link to some training resources or how-to videos.
The app can link to either an external web page, like a clients own intranet system, or you can use an iframe to show the content within your microsite area.
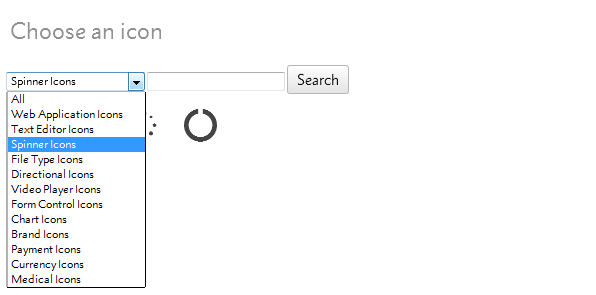
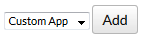
To add a custom app, choose the Custom App option via or
You'll see new options to add a url, choose the url behaviour or show in an iframe.
.png)
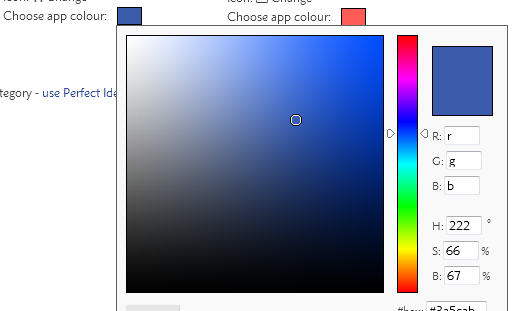
Change the colour and icon, and enter the url of the web page you want to show.
Your new app will then show in your dashboard, and as a menu option.
.png)
If you choose to show the webpage in an iframe, we will load the website within your microsite.
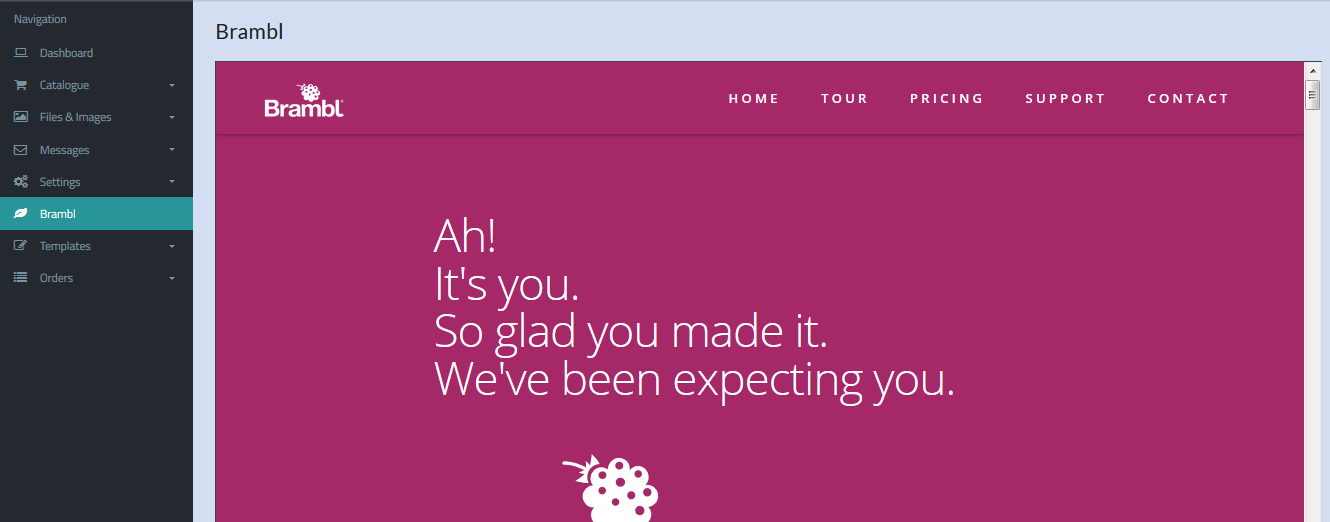
If you'd like to build a web pages quickly and easily to work with your custom apps, ask your support team about upgrading to build websites and webpages with Brambl.
The quotes app allows customer to save multiple different baskets and to swap their basket with an older quote.
It can be used by customers to build up different orders, and leave a quote saved for later if a more immediate requirement for print comes up.
The quotes app appears by default on V3 responsive microsites, and can be removed by choosing other explicit apps - see Microsite Apps - Choosing your menus for more info. If you turn off the quotes app for a customer or category, you won't see a save icon in the basket.
Please note: Basket quotes are not related to the quotes menu in Flyerlink.
The quotes menu in Flyerlink lets Flyerlink users build a quote to check prices and send out a PDF to the client.
Basket quotes allows your customer to save baskets as quotes for later use.
Customers can see a link to all their quotes once they log in and go to their dashboard
The page will show a list of all baskets they've saved
To save a quote, simply head to the basket and press a new save icon.

You will then be redirected back to the quote page where you can see an overview of your quotes
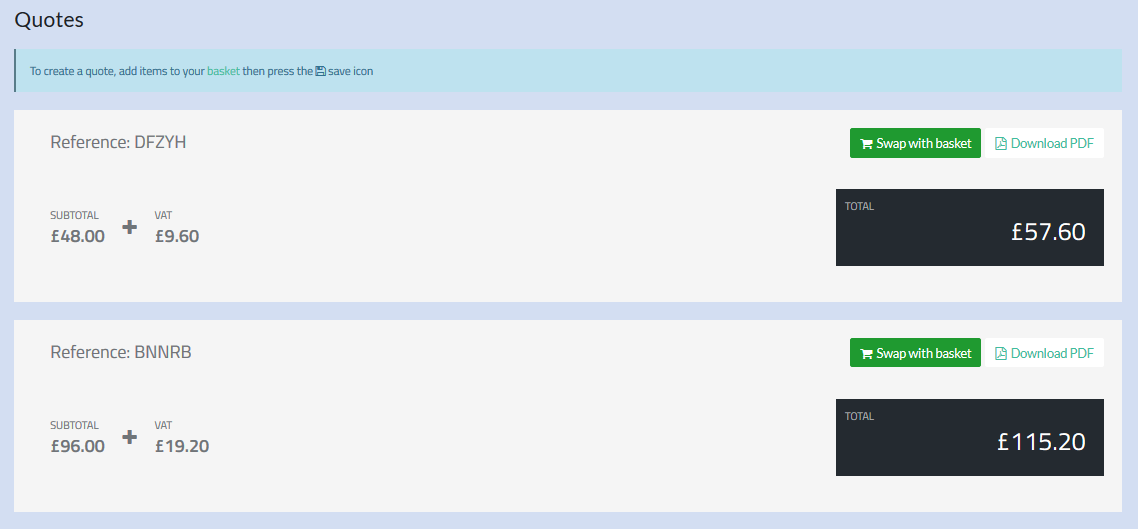
Expand an item to see more details

The quote is active and can be added to within Flyerlink.
Press swap with basket to exchange the existing basket with this quote.
If a client knows they want to build a quote and get prices without having to upload artwork immediately, you can direct them to their quote app.
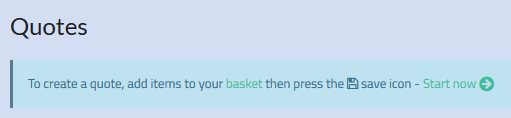
Here they'll see a note that has a helpful "Start now" link.
When that is pressed, instead of redirecting clients to the artwork options when they add an item to their basket, we will instead direct them straight to the basket.
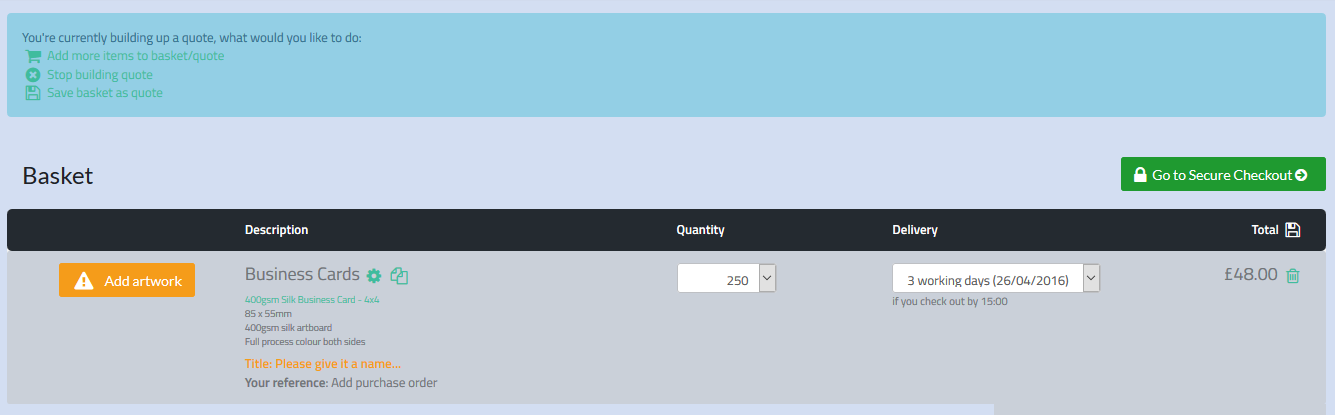
On the basket we highlight the next steps someone can take. Whether they should keep adding items to their basket, stop quoting or save the quote.
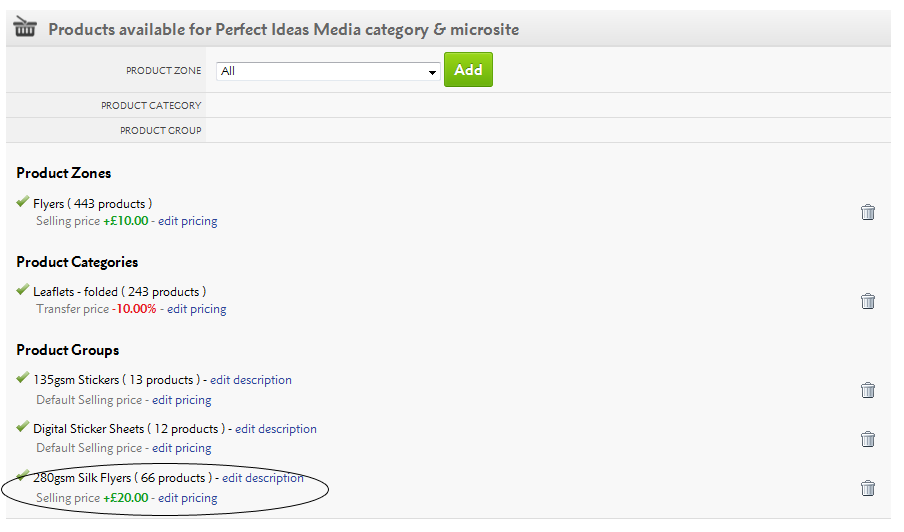
This article explains how to adjust products and prices within your w3shop or private client microsites.
For each Category with an associated microsite, you'll see a menu option . This option will not appear for printing.com studios.
By default all products are available.
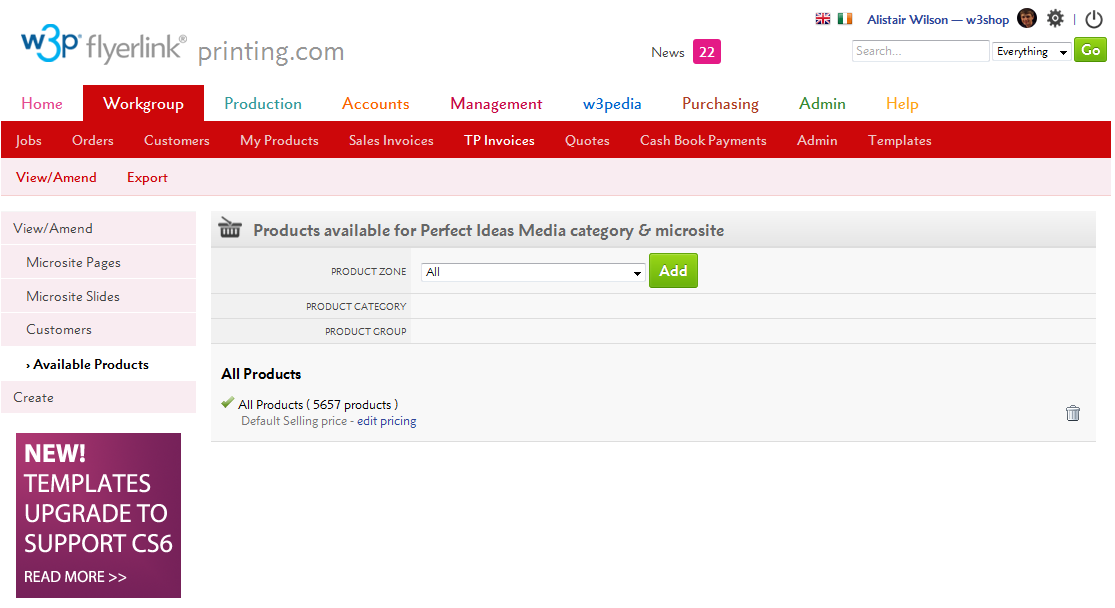
To restrict the product selection:
If you choose a Product Zone, you will list ALL products within that zone. If you restrict the product selection, you'll also need to re-add all the Opensource Products you've set up.
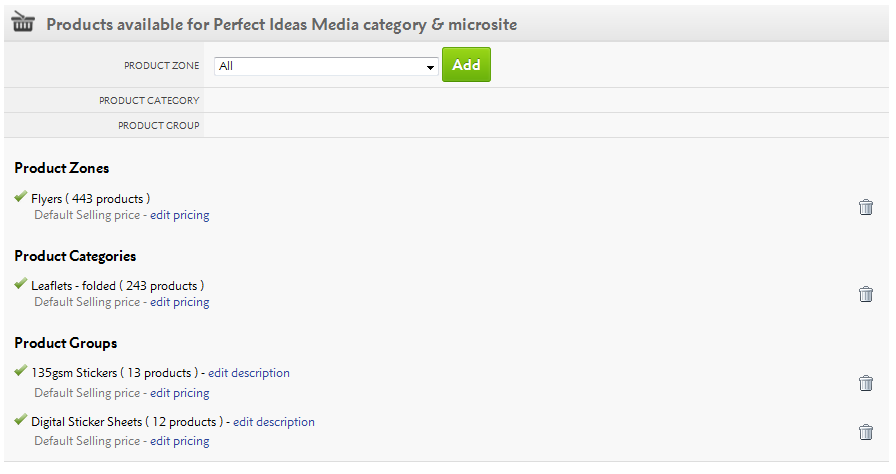
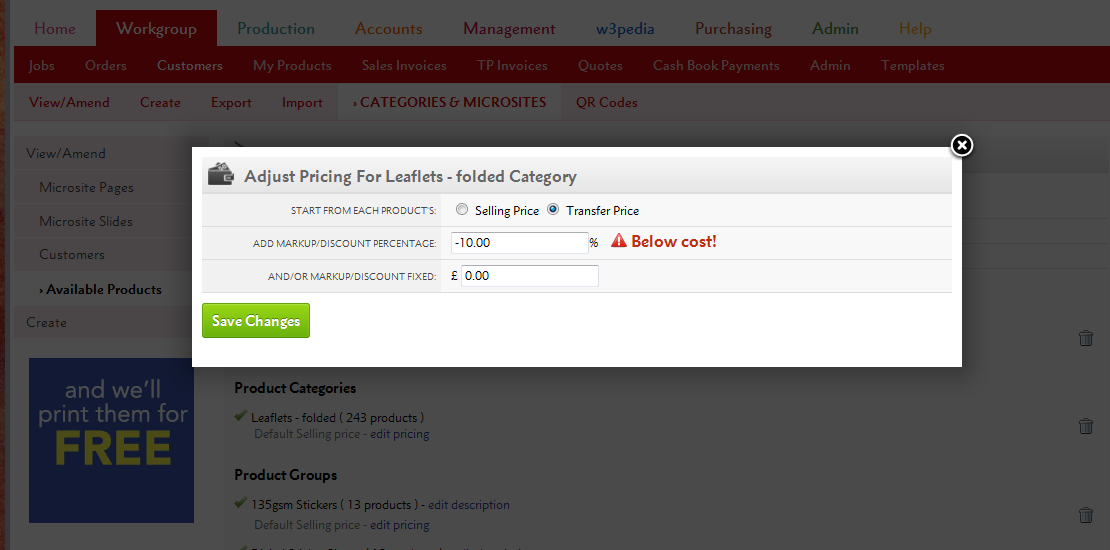
By clicking the "edit pricing" link, a pop-up will appear and you'll be able to adjust the prices for that Product Zone, Product Category or Product Group.
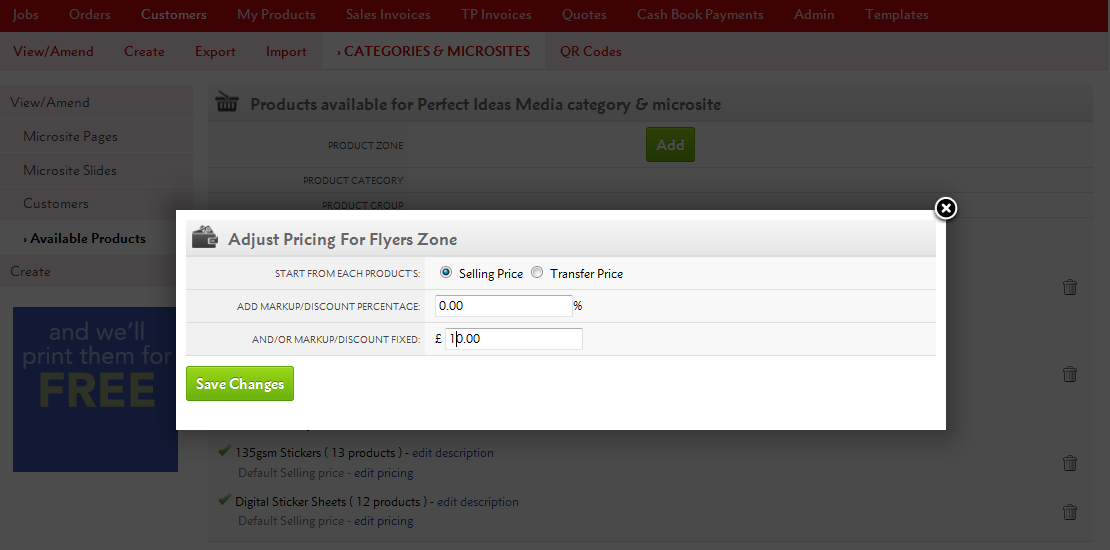
From here, you can either:
a) Make changes to the fixed price or a percentage of the total product Selling Price (RRP), or
b) You can do the same based on the Transfer Price, which is how much you will be charged for the product.
Remember, any negative discounts (based on Transfer Price) mean that you'll be selling products for less than your cost price.
Price changes for Product Groups or Product Categories override those within the Product Zone. So you can increase all Flyers by, say £10, then choose one Product Group to increase by £20.
Add 100% Markup => 50% Gross Profit Margin
Add 66.66% Markup => 40% Gross Profit Margin
Add 42.86% Markup => 30% Gross Profit Margin
Add 25% Markup => 20% Gross Profit Margin
Add 11.11% Markup => 10% Gross Profit Margin
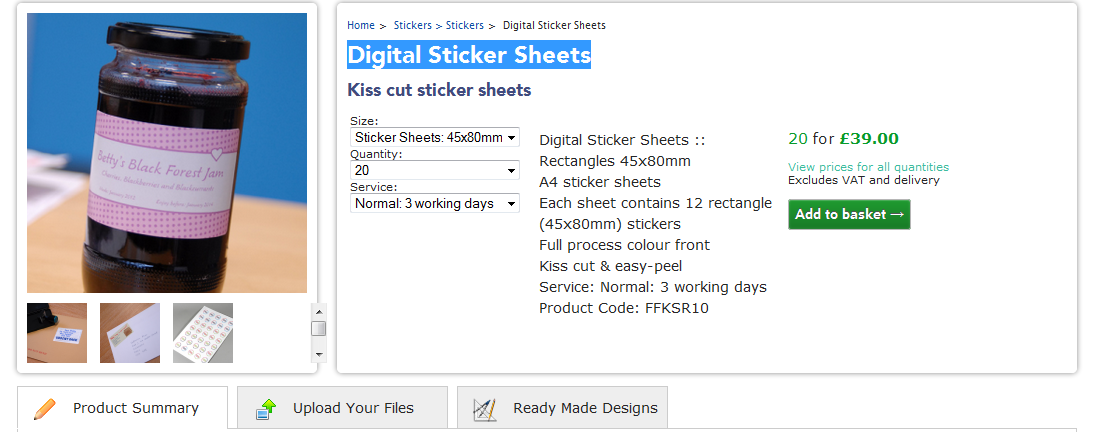
For Product Groups only, you can also change the descriptions your customers see.
Simply click the "edit description" link.
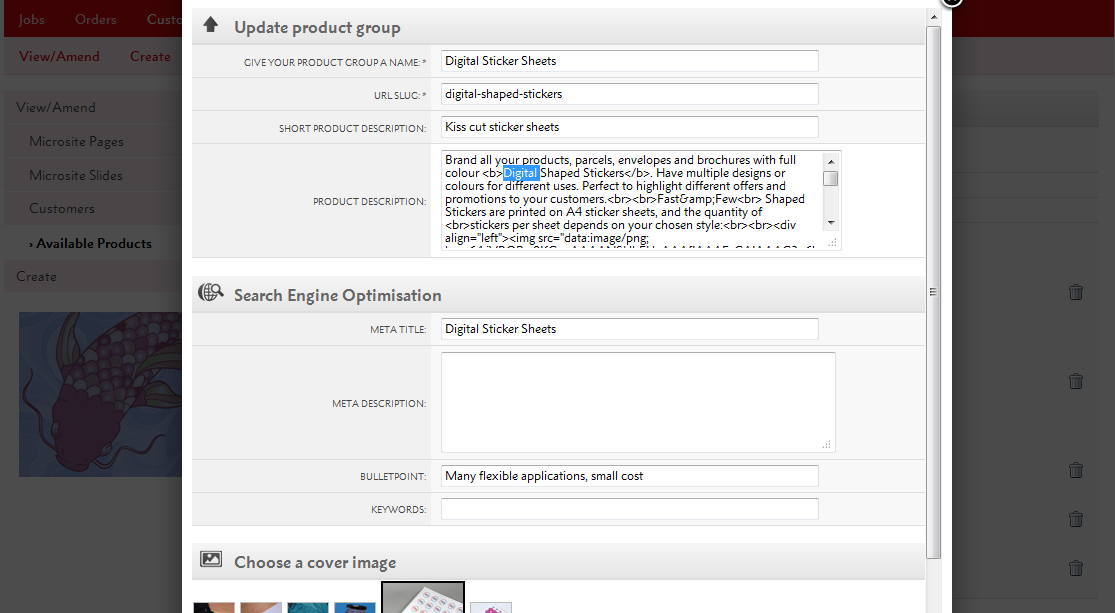
Starting from your supplier's marketing, you'll be able to adjust the Product Group name, url-slug, description and Search Engine Optimisation settings to fit your branding.
Any changes to the text will appear on your microsite.
Your price changes and product restrictions apply across Flyerlink and your microsite.
In Flyerlink, any customers belonging to the microsite will only be able to create jobs for products available to them e.g if you've removed Business Cards, your client won't be able to order them.
On your microsite, only the Product Groups you've selected will show online and any price changes will appear across the entire site.
You will also only see online Templates compatible with the product range(s) you've made available.
Price & description changes can take an hour before they are fully updated on your site.
Templates will update every day but you may have to wait for all the incompatible templates to disappear.
Please refer to Resource Article 4982 for any questions on update speed.
Redirections are URLs that link to another webpage. They are commonly used to help users find webpages, or to replace pages that are now redundant.
You can set up redirections through Flyerlink, using a Short url.
This guide explains how to set up redirections for your w3shop
There are two ways of adding Redirections for your w3shop:
Use permanent redirects to replace now discontinued pages with a more relavent page.
Use the redirection page type to add menus links to Internal pagesor External websites.
You can now view existing and add new permanent redirections for your whole microsite via .
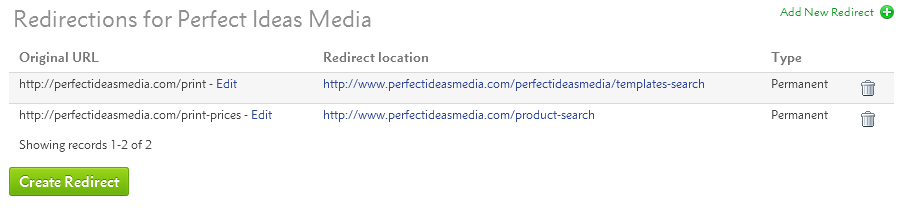
To create a new one, simply press Create Redirect

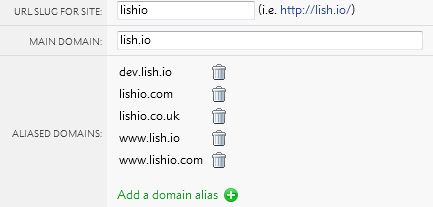
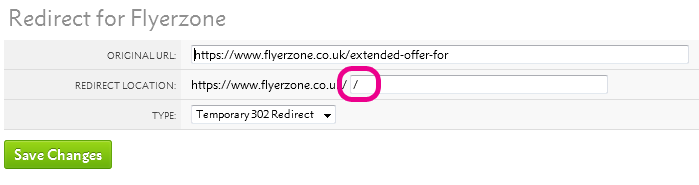
Add your old redundant url page in the Original URL, then enter the page you'd like it to redirect to in the Redirect Location.
You'll be able to add any link into the Original URL that includes your w3shop main domain or aliased domains.
To try out the redirect, enter the old url to your browser and check it goes where you want.
To prevent permanent redirect loops on your homepage, a url slug is required for your redirection location.
If your homepage has no url-slug, you can simply add "/"
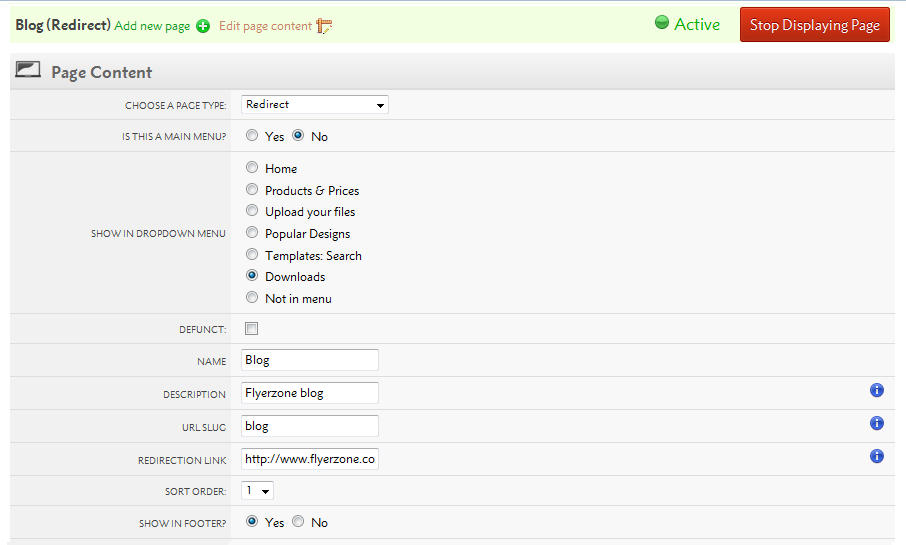
Some w3shop pages like Product Group pages are automatically generated, and you don't need to make a new page type for each one.
However, if you'd like to make a header or footer link you can do so using the Redirection page type.

If there is a website you really like, or if part of your w3shop is hosted by another web provider. You can use redirection links to external sites.
The set up is the same, but your URL should be an external webpage.
Search engines prefer 301 redirections to 302 redirections, however we default to 302 redirections.
The difference is that 302 redirections are easier to change.
301 redirections are cached in a browser memory, if you need to change one of these redirections you will need to refresh the browser cache of everyone who's used the link.
While this is good when you know a page will never change, you may want to use 302 while testing to ensure they are correct before making it harder to undo a mistake.
One of the advantages of w3shops is that they come pre-built with TemplateCloud and products from Grafenia's production HubM. The Grafenia product range already have hundreds of product images to advertise the print range.
It is possible to change the Granfenia product RRP for your shop using the available products filter. And it is also possible to change the Grafenia product images using the Product Images tool.
Use the Product Images tool to change Grafenia product images.
Head to
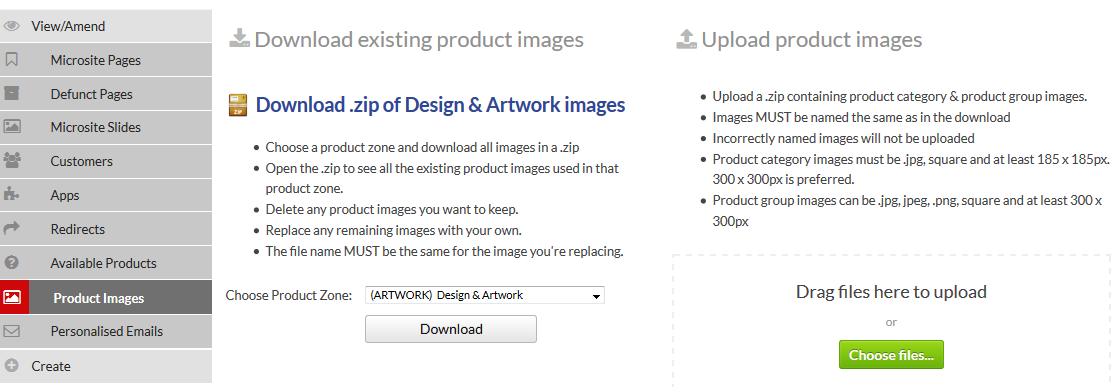
Here you can download the existing product images you have on your site. Choose the product zone you want to download images for.
You'll be given a .zip of the product category images, which appear in the upload your files page type.

And the .zip will also contain all product group images you see on the product search pages.
Delete any images you don't need to update.
Then replace the images with your new ones.
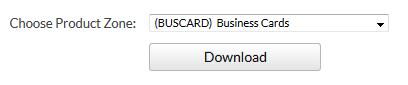
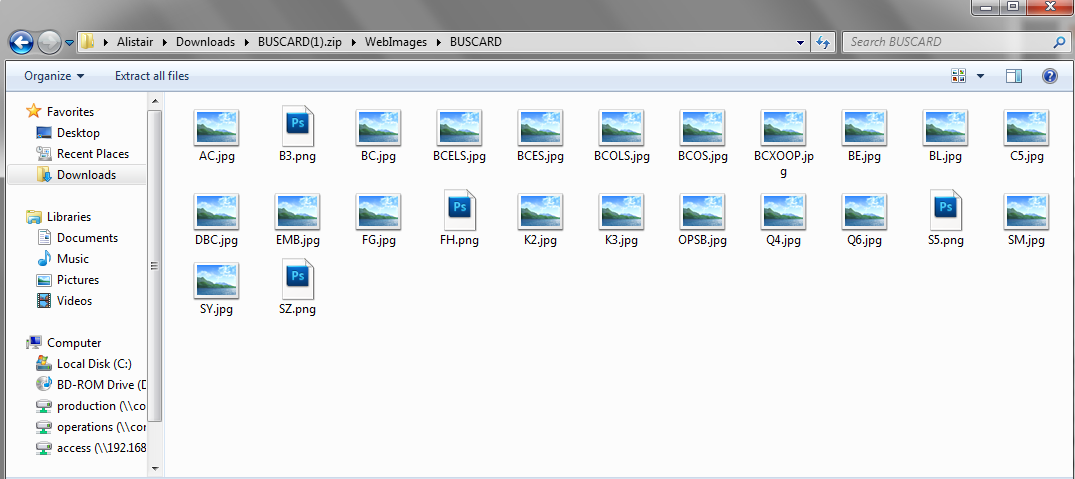
You'll need to keep the file name the same, the file name has a special code that helps us know which image is being replaced. For example you'll need a BUSCARD.png or BUSCARD.jpg file to replace the business card product category image.
If you upload a file that hasn't got one of our special file names, we'll reject it as we don't know which image it's designed to replace.
Once you've adjusted the files, you can .zip up the file again and upload it.
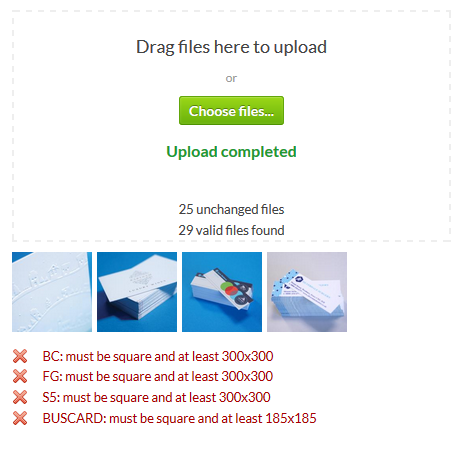
We'll show you if there are any issues we have uploading the files, alongside an image of any files we actually replace.
Product category images show on the upload your files page, which have an hour long cache to improve the page load time.
As a result of this cache, any product category images could take upto an hour before they take affect.
For opensource products, you don't need to use the Product Images tool to replace your product group image.
Simply upload an image for the product you create on
If you've more than 1 product image for a product group, you can choose the cover photo for your product group on
This article explains how to personalise emails sent to your customers and studios from w3p sites.
w3shops and w3client microsites send a number of emails to customers and your sales team when orders are placed, passwords are changed or important activities are undertaken.
You are able to personalise these emails and adjust the text to suit your brand.
Go to .
Either search for an email template you've already personalised, or Add a new one:

Once you've chosen an email to edit, you'll be given a default email.
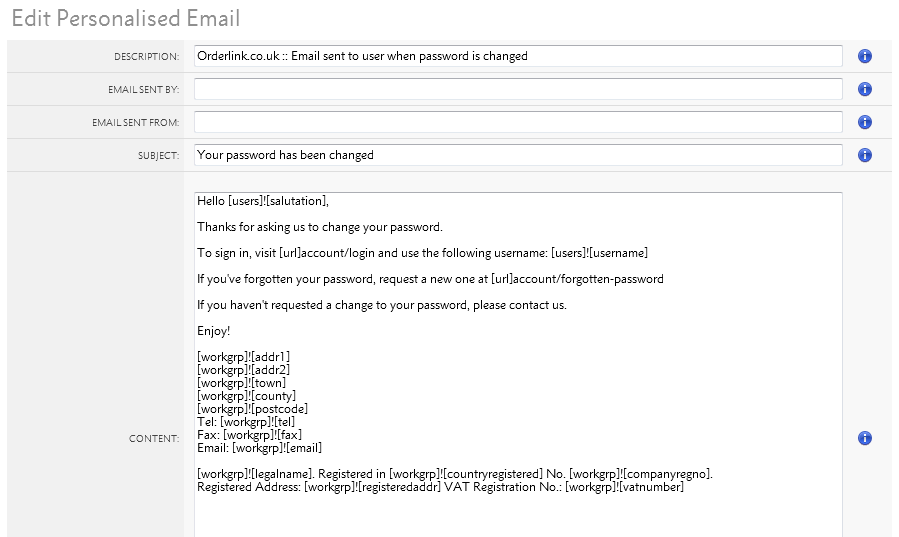
You'll be able to change the description for internal reference of what the email does.
You'll also be able to choose who the email is sent by and which email address it is sent from. If this is blank, a sensible email from your workgroup is chosen.
Then you can change the email's subject line, which is visible to customers, and the email content.
The default emails make extensive use of Active Text Substitutions. These are [square]![brackets] that retrieve information about your customer, their order or your workgroup.
We recommend you continue to use Active Text Substitutions.
Below your email, there'll be an explanation of what information the Text Substitutions retrieve is given.
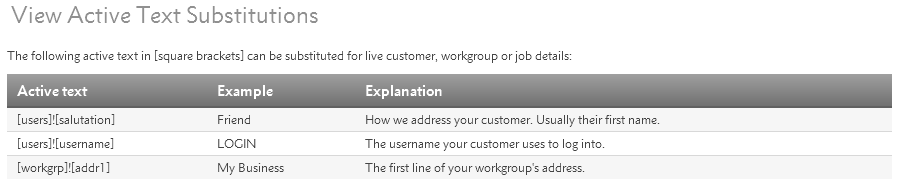
You'll be able to use these Active Text Substitutions anywhere in your email, or you can replace the workgroup information with your own signiture.
Once you've finished personalising your emails, you can send a sample to yourself.
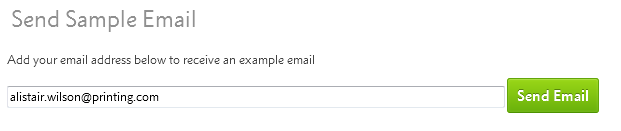
The Sample Email will retrieve your Active Text Substution's example, not a live order. It will make more sense to your customers than to yourself.
When you've finished editing, simply save your changes.
You can also revert to the default email template if you've made a mistake, or you can delete the personalised email and stick to the one created on your behalf.

There are some other emails sent out by flyerlink, mostly workgroup notifications, that cannot be personalised. However, you will be able to personalise all the main emails sent out under your branding.
You will be able to personalise the following types of emails:
All the emails available for personalisation can be found via .
Start at , where you’ll be asked for the customer you are preparing the quote for. After that, you will have a quote with no quote items, ready for editing (see Editing Options, below).
Browse to and enter the quote number.
Alternatively, view Open, Won and Lost quotes from a Customer Account by selecting the tab from the side menu.
Quote items are shown below the Main Details, under the heading Items on this Quote.
Vouchers and one-off discounts can be included in a quote.
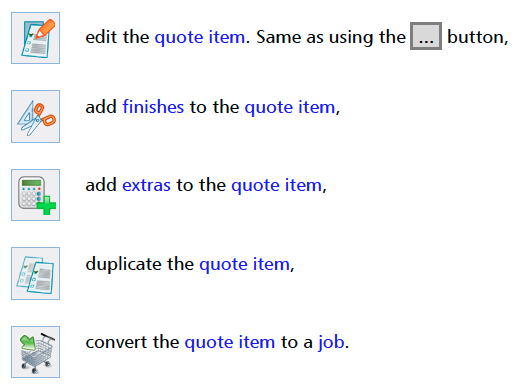
The colourful icons on each quote item allow you to:
Use the Add Item button to choose a product and quantities. While adding the quote item, you can add your own Title and Notes for the quote item; make use of these to relate Grafenia products to the customer’s brief.
When editing or creating quote items (above), you have the option to show different quantities on the quote, and choose one of them to contribute to the Total. The on-screen hint describes this fully.
The Quote PDF presents your quote in a style that can be given to your customer.
The History side menu option shows a list of logged changes.
The current system:
The Matrix is a tool to help you keep track of sales performance.
All it offers is the truth, nothing more.
The Matrix shows an overview of all jobs that have been allocated to production runs and printed over the month you're looking at. The sales are shown use the job net total (excluding VAT) compared to the job transfer price.
.png)
The Matrix is similar to the period end report, but visualises the breakdown of sales into different groupings:
You can easily see on the Matrix which of these contributes most to your total, and which you could be doing better in.
The Matrix also allows you to see how this months performance compares to the same month last year, and lets you set sales targets specific to each of these revenue groupings.
Targets are set per workgroup (if you have more than 1 workgroup, you will need to choose the one you want to add a sales target on).
Once you've chosen the workgroup, double click the Sales Price Target row for the revenue group you want to add a target to.
Then add the amount you are hoping to achieve that month.
.png)
From the screenshot you can set a target amount and/or a target margin.
The first half is the target amount, the second is a target margin. In the vs Target you can see what percentage short or what percentage you have exceeded the targets you set.
If you'd like to know what jobs are making up your figures, click on the row you want to see more of.
You'll see a break down of the jobs and the amounts contributing to the total.
.png)
Both the Matrix grid and click through details can be downloading in a CSV format for you to take a snap shot of the current activity.

Numbers on the Matrix will change if customers are moved to different workgroups, or if more jobs are printed in the month.
Using the stock images app, yourself and your customers can share photos from our stock image library (DepositPhotos) to agree what images should be purchased and used in your designs.
All customers have a lightbox that can be accessed from both Flyerlink and Orderlink.
Your customer can also access their lightbox online using the stock images app.
By default, this app is available if you're customising your client's apps be sure to add it back in
For more details see article 5659
Using this app your customer can search for any image from Depositphotos and save them to their lightbox
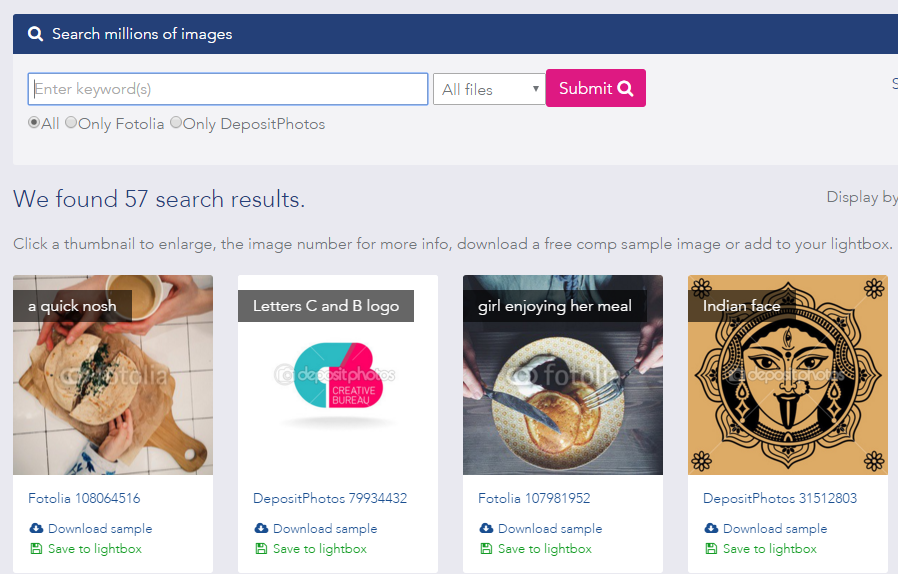
They can remove pictures they don't like and set ones they definitely want to use to "Ready to buy?"
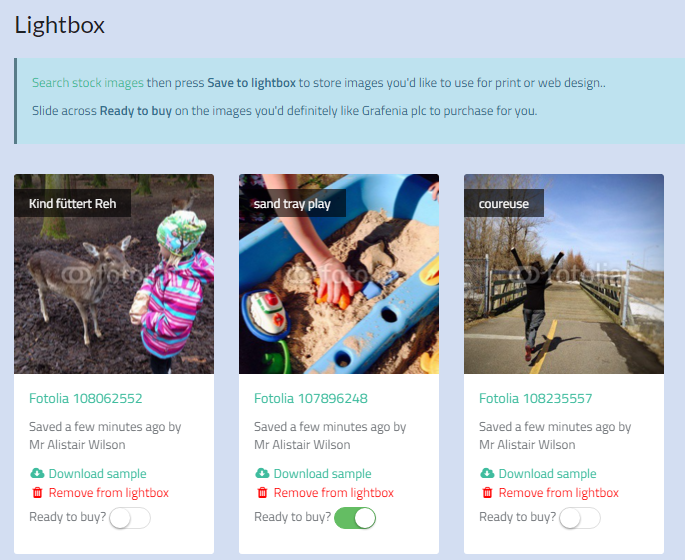
You'll get an email if your customer decides they're ready to buy any images, so you can view their lightbox and purchase the images from Flyerlink on their behalf.
Head to
To view your customer's lightbox. You can choose from here whether to purchase a lightbox. If you've bought the design recently and can download it from , we'll show a download link so you can download it there and then.
Here you can view images your customer has saved via their client microsite, and you can add images yourself.
To add an image, press the Add image to lightbox link
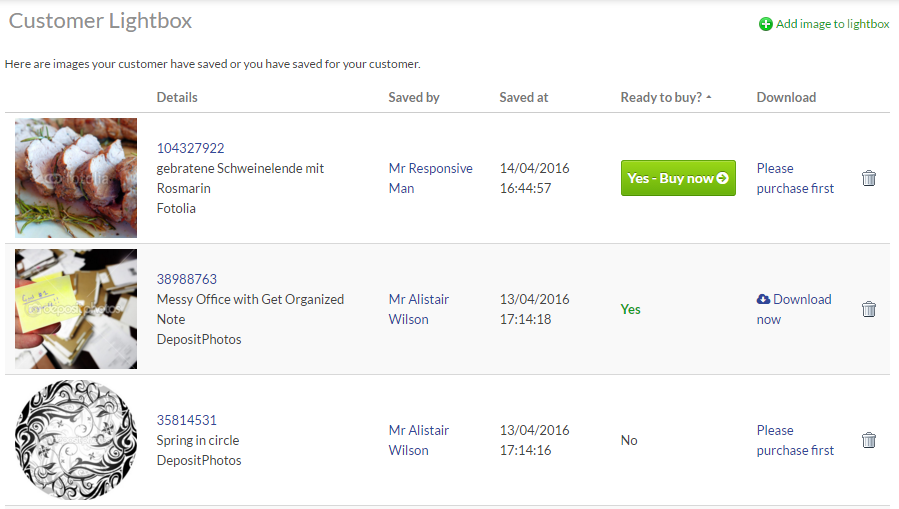
Search for an image, and press the Save to lightbox link in the top right
The image will now be visible to both you and your customer in the lightbox.
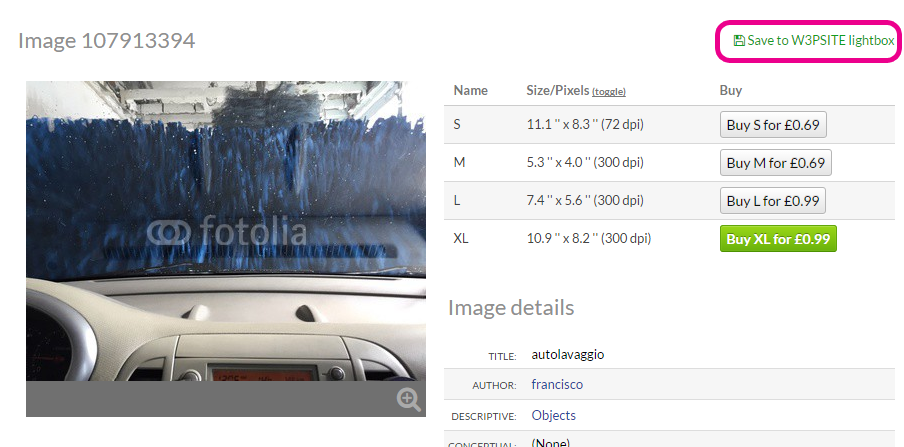
Browse through 14 million royalty-free images directly within Flyerlink. All images available at up to XXL size for only £0.59 each (including vector files).
Go to
These photos, illustrations and vectors are provided by our partners, DepositPhotos. You always get access to a selection of image sizes, and through our group buying, this costs you much less than buying it directly from DepositPhotos.
Every time you buy a stock image from w3p Flyerlink, we'll create a job (using your usual invoicing account as the customer). The job will go straight to 081 and allocated to a run (so will disappear from your studio summary immediately). Once a week, all the stock image jobs will be consolidated in with your other w3p purchases onto your weekly invoice, you'll see one job per image.
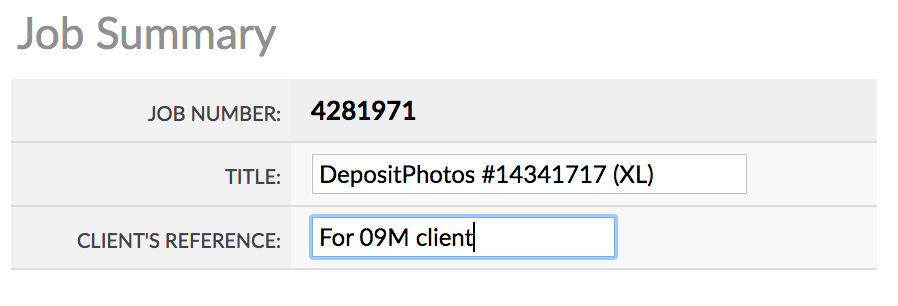
A benefit of this is, you'll now be able to click through to the job:

and add a Client's reference: if you want, to record the client you're purchase the image for:
You can use the images for work not produced by our presses. You could use them as part of a website, or on an eshot, or something you print on your instore equipment. The rules are the same as if you bought directly from DepositPhotos. You must use it as part of a derivative work and not just resell the image (see Terms & Conditions of Use below).
You don't have the right to give or sell the image to anybody, only use it in a derivative work.
DepositPhotos from w3p Flyerlink Terms & Conditions of Use
Works (being photographs, illustrations, images or other pictorial or graphic work) made available for download through Flyerlink are sourced from the DepositPhotos.
Works downloaded by you are licensed to you to be used only as part of an end product that constitutes a derivative work, as defined under United States copyright law, of the Works (the "End Product"). The End Product may be in either a tangible or digital medium, but in all cases Works may only be used in the End Products in a manner that is consistent with the terms of Depositphotos's Content Download Agreement (Standard License) agreement.
Furthermore each download of a Work is for use in one End Product (which End Product may, for the avoidance of doubt, be used, reproduced or displayed an unlimited number of times by such end user) by one end user only, if the same particular Work that was previously downloaded is later included in an End Product for a different end user, then such Work must be downloaded again and a further fee will be incurred.
As regards the agreement between you and us (and in particular as regards the rights that are granted to you, and indemnification given by you, under that agreement with regard to your use of a particular Work) the terms of the DepositPhotos's License agreement (the current version of which may be found at http://depositphotos.com/license.html) shall, save for section 4 (payments and pricing), be deemed incorporated into our agreement ("the Incorporated terms") and shall accordingly form part of the terms of our agreement. In the event of any conflict between the Incorporated Terms and the other terms of our agreement, such other terms shall prevail.
You're not allowed to resell the images themselves. The licence doesn't allow that (see above), just like any other photo library. You can, however, charge extra for your artwork to cover your costs - this is classed as a 'derivative work' and is fine. So you might charge an extra £10 per image say, within the artwork fee.