Support for

Find out how to use the SEO options in w3shop
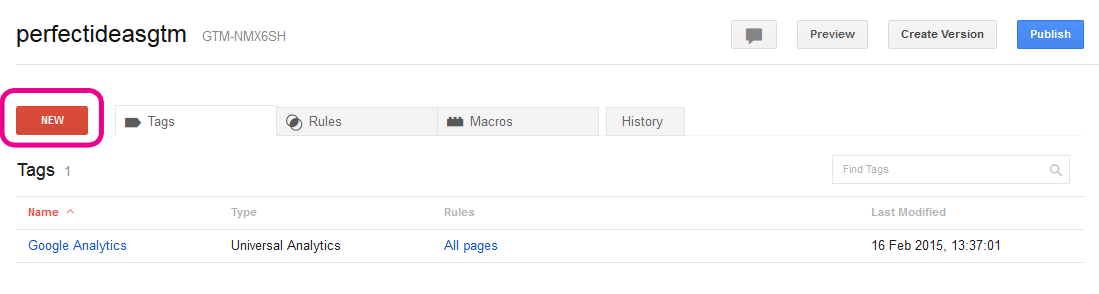
Google Analytics
|
|||||||
Meta Data for your w3shop
|
|||||||
Add Tracking Code
|
|||||||
Favicons
|
|||||||
Redirections
|
|||||||
Robots.txt files
|
|||||||
Find out how to use the SEO options in w3shop
This article explains how to setup Google Analytics in a w3shop.
w3shops allow you to integrate Google Analytics easily in order for you to track the visits to your webshop.
Once you have created a Google Analytics account you can link this to your new w3shop in a matter of seconds.
1. Just tick the ‘Add Google Analytics’ check box.
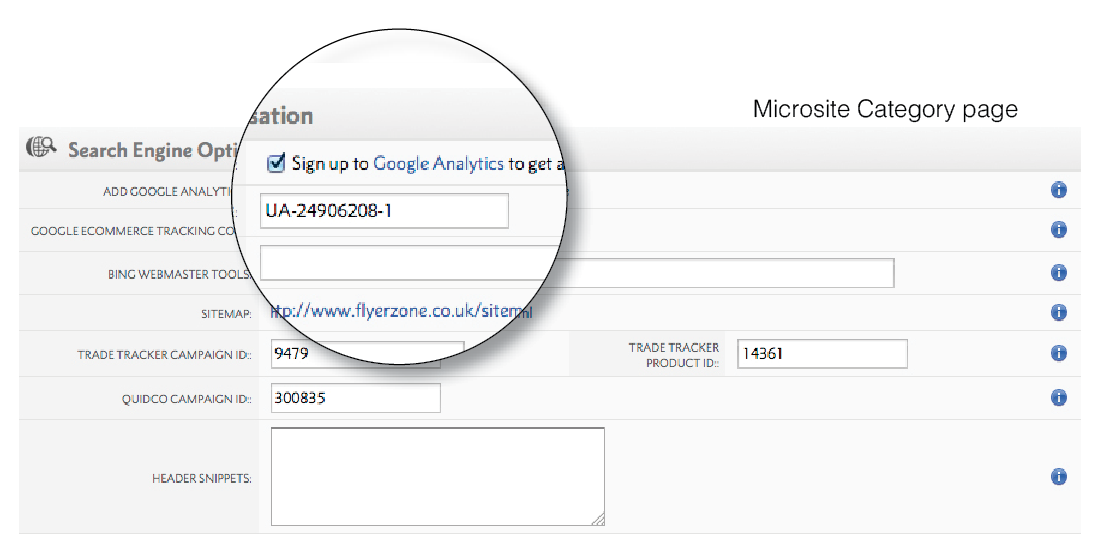
2. Add your Google Analytics Tracking ID, found in your Google Analytics section.

Your analytics is now tracking your website.
If you want to use Universal Analytics, just upgrade in Google Analytics and Tick "Upgrade to Universal Analytics" on in Flyerlink

E-commerce Tracking is automatically set up for your w3shop.
But if Google Analytics is telling you it hasn't been set up...

Simply go to in your Google Analytics control panel. Then turn the E-commerce tracking setting ON

As soon as it's turned on, you'll receive tracking information. Setting up the Analytics and Tracking also activates the cookie pop up.
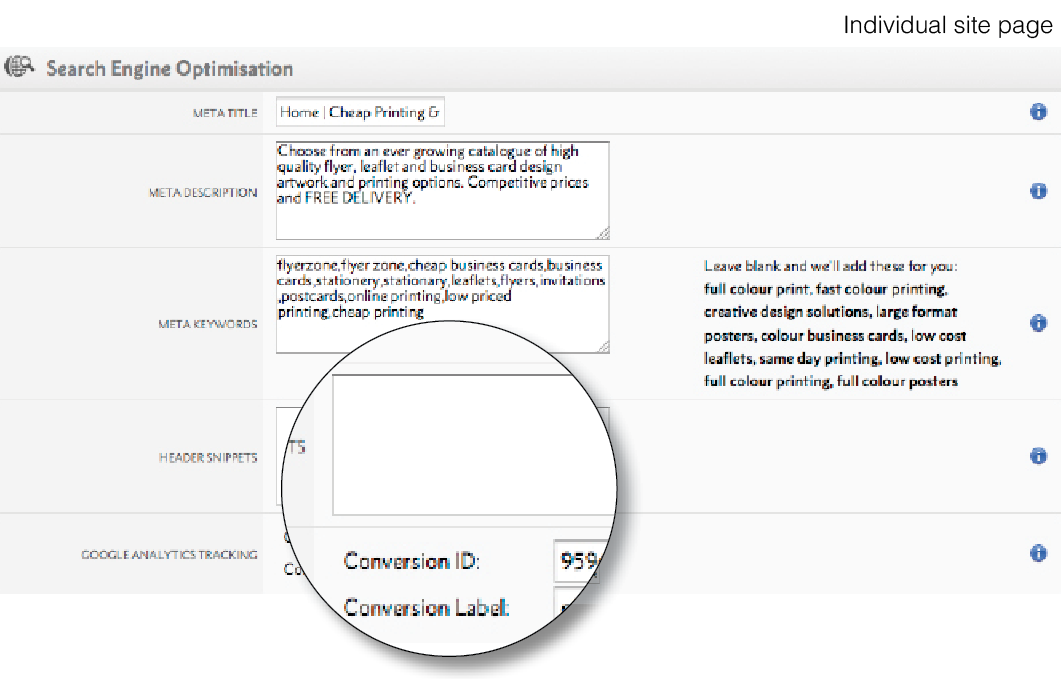
Organic listings display specific information pulled from the content of your website. This is known as Meta Data. Every page should contain unique ‘Meta’ elements.
w3shop enables you to add this information on each page of your webshop.
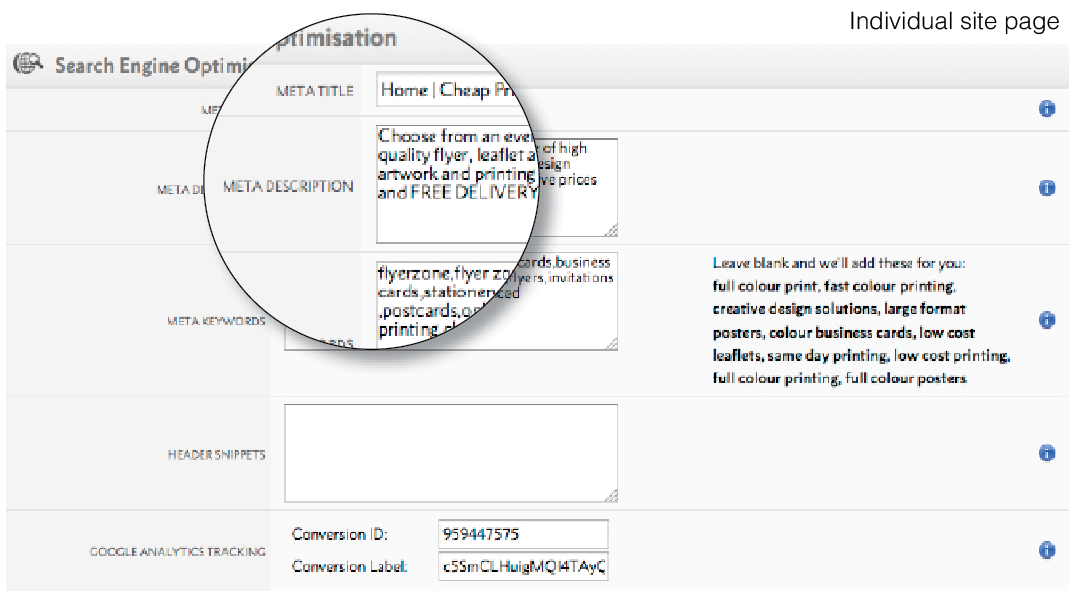
A Meta Title is the main text that describes a web page. It is the second most important on–page SEO element (the most important being overall content), and appears in three key places: browsers, search engine results pages, and external websites. (You’ll see it at the top of your browser)
Keep it short and relevant, between 10 and 70 characters. Every page on your w3shop should have a unique Meta title.
Meta Descriptions are HTML attributes that provide concise explanations of the contents of your web page. Meta descriptions are used on search engine result pages to display preview snippets of your page.
These short paragraphs are your opportunity to advertise content to searchers and to let them know whether the given page contains the information they’re looking for.
Employ the keywords intelligently, get to the point quickly but also create a compelling description that a searcher will want to click. Direct relevance to the page is key. The description should be between 150-160 characters and unique to every page.
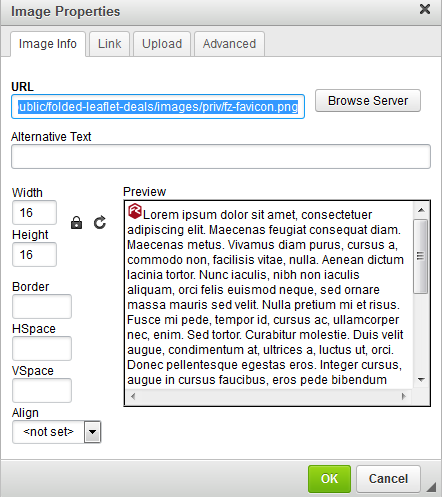
We have integrated many different tracking codes for your convenience. However, there may be some specific tracking code or application that you may like to add to your w3shop.
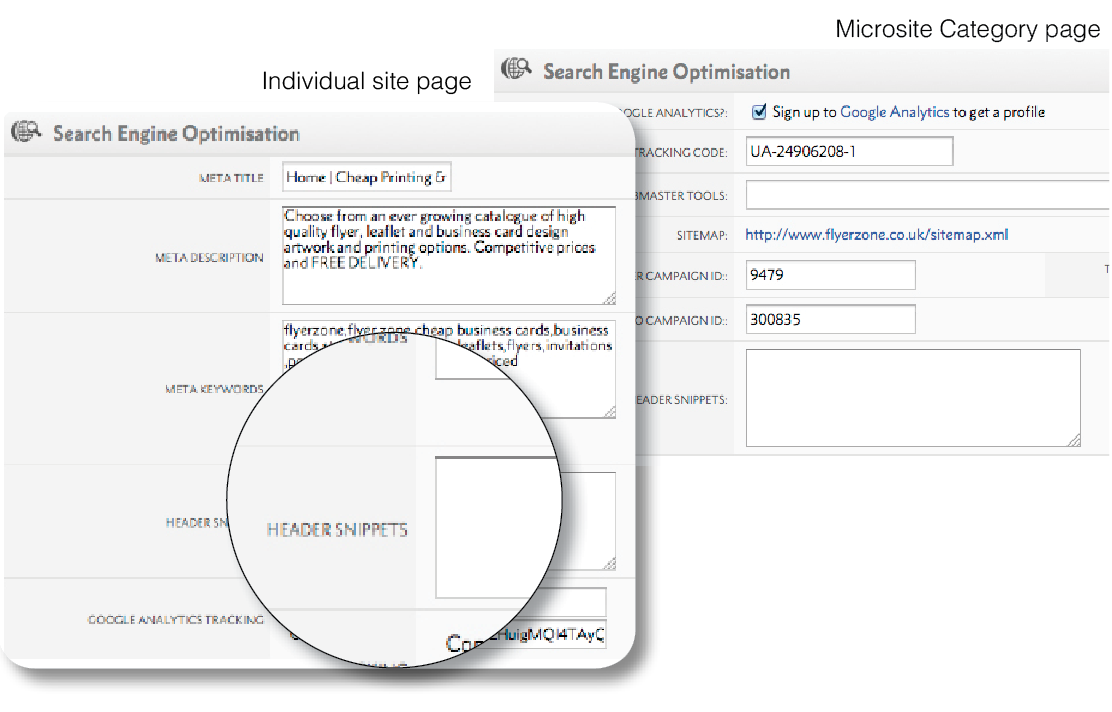
The Header Snippets box is available site wide or on selected individual pages. Adding code snippets to individual site pages will only add the javascript to that individual page.
Any code snippets added to the category site page will add the JavaScript to every page of your w3shop.
There may be bespoke tracking apps that you want to add. Maybe you want to add a webchat function. These types of applications typically require the addition of JavaScript in the header tag of your website. The header snippet box allows you to add bespoke applications specific to your w3shop.
You can also use Header Snippets to add favicons to your w3shop.
When adding JavaScript to your header. This can cause performance issues and errors.
For best results:
1) Find the JavaScript source and ensure you trust the provider
2) Ensure your code starts with < and ends with >
3) After proceeding, check your w3shop still runs smoothly.
To help connect w3shops with third party tracking companies or features, you can use either Header Snippets or Google Tag Manager.
Header Snippets let you add tracking code to the <head> of your w3shop, while Google Tag Manager let you add tracking code to the <body>.
Through Google Tag Manager you can add either Custom HTML, or a number of different Ad tracking campaigns including DoubleClick and AdWords.

To get started, you'll need to sign up to an account with Google Tag Manager.
Create a container and copy the Tag Manager code you've been given. It will look like "GTM-XXXX"
Copy this, and head to in Flyerlink. In the Search Engine Optimisation section, add the code to your Google Tag Manager field.
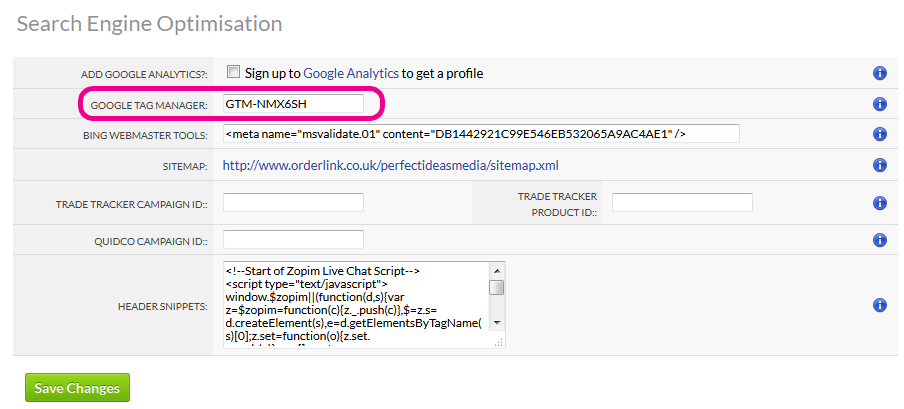
This will add the Tag Manager code to your w3shop.
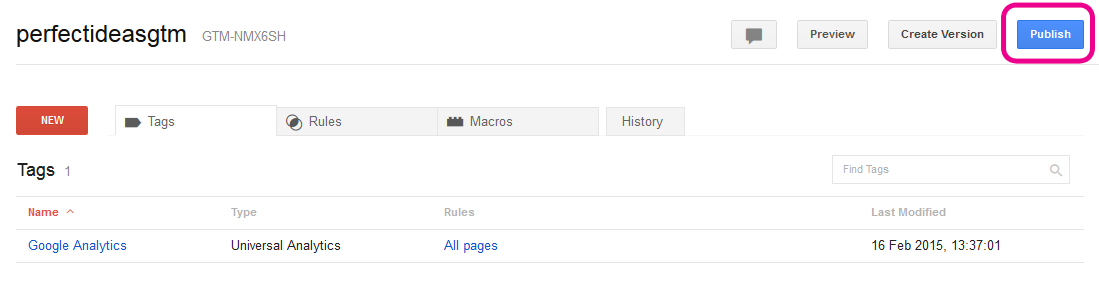
Warning: Tag Manager will not track anything until Tags are added to your container, Firing rules are set up AND the container is Published.
To add a new campaign, simply head to your Container and Add a new tag.
Choose the campaign you want and sign up with the third party to get your account details. You will need to follow documentation with each of the different tracking parties to understand what is involved in adding these tags.
With Google Tag Manager, you can control which pages your tracking code will show on (or fire from) and which they will be blocked from.
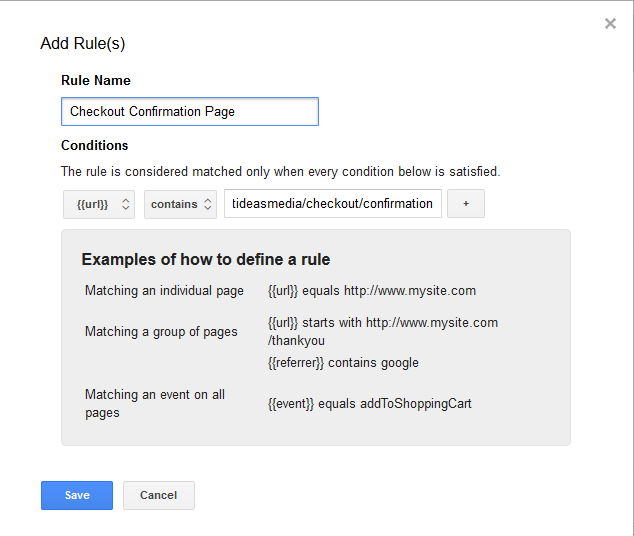
Simply head to one of the Tags you've set up, and on the right hand side you'll see the Firing rules.
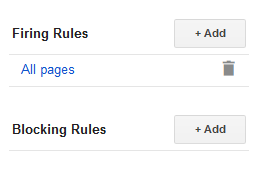
You can fire on all pages, or set some rules to ensure it will only be shown on specific pages, such as the Checkout Confirmation page or particular Product Group pages.
You need to set up firing rules before your tags can be tracked.
When you first set up your container it will be in Draft mode. Once you've made changes, you can change the container status to be Published.
For more advice on adding tracking code to your w3shop through Google Tag Manager, including Individual Tag Set Up Guides, check out the Help Centre.
While it's possible to add Google Analytics using Tag Manager, it's better to add the UA-XXX code in Flyerlink, as that has e-commerce tracking set up for you.
Google adwords will assign a conversion Id and conversion label to your account. Adding the details into your w3shop will do two things:
You may want to serve Pay Per Click (PPC) remarketing adverts using the Google Display Network. Adding your Conversion ID & Conversion label on a page will display relevant adverts to be served to users that have visited this particular page.
The code for Adwords tracking code for Google is already integrated into your webshop. It has been added to the checkout/payment page. This allows Google to track a sale in adwords. To activate this you need to add your tracking Conversion ID & Conversion Label onto your HOME page.
NOTE: The Conversion label for your remarketing adverts and your adwords tracking may vary. So add the conversion label required for adwords tracking on the home page, and the conversion label for remarketing on every other page you wish to serve remarketing adverts for.
Favicons are icons that appear alongside your website in the tabs of modern browsers. They also show in bookmarks on your browser. It's good practice to add to all websites, including w3shop stores.
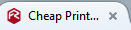
You can add Favicons to your w3shop using Header Snippets.
Follow these steps:
1) Save an image 16x16px or 32 x 32px
2) Edit a page on your w3shop and upload the image.
Take a note of the favicon image url.
3) Head to
In the Search Engine Optimisation section, copy the following code in the header snippet
<link rel="shortcut icon" type="image/x-icon" href="https://ssl2.nettl.dev/uk/CategoryPages/BHS/images/fz-favicon.png" />
6) Replace the href="..." with your favicon image url from note 2).
We recommend to use a relative url for your favicon.
If you use a link with "http://" then you'll get a mixed content warning when you view the website.
Make sure your link is either a relative link or starts with "https://" and still works for you to pull in a url that doesn't give a mixed content wanring.
Redirections are URLs that link to another webpage. They are commonly used to help users find webpages, or to replace pages that are now redundant.
You can set up redirections through Flyerlink, using a Short url.
This guide explains how to set up redirections for your w3shop
There are two ways of adding Redirections for your w3shop:
Use permanent redirects to replace now discontinued pages with a more relavent page.
Use the redirection page type to add menus links to Internal pagesor External websites.
You can now view existing and add new permanent redirections for your whole microsite via .
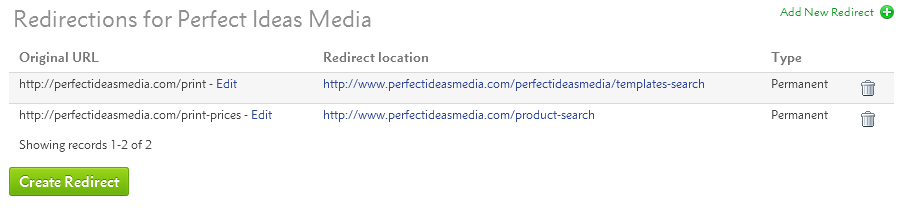
To create a new one, simply press Create Redirect

Add your old redundant url page in the Original URL, then enter the page you'd like it to redirect to in the Redirect Location.
You'll be able to add any link into the Original URL that includes your w3shop main domain or aliased domains.
To try out the redirect, enter the old url to your browser and check it goes where you want.
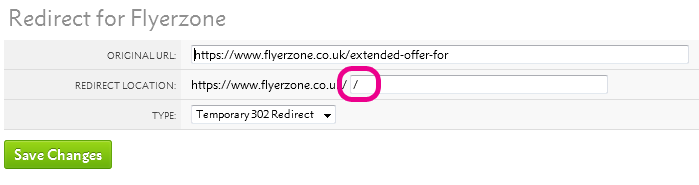
To prevent permanent redirect loops on your homepage, a url slug is required for your redirection location.
If your homepage has no url-slug, you can simply add "/"
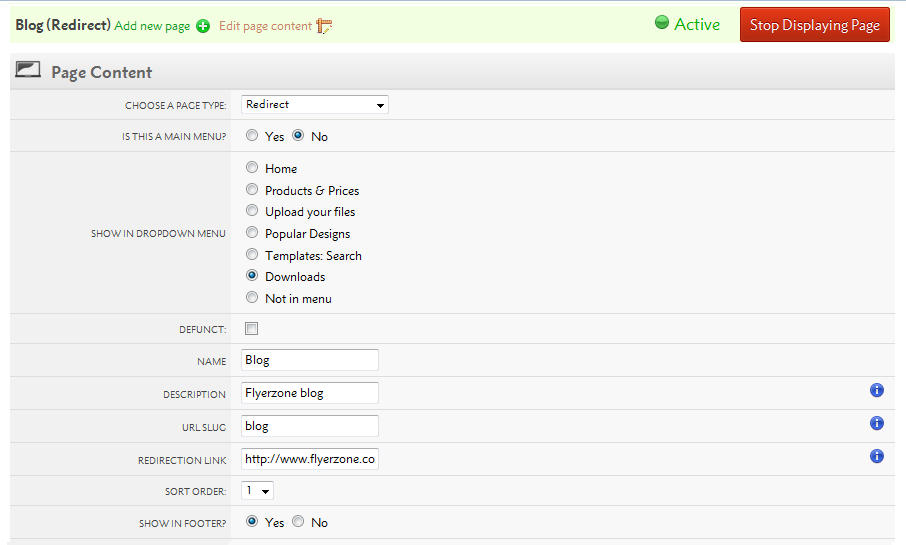
Some w3shop pages like Product Group pages are automatically generated, and you don't need to make a new page type for each one.
However, if you'd like to make a header or footer link you can do so using the Redirection page type.

If there is a website you really like, or if part of your w3shop is hosted by another web provider. You can use redirection links to external sites.
The set up is the same, but your URL should be an external webpage.
Search engines prefer 301 redirections to 302 redirections, however we default to 302 redirections.
The difference is that 302 redirections are easier to change.
301 redirections are cached in a browser memory, if you need to change one of these redirections you will need to refresh the browser cache of everyone who's used the link.
While this is good when you know a page will never change, you may want to use 302 while testing to ensure they are correct before making it harder to undo a mistake.
This article explains the usage of robot.txt files within your w3shop.
Within your main w3shop page you will find a 'robots.txt' panel within the SEO section. This will only display if you have your own domain set.
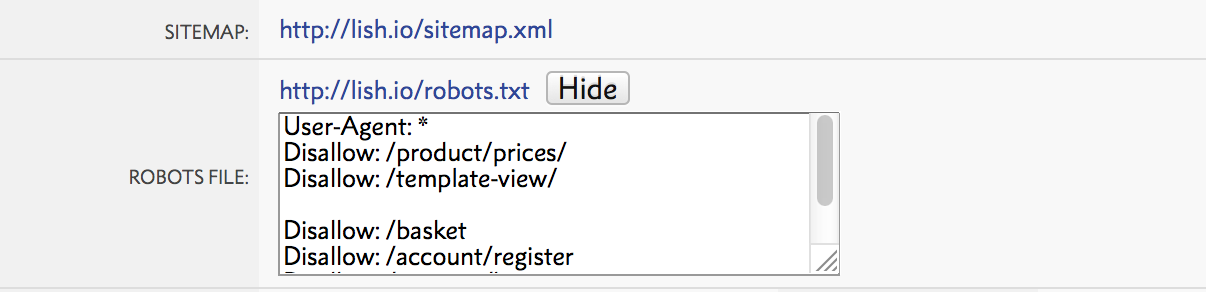
This tells search engine crawlers (Google, bing, yahoo etc) how to visit your site. Importantly what pages or content you do NOT want indexing and therefore where crawlers should NOT visit.
This file is a very simple .txt file. As standard your w3shop robots.txt file will be setup as follows:
User-Agent: *
Disallow: /product-price-grid
Disallow: /template-details

Disallow: /basket
Disallow: /account/register
Disallow: /account/login
The "User-agent: *" means this section applies to all robots. The "Disallow: /" tells the robot that it should not visit these pages on the site.
/Product-price-grid (url may vary site by site) is the 'Product price grid' page type. For example, these pages:
/template-details (url may vary site by site) is the 'Template: details' page type. For example, these pages:
Search engine crawlers have a finite amount of time to crawl your site. If a website has identical content in multiple places, this leaves less time for core pages. This identical content can cause links to be spread across two pages and force the search engine to pick one to display over the other. This shared link value will cause both pages to be weaker than if there was just one core page.
Identical content can be caused by numerous issues, for example:
So using the robots.txt file tells search engines what to focus their time on. Making sure that any potentially duplicate content is avoided by search engines makes it more likely that your core 'Landing Pages' rank on Search Engine Results Pages (SERPs).
Landing pages should be the the focus entry point(s) of your website and therefore what you want to be ranked (along with you main domain).
You can add to, edit or remove elements from the standard robots.txt file. Simply edit the robots file text to add, change or remove the urls listed. You need a separate "Disallow" line for every URL prefix you want to exclude.
Only add this to specific, relevent pages. DO NOT add this to the main category 'header snippet' box.
In addition you may want to use the Meta 'noindex' - a tag added to the of a page. This tells search engines not to index that page. Ideally though, you should be using the robots.txt file because this stores everything in one central location.
However, you can choose to add the Meta 'noindex':
into the header snippet box of the page you want blocked:

If your site has already been indexed and you'd like aspects of you site not to have been, you need to remove any 'disallow' content from your robots.txt file. Then add the Meta 'noindex' to the pages you want de-indexing.
This allows search engines to crawl those pages and see the "noindex, nofollow" tags. Once google has crawled your site again, and de-indexed the relevant pages you can add the disallow content back to the robots.txt file.
Jump to contents page of
|
|||